
What to Do When Your Delta Shower Head Is Leaking
A delta shower head leaking is one of the most common plumbing complaints from Southern California homeowners — and it can waste up to 20 gallons of water per day if left unchecked.
Before diving in, here’s a quick answer:
Most Delta shower head leaks can be fixed in 5 steps:
- Shut off the water and protect the drain
- Clean mineral deposits with a vinegar soak
- Replace worn O-rings or washers
- Reseal the swivel joint with Teflon tape
- Replace the valve cartridge if it drips when the water is off
If none of those fix it, Delta’s lifetime warranty covers a free replacement — even if you’ve already had one replaced before.
That slow drip is more than just annoying. It drives up your water bill, can cause mold and water damage over time, and often signals a fixable problem inside the shower head itself. The good news? Most Delta shower head leaks don’t require a plumber. A few basic tools and 30–60 minutes is usually all it takes.
That said, some leaks — especially those coming from behind the wall or from the valve — do need a professional.
I’m Tiffany Miley, owner of Level Up Plumbing, and with over 21 years of experience in Southern California’s plumbing and trades industry, I’ve diagnosed and fixed every variation of a delta shower head leaking you can imagine. Let’s walk through exactly how to stop that drip for good.
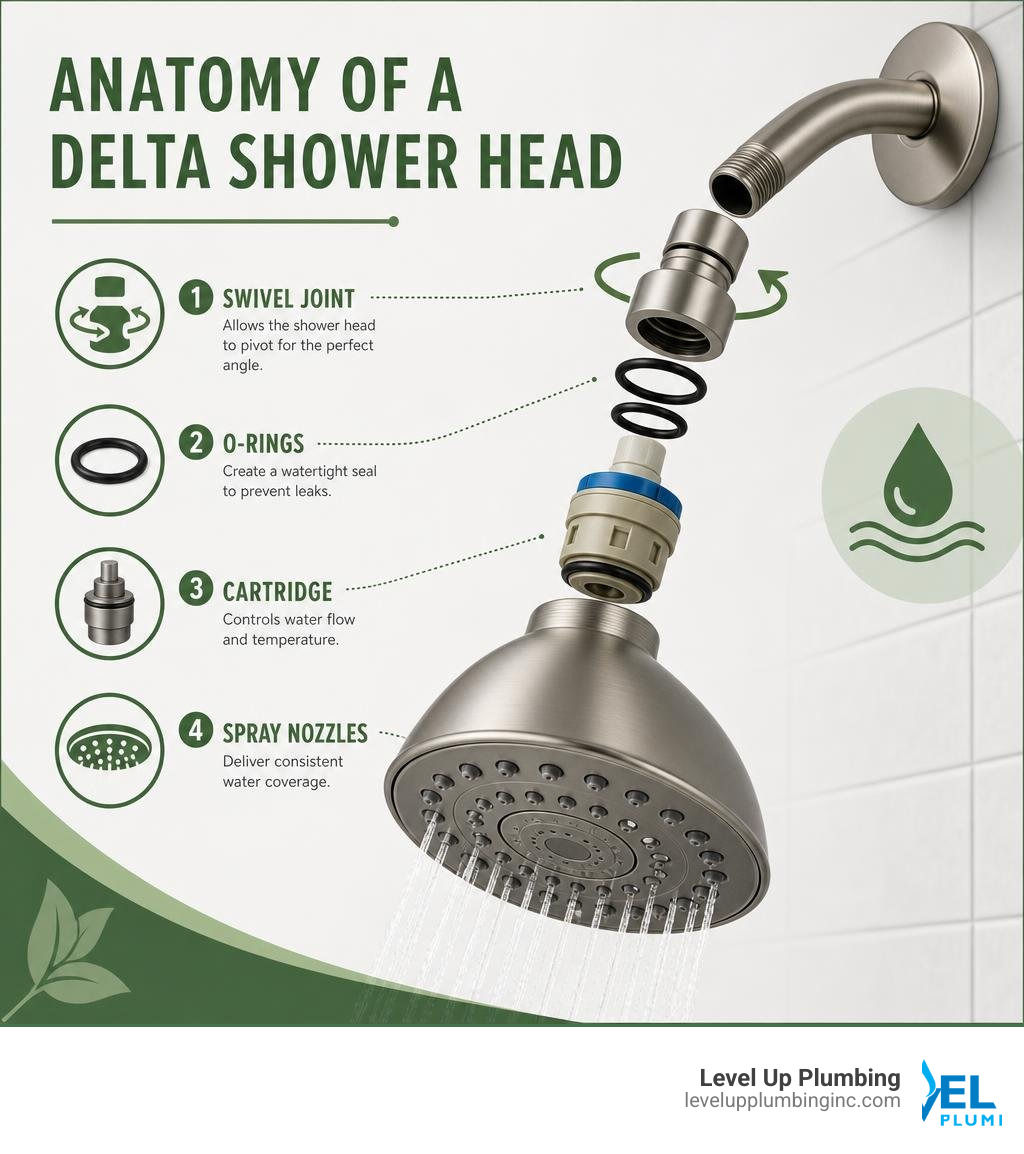
Delta shower head leaking vocabulary:
Common Causes of a Delta Shower Head Leaking
Before you grab your wrench, you need to understand exactly why your shower is crying when it should be dry. In our years of servicing homes across Cypress, Garden Grove, and Huntington Beach, we have found that most leaks boil down to a few usual suspects.

- Mineral Buildup and Hard Water: Southern California is famous for its hard water. Over time, calcium and magnesium accumulate inside the shower head, clogging the tiny spray nozzles. This blockage restricts water flow, increases internal pressure, and forces water to escape through the seams or the swivel connection.
- Worn-Out O-Rings and Gaskets: Inside your Delta shower head are small rubber O-rings and flat washers designed to create a watertight seal. Rubber naturally degrades over time, hardening, cracking, or tearing after years of hot water cycles. When this happens, water sneaks past the seals.
- A Damaged Swivel Joint: The pivot or swivel ball allows you to adjust the angle of your shower. Because this part moves constantly, friction wears down the internal seals. Additionally, a tiny plastic bearing ring inside some Delta swivel joints can crack under stress, causing a persistent leak at the connection point.
- High Water Pressure: If your home’s water pressure is soaring above 80 PSI, it puts immense strain on your plumbing fixtures. High pressure can degrade internal gaskets prematurely and cause sudden leaks.
- A Failing Shower Valve Cartridge: This is a crucial distinction. If your delta shower head leaking problem occurs while the shower is turned off, the issue isn’t the shower head at all. It is the valve cartridge behind the handle wall failing to stop the water flow.
For a deeper dive into how these factors interact, check out the How to Fix a Leaky Shower Head | Delta Faucet Blog for manufacturer-specific insights.
5 Steps to Fix Your Leaking Delta Shower Head
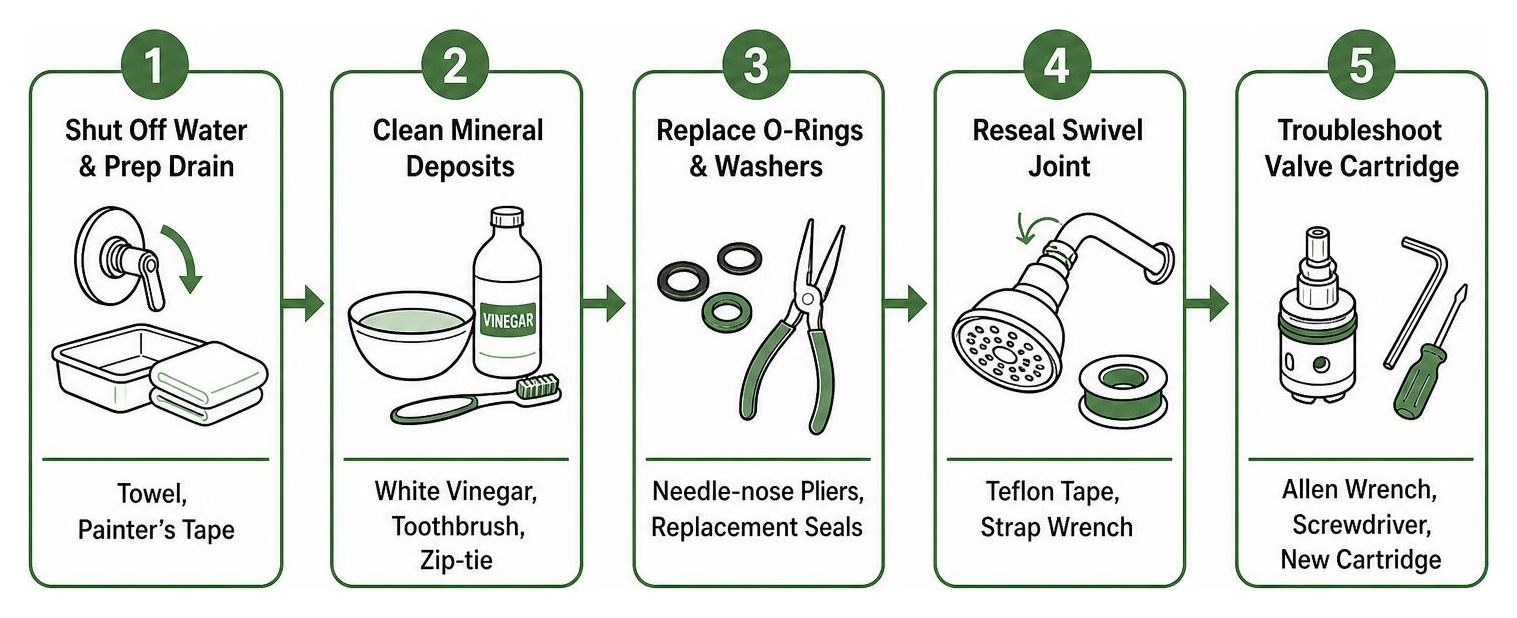
Ready to tackle this project yourself? Below is a quick comparison table of what you will need and the steps we are going to take.
| Step | Action | Tools Needed | Difficulty |
|---|---|---|---|
| 1 | Shut Off Water & Prep Drain | Towel, Painter’s Tape | Very Easy |
| 2 | Clean Mineral Deposits | White Vinegar, Toothbrush, Zip-tie | Easy |
| 3 | Replace O-Rings & Washers | Needle-nose Pliers, Replacement Seals | Easy |
| 4 | Reseal Swivel Joint | Teflon Tape, Strap Wrench | Moderate |
| 5 | Troubleshoot Valve Cartridge | Allen Wrench, Screwdriver, New Cartridge | Moderate to Hard |
To help you visualize the repair sequence, take a look at this quick framework:
For general tips on handling home leaks safely, you can also read our guide on How to Fix Leak Quickly and Safely at the Same Time.
Step 1: Shut Off the Water and Prep the Drain
First rule of DIY plumbing: never skip the prep work. If you forget to cover the shower drain, a tiny screw or washer will find its way down the pipe, turning a 10-minute fix into an afternoon of frustration.
- Turn off the water supply: Shut off the main water valve to your home, or turn off the local shower shut-off valves if your bathroom has access panels.
- Protect the drain: Lay a thick towel or washcloth over the shower drain. This catches falling parts and protects your tub’s finish from dropped tools.
- Protect the fixture finish: If you are using an adjustable metal wrench to unscrew your shower head, wrap the jaws of the wrench with painter’s tape or wrap a soft rag around the shower head nut. This prevents scratching premium finishes like Matte Black or Champagne Bronze.
Step 2: Clean Mineral Deposits and Debris
Many “leaks” are actually just water spraying wildly out of clogged nozzles or back-pressuring through the connection threads.
- Unscrew the shower head: Turn the connection nut counter-clockwise to remove the shower head from the shower arm. If it is stubborn, use a strap wrench or a protected adjustable wrench.
- Inspect the debris screen: Look inside the female connection of the shower head. You will see a small metal mesh screen. If it is covered in rust or grit, remove it gently and rinse it out.
- The vinegar soak: Submerge the entire shower head in a bowl filled with equal parts warm water and distilled white vinegar. Let it soak for at least two hours (or overnight if you have severe mineral buildup).
- Scrub and rinse: Take an old toothbrush and scrub the rubber nozzles to break loose any remaining calcium deposits. Rinse the shower head thoroughly with clean water.
Step 3: Replace Worn O-Rings and Washers
With the shower head removed, look inside the swivel ball connection. You will see a black rubber washer or O-ring.
- Remove the old seal: Use needle-nose pliers or a small flathead screwdriver to pry out the old, flattened, or cracked rubber washer.
- Find the right replacement: Take the old washer to your local Cypress or Huntington Beach hardware store to match the exact size, or use Delta’s universal gasket replacement part (RP43621).
- Lubricate and install: Apply a pea-sized amount of silicone plumber’s grease to the new O-ring or washer. This helps it seat properly and extends its lifespan. Press it firmly into place inside the shower head connection.
Step 4: Fixing a Delta Shower Head Leaking at the Swivel Joint
If your shower head is spraying water directly out of the rotating swivel joint while you are showering, the internal connection needs some attention.
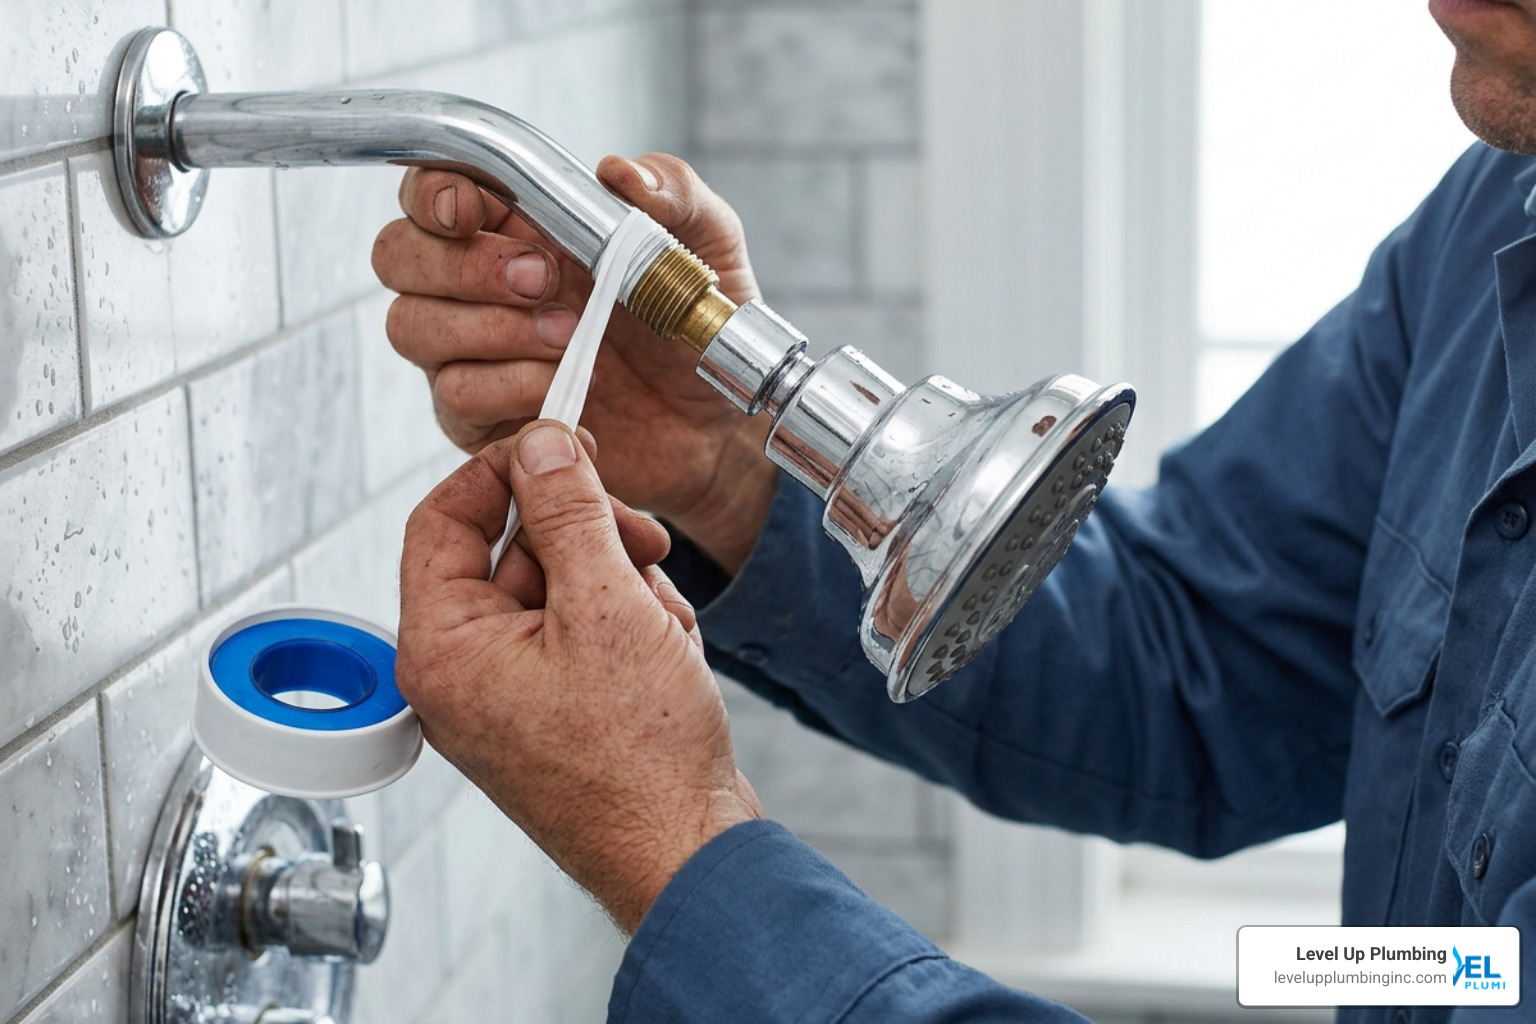
- Clean the threads: Wipe down the male threads on the shower arm extending from the wall to remove old adhesive, rust, or crumbling tape.
- Apply Teflon tape correctly: Wrap plumber’s Teflon tape (also known as thread seal tape) clockwise around the male threads of the shower arm 3 to 4 times. Wrapping it clockwise ensures that when you screw the shower head back on, the tape tightens instead of unraveling.
- Check the plastic bearing ring: Some Delta models, like the In2ition dual shower head, feature an internal plastic bearing ring within the swivel ball. Inspect this ring for hairline cracks. If it is cracked, the swivel joint will continue to leak, and the entire shower head will likely need to be replaced.
- Reassemble: Screw the shower head back onto the arm by hand, then give it a final quarter-turn with your wrench. Do not over-tighten, as plastic threads can crack easily under too much pressure.
For further details on addressing swivel joint failures, check out the excellent troubleshooting guide on Delta Showerhead Leaking from Swivel Joint? How to Fix the Problem – sprucebath.com.
Step 5: Troubleshooting a Delta Shower Head Leaking When Turned Off
If your shower head continues to drip-drip-drip hours after you have finished your shower, the problem is not the shower head. The culprit is a failing shower valve cartridge behind your wall.
For single-handle Delta showers, this means replacing the rubber seats and springs or replacing the entire cartridge assembly.
- Remove the handle: Use an Allen wrench to loosen the set screw on the side of the handle, then pull the handle off.
- Remove the trim and bonnet: Unscrew the decorative trim plate (escutcheon) and use a strap wrench to unscrew the brass bonnet nut. Be gentle—deforming this nut will prevent the new cartridge from sealing.
- Pull the cartridge: Wiggle and pull the cartridge out of the valve body. For older Delta monitors (pre-2006), you will likely need cartridge part RP19804. For newer MultiChoice valves (post-2005), you will need part RP46074.
- Replace seats and springs: If you don’t want to replace the whole cartridge, you can often fix the drip by replacing the small rubber seats and metal springs (RP4993) inside the valve. Insert the springs wide-side-down first, then press the rubber cups over them.
- Reassemble and test: Apply plumber’s grease to the cartridge O-rings, slide the cartridge back into place aligning the “hot” side markings, tighten the bonnet nut, reinstall the trim, and turn your water back on.
If you have ever tackled a leaky toilet, you will find this process very similar to swapping out flush valves. For a quick conceptual comparison of working with rubber seals, check out our guide on How to Fix a Leaking Toilet Valve in 5 Quick Steps.
Delta Warranty and Replacement Options
One of the best things about owning Delta fixtures is their customer-friendly warranty policy. Delta Faucet offers a Lifetime Faucet and Finish Limited Warranty to the original consumer purchaser.
If your delta shower head leaking issue is caused by a cracked seam, a failed mode selector dial, or a worn-out swivel joint that cannot be repaired, you do not have to buy a new one.
- What is covered? The warranty covers all parts and finishes of Delta faucets and shower heads to be free from defects in material and workmanship for as long as the original purchaser owns their home.
- Repeated failures: If Delta replaced your shower head once and the replacement unit begins leaking at the pivot point again, they will honor the warranty and send another replacement.
- How to claim: You can contact Delta Faucet customer service directly by calling 1-800-345-DELTA (3358) or submitting a help ticket on their website. Be prepared to provide your model number and proof of purchase (or photos of the leaking fixture if you do not have the receipt).
For official warranty details and parts FAQs, visit the Leaks – Service & Parts FAQ | Delta Faucet page.
Frequently Asked Questions
Can a leaking Delta shower head swivel joint be repaired?
Typically, no. If the leak is coming directly from a cracked plastic bearing ring or a split seam in the plastic casing of the swivel ball, it cannot be reliably repaired with glue or tape. In these cases, you will need to utilize Delta’s lifetime warranty to secure a replacement shower head.
Is a dripping shower head normal after turning off the water?
Yes, to an extent. After you turn off the shower, it is completely normal for the shower head to drip for a minute or two. This is known as “run on” or reservoir drainage, where gravity empties the residual water trapped inside the shower head’s chambers. However, if the dripping continues for hours, you have a leaking shower valve cartridge that needs to be replaced.
When should I call a professional plumber?
While cleaning mineral deposits and changing washers are great DIY weekend projects, you should call a professional plumber if:
- You hear water dripping behind the shower wall when the water is turned off.
- The brass bonnet nut holding your shower cartridge is seized or corroded and will not budge.
- You do not feel comfortable working with water shut-offs or disassembling wall valves.
- You suspect your home has high water pressure issues that require a pressure regulator installation.
If you want to understand how a professional tackles these complex repairs safely, read our articles on How a Licensed Plumber Can Help You Repair a Faucet and Faucet Leak Repair: How a Licensed Plumber Can Help You.
Conclusion
Stopping a delta shower head leaking is a highly rewarding DIY project that saves water, lowers your utility bills, and prevents mold growth in your bathroom. By following this 5-step guide, you can confidently diagnose whether you simply need a quick vinegar soak, a new 50-cent washer, or a warranty replacement from Delta.
However, plumbing systems can sometimes throw unexpected curveballs. If you run into a stubborn cartridge, suspect a leak behind your shower wall, or want the peace of mind that comes with professional installation, our team at Level Up Plumbing is here to help.
As a woman-owned plumbing company with over 21 years of local expertise in Cypress, Garden Grove, and Huntington Beach, we take pride in delivering award-winning customer service. If you are dealing with persistent leaks or suspect an issue under your home’s foundation, don’t wait. Schedule a Slab Leak Inspection in Huntington Beach with us today, and let’s get your home’s plumbing running beautifully!