
What to Do When Your Shower Is Leaking
Leaking shower repair is something most homeowners in Southern California will face at least once. It starts small — a drip here, a damp patch there — and before long you’re watching your water bill climb and wondering how bad the damage really is.
Here’s a quick answer to the most common shower leak fixes:
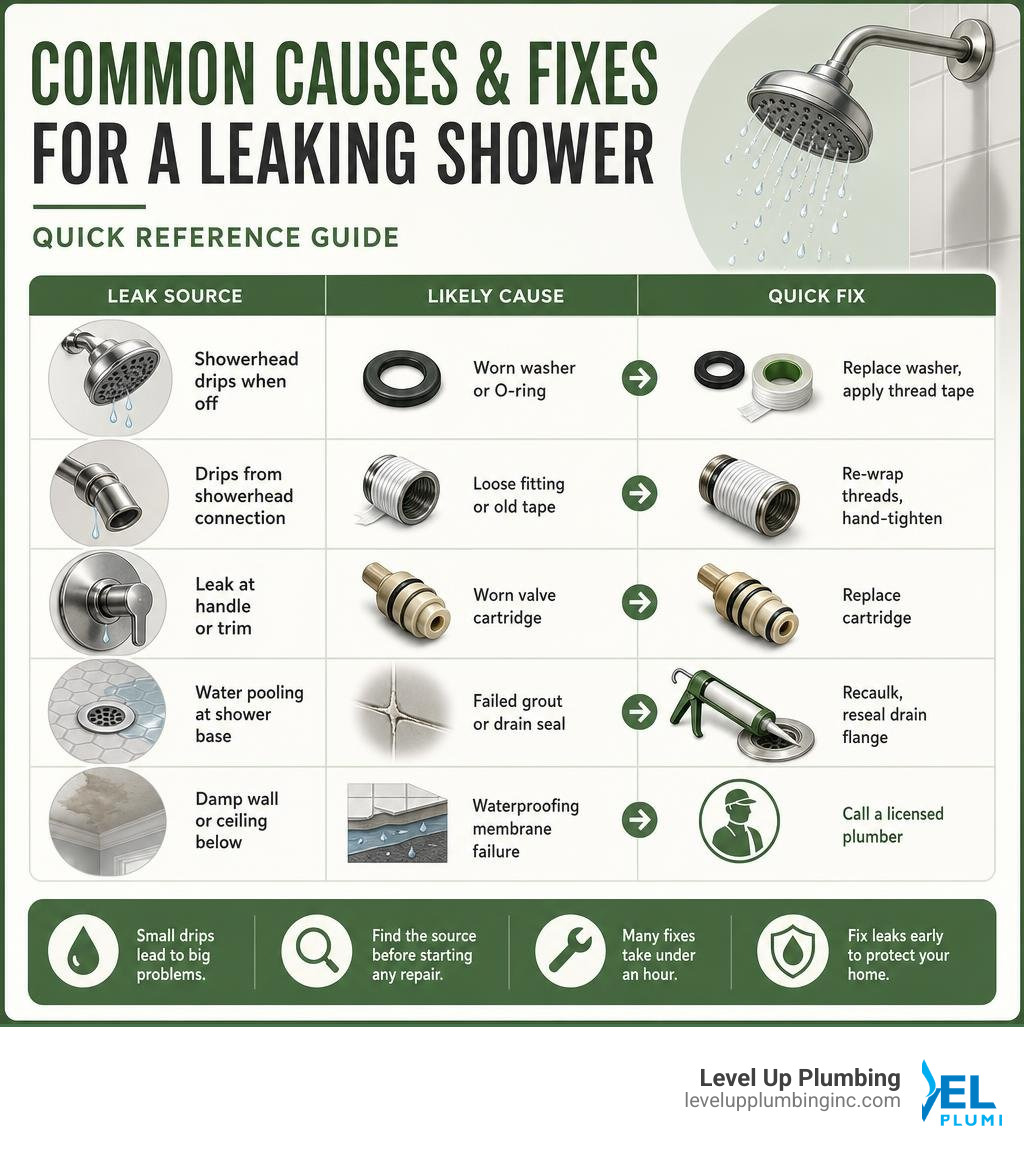
| Leak Source | Likely Cause | Quick Fix |
|---|---|---|
| Showerhead drips when off | Worn washer or O-ring | Replace washer, apply thread tape |
| Drips from showerhead connection | Loose fitting or old tape | Re-wrap threads, hand-tighten |
| Leak at handle or trim | Worn valve cartridge | Replace cartridge |
| Water pooling at shower base | Failed grout or drain seal | Recaulk, reseal drain flange |
| Damp wall or ceiling below | Waterproofing membrane failure | Call a licensed plumber |
A dripping showerhead wastes up to 3,000 gallons of water per year, according to the EPA. That’s not just a nuisance — it’s money down the drain, literally.
The good news? Many shower leaks are straightforward DIY fixes that take under an hour. The tricky part is knowing exactly where the leak is coming from before you start pulling things apart.
This guide walks you through how to diagnose the source, what tools you’ll need, and which fixes you can handle yourself — and when it’s time to call in a pro.
I’m Tiffany Miley, owner of Level Up Plumbing, and with over 21 years of experience in the trades I’ve seen how a small ignored drip can turn into thousands of dollars of structural damage. Whether you’re dealing with a simple leaking shower repair or something more serious behind the wall, this guide will help you make the right call.
Leaking shower repair vocab to learn:
Diagnosing the Source of Your Shower Leak

Before you grab your wrench and start twisting metal, you need to play detective. A shower is a complex system of supply lines, valves, drains, and waterproofing barriers. Misdiagnosing the leak can lead to wasted time, unnecessary parts purchases, or worse, sealing a leak on the outside while it silently rots your wall studs on the inside.
To systematically track down the problem, we recommend consulting a structured approach to How To Repair a Leaking Shower – Plumbing Resource. Generally, shower leaks can be categorized into five distinct trouble zones:
- The Showerhead Connection: Dripping from the swivel joint or where the head meets the shower arm while the water is running.
- The Mixer Tap or Valve Body: Constant dripping from the showerhead or spout even when the handles are turned completely off.
- The Shower Base or Floor: Water pooling outside the stall, or dampness showing up on the ceiling directly below the bathroom.
- The Shower Screen or Enclosure: Water escaping through deteriorated silicone seals around the glass door or metal frame during a shower.
- The Grout and Tile Wall: Water seeping through cracked grout lines into the drywall backing.
Normal Post-Shower Dripping vs. An Active Leak
We often get calls from worried homeowners in Huntington Beach and Cypress who notice water dripping from their showerhead ten minutes after they step out. In many cases, this is completely normal!
When you turn off the shower, a small amount of residual water remains trapped inside the showerhead body and the overhead shower arm. Gravity eventually wins, and this water slowly drains out over the next few minutes.
However, if your showerhead continues to drip hours after use, or if it drips consistently 24/7, you have an active leak. This constant flow indicates that the valve cartridge behind the wall handle is failing to shut off the water supply completely.
If you are unsure whether you have a hidden leak somewhere in your home’s system, you can perform a simple water meter test. First, ensure all faucets, showers, and water-using appliances in your home are completely turned off. Locate your water meter and take a reading. Wait two hours without using any water, and check the meter again. If the numbers have moved, you have an active leak somewhere in your plumbing. For safety precautions during any leak investigation, review our guide on How to Fix Leak Quickly and Safely at the Same Time.
Common Causes of a Leaking Shower
Why do showers start leaking in the first place? In our 21+ years servicing Orange County, we’ve found that most issues boil down to a few common culprits:
- Mineral Buildup: Hard water is incredibly common in Southern California. Over time, calcium and magnesium deposits clog the tiny spray nozzles on your showerhead. This restriction increases backpressure inside the fixture, forcing water to leak out of the swivel joint or the threads.
- Worn Washers and O-Rings: The rubber seals inside your showerhead and faucet assembly degrade, harden, and crack over time due to constant friction and chemical exposure from tap water.
- Failed Valve Cartridges: The cartridge is the internal engine of your shower handle that controls the mix of hot and cold water. Most ceramic disc or plastic cartridges last between 10 to 15 years before they wear out and allow water to bypass the seal.
- Grout and Silicone Failure: Houses naturally settle and shift. This structural movement, combined with temperature changes, causes cement-based grout and silicone caulking to crack. Once the outer seal is broken, water easily penetrates the walls.
- Drain Assembly Issues: If the drain flange under your shower floor becomes loose or the plumber’s putty dries out, water will leak down the outside of the drain pipe. To understand how joints fail and how to address them quickly, check out How to Fix a Leaking Drain Pipe Joint Fast.
Hidden Wall Leaks and Waterproofing Failures
The most dangerous leaks are the ones you cannot see. A hidden leak behind your shower wall or beneath the waterproofing membrane can cause catastrophic damage before you ever notice a drop of water.
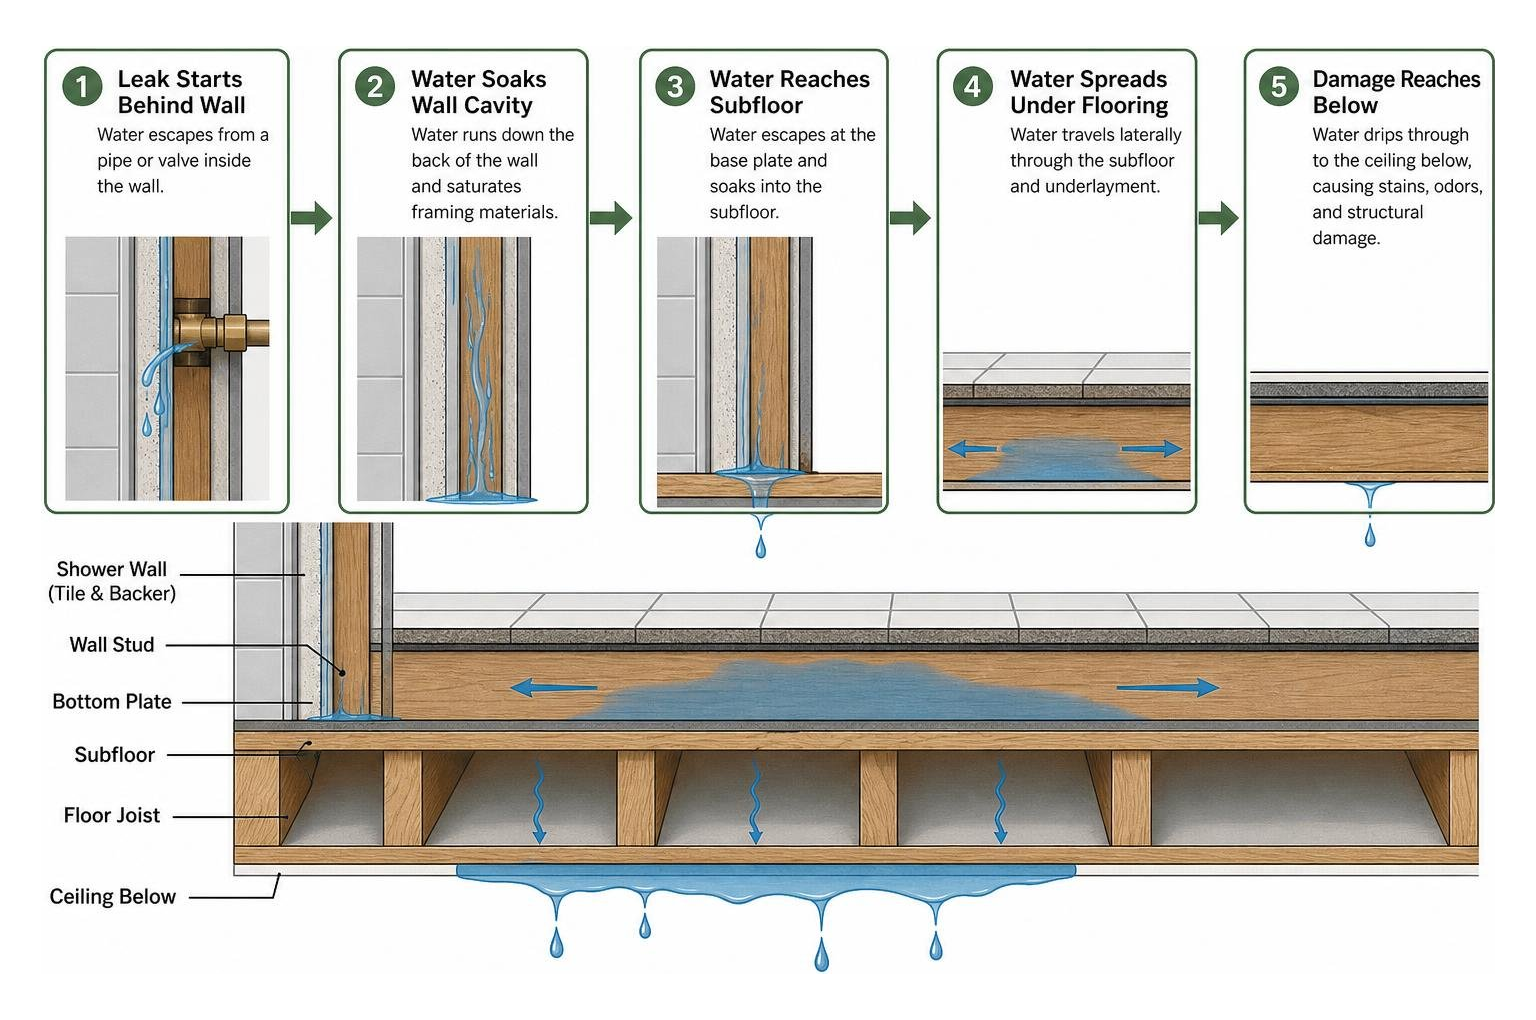
Keep an eye out for these subtle warning signs of a hidden leak:
- Spongy or soft drywall near the shower stall.
- Bubbling, peeling, or flaking paint on adjoining walls.
- A persistent, musty odor that doesn’t go away after cleaning.
- Discolored, dark, or crumbling grout lines.
- Water stains on the ceiling of the room directly below the bathroom.
When a waterproofing membrane fails — whether due to poor initial installation, house settling, or age — water begins to saturate the subfloor and wall framing. Because these areas are dark and damp, mold growth can begin within 24 to 48 hours.
Diagnosing these issues without tearing down your beautiful tile requires specialized tools. Professional plumbers use thermal imaging cameras to locate temperature anomalies (cold spots indicating moisture) and non-invasive moisture meters to map out the exact spread of water behind your walls. If you suspect a hidden leak, attempting a blind DIY repair can lead to deeper structural rot.
Essential Tools and Safety Steps for Leaking Shower Repair
Before you attempt any leaking shower repair, preparation is key. Working on pressurized water lines without taking the proper safety precautions is a recipe for a flooded bathroom and an emergency plumbing bill.
First, always shut off the water supply. Some modern shower valves have integrated shut-off stops built into the valve body itself, which you can access by removing the handle and trim plate. However, in most residential setups, you will need to shut off the main water valve to your home.
Once the water is shut off, open the shower handle completely (both hot and cold sides) to relieve the residual pressure and drain any remaining water from the pipes. Place a rag or a towel over the shower drain to prevent small screws, washers, or O-rings from accidentally falling down the pipe.
Here is a comparison of the essential tools and materials you will need depending on the type of repair:
| Tool / Material | Purpose | Essential for DIY? |
|---|---|---|
| Adjustable Wrench | Loosening and tightening showerheads and nuts | Yes |
| Screwdriver (Flat/Phillips) | Removing handle screws and trim plates | Yes |
| Needle-Nose Pliers | Pulling out old cartridges and retaining clips | Yes |
| Thread Seal Tape (Teflon) | Creating watertight seals on threaded joints | Yes |
| Silicone Plumber’s Grease | Lubricating new rubber seals and cartridges | Yes |
| White Vinegar & Ziploc Bag | Descaling mineral buildup from the showerhead | Yes |
| Utility Knife | Scraping away old silicone and caulking | Yes |
| Safety Glasses | Protecting your eyes from debris and mineral flakes | Yes |
Step-by-Step DIY Fixes for Common Shower Leaks
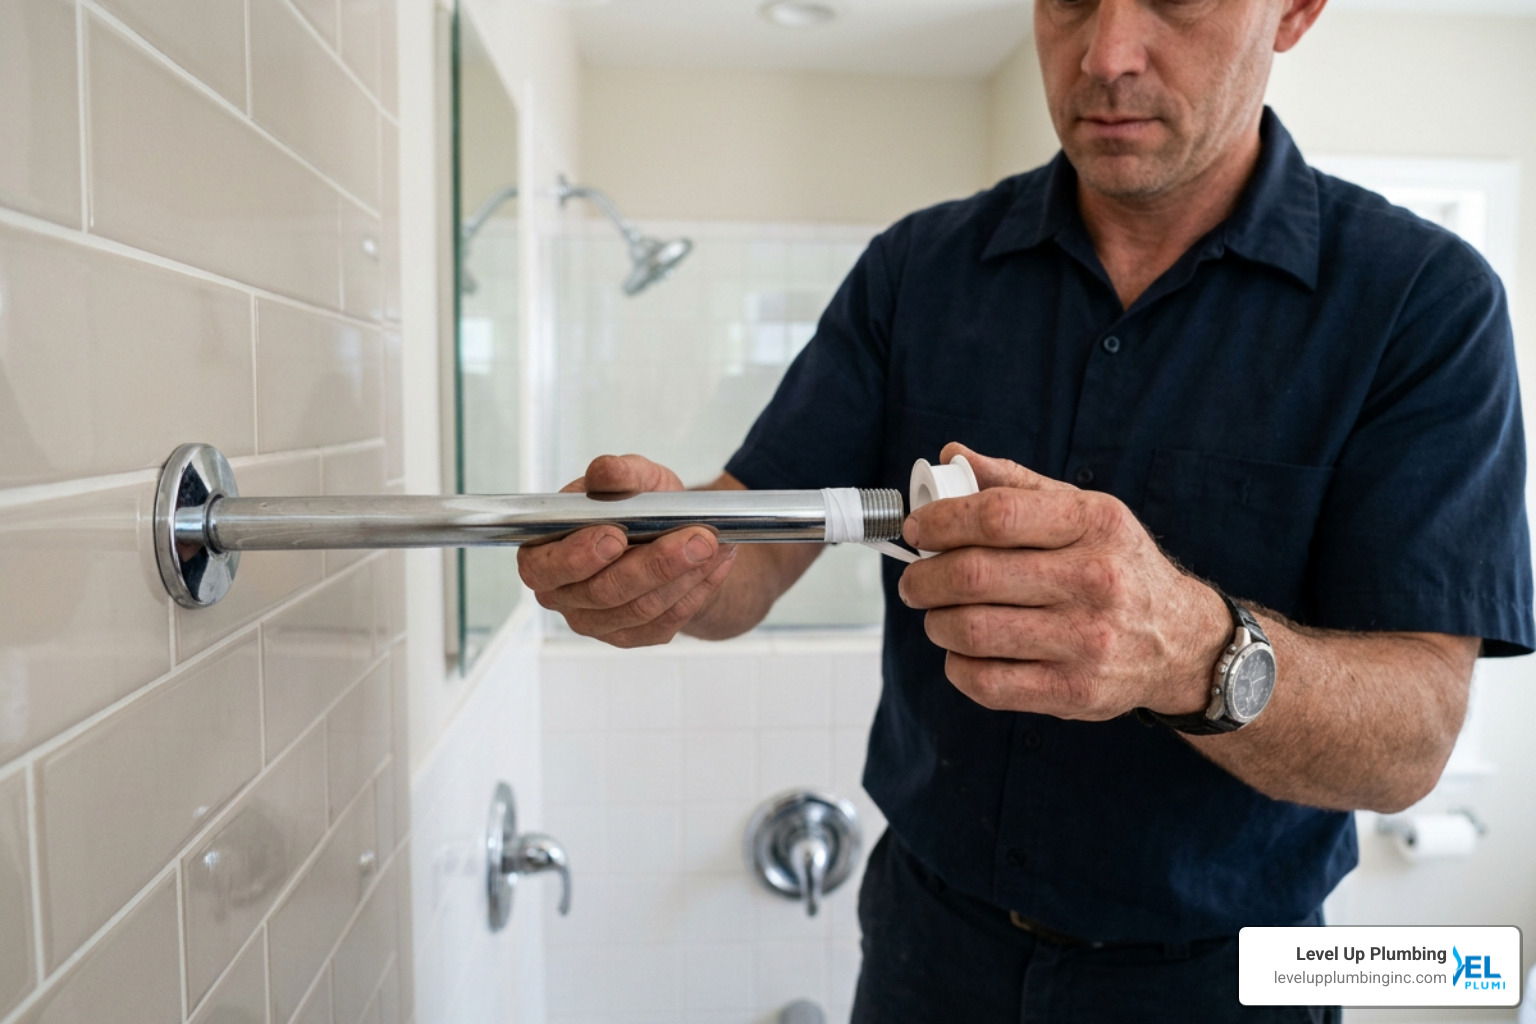
Now that your workspace is prepped and your water is safely shut off, let’s dive into the step-by-step processes for resolving the most common shower leaks.
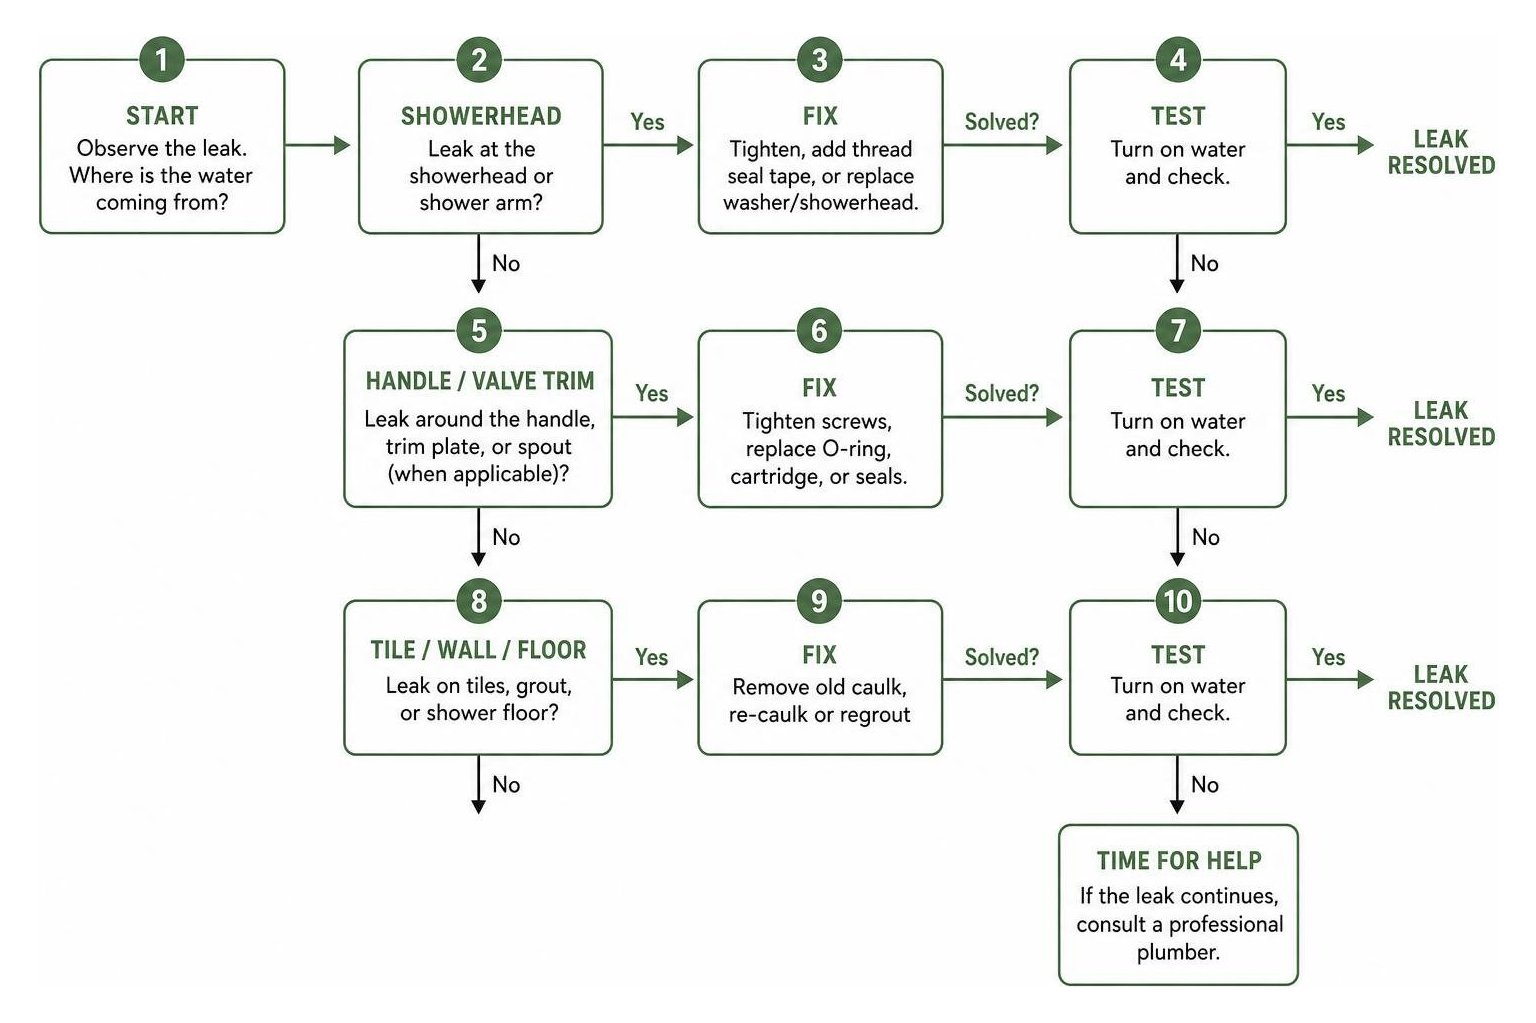
To help you visualize the repair journey, here is a quick diagnostic and repair workflow:
How to Perform a DIY Leaking Shower Repair on a Showerhead
If your showerhead is dripping from the swivel joint or spraying water wildly from the threads when the shower is turned on, the fix is incredibly simple. You can usually complete this in about 15 minutes. Learn more about professional faucet and fixture care by reading How a Licensed Plumber Can Help You Repair a Faucet.
Step 1: Remove the Showerhead Wrap a soft rag around the shower arm connection to protect the chrome or brushed-nickel finish. Use your adjustable wrench to grip the connection nut and turn it counterclockwise to unscrew the showerhead.
Step 2: Inspect the Washer and O-Ring Look inside the threaded connector of the showerhead. You will see a small rubber washer or O-ring. If it is hardened, cracked, distorted, or completely missing, this is the source of your leak. Take the old washer to your local hardware store in Garden Grove or Huntington Beach to find an exact replacement match.
Step 3: Clean the Threads and Descale the Head Old thread tape and mineral crust can prevent a proper seal. Use an old toothbrush and a utility knife to scrape away old Teflon tape from the male threads of the shower arm. If the showerhead nozzles are clogged with white scale, fill a Ziploc bag with white vinegar, submerge the showerhead in it, secure it with a rubber band, and let it soak overnight. Rinse thoroughly.
Step 4: Apply Fresh Thread Seal Tape Wrap new Teflon tape clockwise around the shower arm threads 2 to 3 times. Wrapping it clockwise ensures that the tape stays flat and doesn’t unravel when you screw the showerhead back on.
Step 5: Reassemble and Test Insert the new rubber washer into the showerhead. Thread the showerhead back onto the arm by hand, turning clockwise. Once snug, use your wrench to tighten it an additional quarter-turn. Do not overtighten, as this can crack the plastic or brass housing. Turn the water supply back on and check for leaks.
When to Choose Valve Cartridge Replacement Over Simple Leaking Shower Repair
If your shower continues to drip from the showerhead or tub spout long after the water is turned off, the issue is not the showerhead itself. The culprit is a worn-out valve cartridge inside the handle assembly. Replacing the cartridge is a highly effective way to stop a constant drip. For a parallel look at how valve systems work, check out our guide on How to Fix a Leaking Toilet Valve in 5 Quick Steps.
Here is how to replace a standard shower valve cartridge:
Step 1: Remove the Handle and Trim Plate Locate the small index button (usually indicating red/blue for hot/cold) on your shower handle. Pry it off with a small flathead screwdriver to reveal the handle screw. Remove the screw and pull the handle off. Next, unscrew and remove the decorative trim plate (escutcheon) to expose the valve body inside the wall.
Step 2: Remove the Retaining Clip or Nut Depending on your valve brand (Moen, Delta, Kohler, etc.), you will see either a large brass locking nut or a small U-shaped metal retaining clip holding the cartridge in place. Use needle-nose pliers to pull the retaining clip straight up, or use an adjustable wrench to unscrew the locking nut.
Step 3: Extract the Old Cartridge Grasp the cartridge stem with pliers and pull it straight out. If the cartridge is stuck due to mineral buildup, do not force it or twist violently, as you can damage the brass valve body behind the wall. Use a specialized “cartridge puller” tool (available at any hardware store) to safely extract it.
Step 4: Lubricate and Install the New Cartridge Apply a thin layer of silicone plumber’s grease to the rubber O-rings on your new cartridge. This helps it slide in easily and prevents the seals from pinching or tearing. Push the new cartridge into the valve body, ensuring it is oriented in the exact same direction as the old one (many have a “H/C” or “UP” indicator).
Step 5: Reassemble and Test Reinstall the retaining clip or brass locking nut. Turn the water supply back on to test for leaks before putting the trim plate and handle back on. Once you verify that the dripping has completely stopped, reattach the trim plate (applying silicone caulk around the top and sides, leaving the bottom open so trapped water can escape) and reinstall the handle.
Fixing Shower Base, Tray, and Drain Assembly Leaks
A leak coming from the base of your shower can cause severe structural damage to your subfloor. If you notice water pooling on the floor outside the shower glass, or if you have a damp spot on the ceiling below, you need to address the shower tray or drain assembly. To understand how drain pipes leak and how to fix them, read How to Fix Leaking Bathtub Drain Pipe in 5 Easy Steps.
To diagnose a drain leak, plug the shower drain completely and fill the shower base with a few inches of water. Let it sit for 15 to 20 minutes. If water begins to leak below, but no water was run through the showerhead, the issue is a failed shower pan membrane or a loose drain flange.
If the leak only occurs when water is actively running, the drain pipe joint or the connection between the drain flange and the shower tray is compromised. To fix a leaking drain flange:
- Remove the drain grate.
- Use a drain wrench to unscrew the drain flange from the drain pipe.
- Clean away all old silicone, plumber’s putty, and debris from the drain opening.
- Apply a generous bead of 100% silicone sealant or fresh plumber’s putty under the lip of the new drain flange.
- Thread the flange back into place and tighten securely. Wipe away any excess sealant that squeezes out.
If the leak is caused by cracked silicone caulking along the floor-to-wall junctions of your shower tray, use a utility knife to carefully scrape away the old caulk. Clean the area with rubbing alcohol, let it dry completely for 24 hours, and apply a fresh bead of high-quality, mold-resistant sanitary silicone.
Frequently Asked Questions About Shower Leaks
How much does a typical shower leak repair cost?
The cost of a leaking shower repair varies significantly depending on the source of the leak and whether you choose to fix it yourself or hire a professional.
For a simple DIY fix, like replacing a showerhead washer or applying new plumber’s tape, your total cost will be under $10 to $20 for basic materials. If you need to replace a worn-out valve cartridge yourself, the replacement part typically runs between $20 and $80 depending on the manufacturer brand.
When hiring a licensed plumber in Orange County, CA, professional service charges for minor showerhead repairs or cartridge replacements generally range from $150 to $450, which includes parts, labor, and a professional warranty. If the leak has spread behind the walls and requires a full waterproof membrane replacement or structural tile repair, professional remediation can range from $1,500 to $5,000+ depending on the extent of the water damage.
In many cases, if your showerhead is old, rusted, or heavily calcified, it is actually cheaper and faster to purchase a brand-new, water-efficient showerhead entirely rather than trying to repair and descale an obsolete fixture.
What are the long-term risks of ignoring a leaking shower?
Ignoring a tiny drip might seem harmless, but water is incredibly destructive. Over time, even a slow leak can lead to severe consequences:
- Structural Timber Rot: Water seeping behind wall tiles will eventually saturate the wood studs and subfloor. This weakens the structural integrity of your home and can cause floors to sag or walls to collapse.
- Toxic Mold and Mildew: Mold thrives in dark, damp environments. A hidden shower leak creates the perfect breeding ground for black mold, which can cause respiratory issues and severe allergies for your family.
- Spiking Water Bills: A shower dripping at just 30 drops per minute wastes over 1,000 gallons of water a year. In Southern California, where water rates are high, ignoring multiple leaks can add hundreds of dollars to your annual utility bills.
- Pest Infestations: Damp, rotting wood attracts termites, carpenter ants, and other wood-boring pests directly into your bathroom walls.
Can you repair a leaking shower without removing tiles?
Yes! In many cases, if the underlying waterproofing membrane is still intact, you can repair a leaking shower without undergoing a costly and messy tile demolition.
If the leak is caused by cracked grout or failed silicone seals, a professional can perform a non-invasive repair. This process involves scraping out the old, compromised grout and silicone, injecting specialized epoxy sealants into the wall-to-floor junctions, and applying a penetrative waterproofing barrier over the existing tile and grout lines.
However, if the waterproof membrane behind the tiles has completely failed, surface sealants are only a temporary band-aid. In those advanced cases, the only permanent solution is to remove the bottom rows of tile, repair the damaged substrate, install a new compliant waterproofing membrane, and retile the area.
Conclusion
A leaking shower is a household headache, but with a systematic approach, the right tools, and a little patience, you can stop the drip before it drains your wallet. Whether you are swaping out a simple rubber washer or replacing a tricky valve cartridge, taking action early is the key to protecting your home from costly water damage.
At Level Up Plumbing, we’ve spent more than two decades helping homeowners throughout Huntington Beach, Cypress, Garden Grove, and the wider Orange County area keep their plumbing systems running flawlessly. As a local, woman-owned business, we pride ourselves on delivering award-winning customer service and honest, long-lasting solutions.
If you suspect you have a hidden leak behind your shower wall, or if a DIY fix feels a bit out of your comfort zone, don’t wait for the damage to spread. Schedule a professional slab leak inspection today with our expert team, and let us level up your home’s plumbing!