
Stop a Leaky Water Pipe Before Damage Spreads
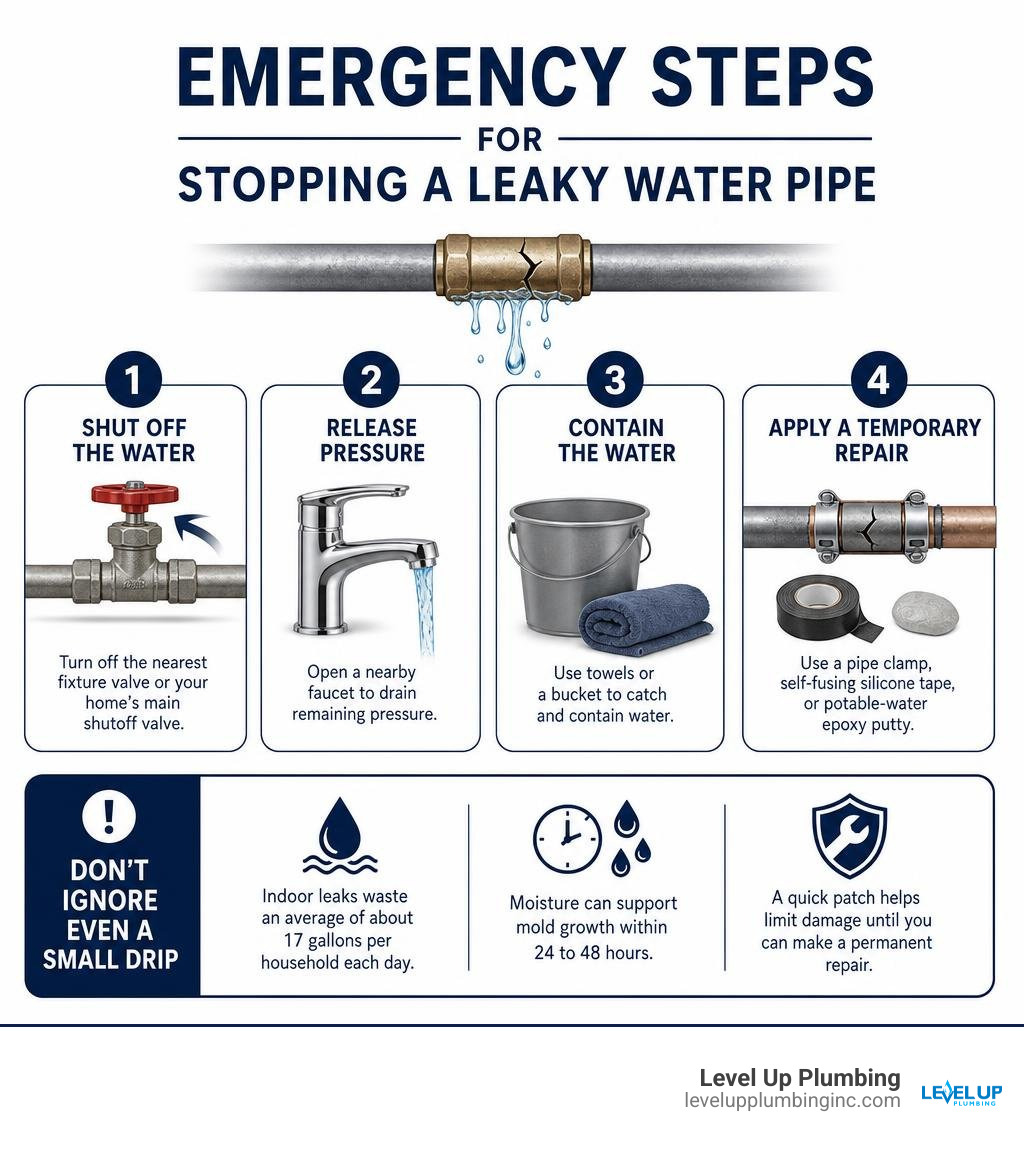
First, shut off the water at the nearest fixture valve or your home’s main shutoff valve. Then open a nearby faucet to release pressure, contain the water with towels or a bucket, and use a pipe clamp, self-fusing silicone tape, or potable-water epoxy putty as a short-term emergency patch.
Do not ignore even a small drip. Indoor leaks waste an average of about 17 gallons per household each day, and moisture can support mold growth within 24 to 48 hours. A quick patch helps limit damage, but the right permanent repair depends on whether the pipe is copper, PVC, CPVC, PEX, or galvanized steel.
I’m Tiffany Miley, owner of Level Up Plumbing in Huntington Beach, with more than 21 years of experience in Southern California trades and home services. I have helped homeowners address everything from a visible leaky water pipe to hidden plumbing leaks, with a focus on clear answers and repairs that solve the real problem.
Relevant articles related to leaky water pipe:
Understanding Pipe Materials and Failure Causes
Water leaks cause more property damage in American homes than fires, storms, and break-ins combined. When pressurized water breaks containment, it spreads quickly behind walls, under subfloors, and across ceilings. Knowing why your plumbing failed in the first place is the key to selecting the right long-term fix instead of putting a temporary bandage on a systemic problem.
Plumbing lines operate under constant pressure, typically between 40 and 70 pounds per square inch (PSI). When internal or external stresses exceed what the material can withstand, pinhole leaks, hairline cracks, or split joints occur.
| Pipe Material | Common Failure Causes | Best Temporary Fix | Recommended Permanent Repair |
|---|---|---|---|
| Copper | Pinhole corrosion, aggressive water chemistry, worn solder joints | Rubber clamp, self-fusing silicone tape, epoxy putty | Push-to-connect slip coupling, soldered copper coupling |
| PEX | Loose crimp rings, mechanical friction, improper bend radiuses | Crimp re-tightening, silicone tape | Push-to-connect fitting, newly crimped PEX coupling |
| PVC / CPVC | Brittle joints, excessive pressure spikes, thermal cracking | Pipe repair cast, silicone tape, epoxy putty | Solvent-weld coupling (primer + solvent cement) |
| Galvanized Steel | Severe internal rust, thread corrosion, scale buildup | Heavy-duty pipe repair clamp | Section replacement with transition fittings, repiping |
Identifying the Root Causes of a Leaky Water Pipe
Plumbing leaks rarely happen out of nowhere. Most stem from ongoing environmental and physical conditions:
- Pinhole Corrosion and Chemical Oxidation: Copper lines degrade over time due to localized pitting corrosion. This happens when water chemistry interacts with the pipe’s copper interior, eventually creating microscopic pinholes that spray fine mists.
- Excessive Water Pressure: Municipal water systems sometimes experience surges, or home pressure reducing valves fail. Pressure exceeding 80 PSI strains pipe joints, fixture supply lines, and appliance valves beyond their engineering limits.
- Water Hammer and Mechanical Stress: When a running valve shuts off abruptly, high-velocity water slams into the closed gate, sending shockwaves through the plumbing. Without water hammer arrestors, this vibration loosens pipe hangers, joints, and fittings.
- Thermal Expansion and Contraction: Hot-water lines expand when heated and contract when cool. Over decades, this movement rubs against framing studs, concrete slabs, and pipe supports, wearing down pipe walls.
- Aged Plumbing Infrastructure: Homes with original galvanized steel or aging copper lines simply reach the end of their useful lifespans. Galvanized steel pipes corrode internally from the inside out, restricting water flow while weakening the outer metal wall.
Pipe Identification: Copper, PEX, PVC, CPVC, and Galvanized Steel
Before picking up tools or buying repair supplies, inspect the pipe line to confirm what material you are working with.

- Copper: Rigid, metallic piping that looks like a penny. Older installations develop a dull brown or greenish patina. Copper lines are soldered (sweated) together at joints or connected via mechanical compression fittings.
- PEX (Cross-Linked Polyethylene): Flexible plastic tubing widely used in modern construction. It is color-coded for convenience: red for hot supply lines, blue for cold supply lines, and white or gray for neutral lines. PEX connects using metal crimp rings, clamp rings, or push-to-fit connections.
- PVC and CPVC: Rigid plastic piping. Standard PVC is bright white and rated strictly for cold water and drainage applications. CPVC (Chlorinated Polyvinyl Chloride) is cream or tan, designed to safely handle high-temperature, pressurized hot water. Both materials connect with solvent-based primers and cements.
- Galvanized Steel: Heavy, dull-gray, threaded metallic pipes commonly installed in pre-1970s homes. If a refrigerator magnet sticks to the pipe, it is steel or iron.
- Drain Lines (ABS/PVC): Non-pressurized waste pipes are often black ABS or white PVC. If you are dealing with wastewater dripping under a sink, review our guide on how to fix a leaking drain pipe joint fast to secure those slip nuts and traps properly.
How to Fix a Leaky Water Pipe in 5 Steps
When you spot a leak, following a methodical sequence prevents minor drips from turning into indoor floods.

Step 1: Shut Off the Water Supply and Relieve Line Pressure
The moment you discover water escaping from a pressurized supply line, close the water source immediately:
- Isolate the Fixture: If the leak is isolated to an accessible fixture (such as a bathroom faucet supply line, toilet stop, or under-sink angle stop), turn its oval chrome valve handle clockwise until snug.
- Turn Off the Main Valve: If the break is in an accessible main line, basement run, or crawlspace, locate your home’s main water shutoff valve near the street curb or where the line enters the house. Turn gate valves clockwise until fully seated; turn ball valves a quarter-turn until the lever rests perpendicular to the pipe.
- Relieve Trapped Line Pressure: Go to the lowest faucet in your home (or an outdoor hose bib) and open it completely. Then open a faucet on the highest floor to allow air in. This drains residual water from the system, relieving line pressure and keeping your workspace dry.
- Electrical Hazard Safety: If water is pooling near electrical panels, wall outlets, or appliances, turn off the breaker for that zone at your main service panel. Never stand in standing water while operating electrical equipment. For deeper insights on managing emergency leaks securely, read our guide on how to fix leak quickly and safely at the same time.
Step 2: Clean, Cut, and Prepare the Damaged Pipe
A secure repair requires clean, smooth surfaces free from corrosion, scale, or burs.
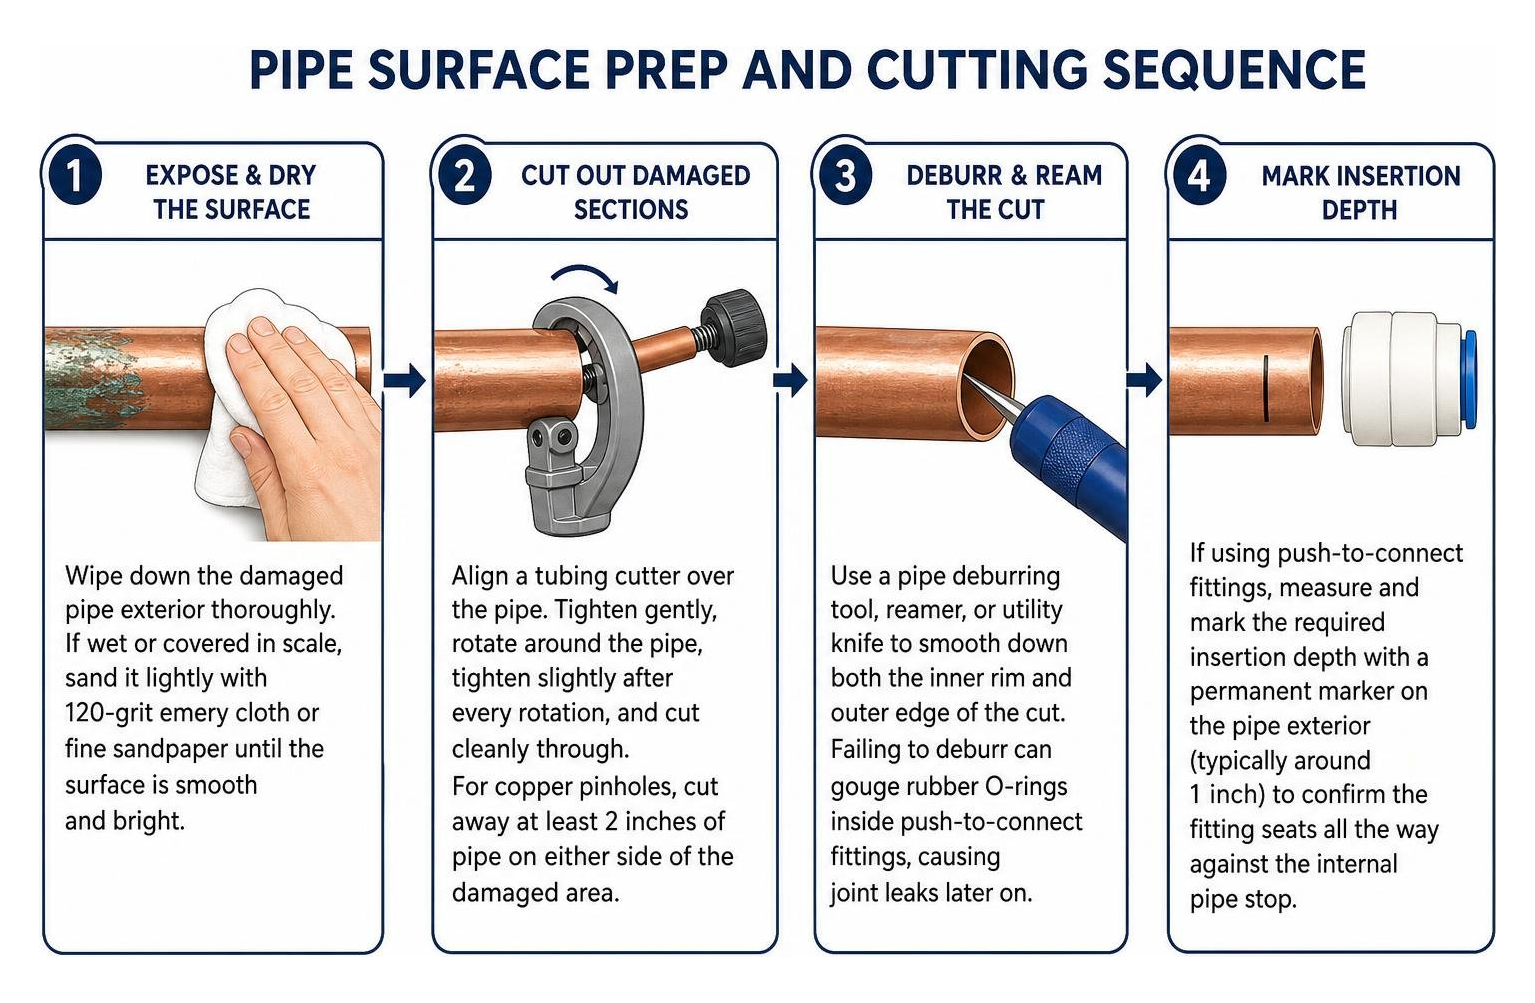
- Expose and Dry the Surface: Wipe down the damaged pipe exterior thoroughly using clean rag towels. If the pipe is wet or covered in scale, sand it lightly with 120-grit emery cloth or fine sandpaper until the raw surface is smooth and bright.
- Cut Out Damaged Sections (For Permanent Repairs): If you are installing a replacement coupling, align a dedicated tubing cutter over the pipe. Tighten the cutting wheel gently, rotate the tool around the pipe, tighten slightly after every rotation, and cut cleanly through. For copper pinholes, cut away at least 2 inches of pipe on either side of the damaged area, as internal oxidation usually stretches beyond the visible pinhole.
- Deburr and Ream the Cut: Fresh cuts leave sharp metal or plastic lips. Use a pipe deburring tool, reamer, or utility knife to smooth down both the inner rim and outer edge of the cut. Failing to deburr can gouge rubber O-rings inside push-to-connect fittings, causing joint leaks later on.
- Mark Insertion Depth: If using push-to-connect fittings, measure and mark the required insertion depth with a permanent marker on the pipe exterior (typically around 1 inch) to confirm the fitting seats all the way against the internal pipe stop.
Step 3: Apply an Emergency Stop with Clamps, Tape, or Epoxy Putty
If you cannot immediately cut and rebuild the pipe section, stabilize the leak with an emergency patch. These hold pressure temporarily while you gather permanent materials or wait for a plumbing professional.
- Pipe Repair Clamps: These metal sleeves feature a thick neoprene or rubber internal gasket. Center the rubber pad directly over the leak, wrap the hinged steel sleeve around the pipe, insert the mounting bolts, and tighten them down evenly with a socket wrench. Avoid overtightening, which can deform plastic pipes.
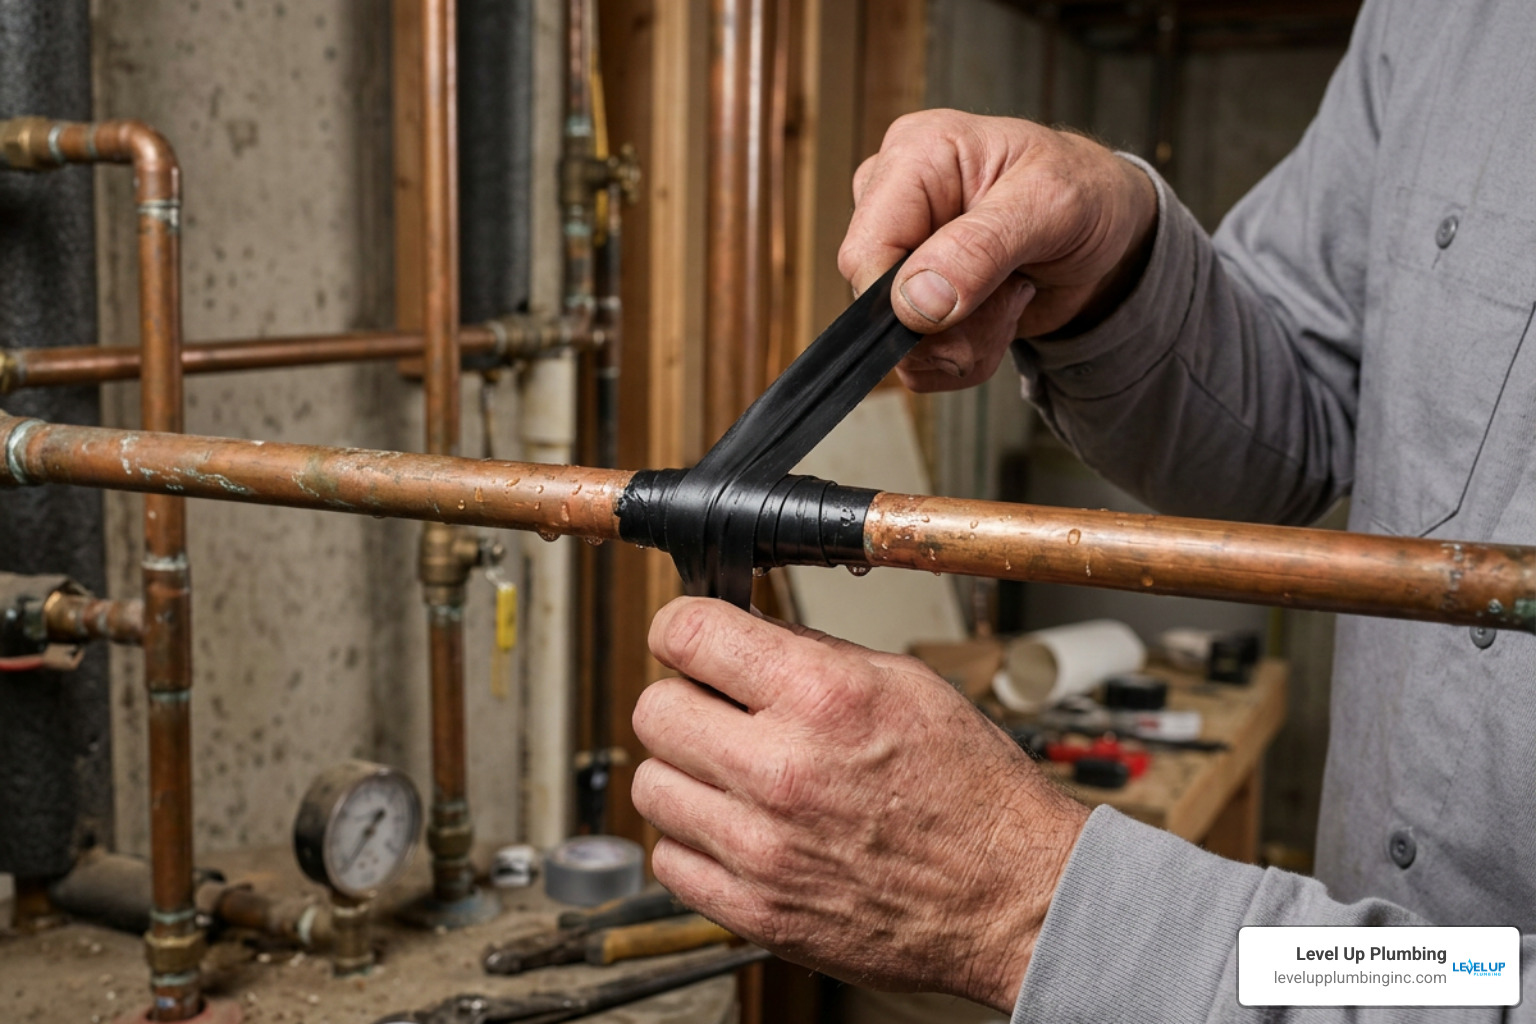
- Self-Fusing Silicone Repair Tape: This flexible tape bonds only to itself under tension. Stretch the silicone tape to roughly double its resting length as you wrap the leaking section, overlapping each wrap by 50%. Extend the wrapping at least 2 inches to the left and right of the leak to build a compression barrier.
- Two-Part Potable-Water Epoxy Putty: Cut a piece of two-part epoxy stick and knead it with gloved fingers until the contrasting inner and outer colors blend into a single, uniform shade. Mold the putty over the leak point, pressing it firmly against the dry, sanded pipe. Most epoxy putties set in 5 to 10 minutes and cure within an hour, resisting operating pressures up to 300 PSI.
Step 4: Install a Permanent Push-to-Connect or Solvent Repair
For a lasting fix, replace the damaged section with new pipe and code-compliant fittings.
- Push-to-Connect Slip Couplings (Copper, CPVC, PEX): These fittings use stainless steel grab rings and rubber O-rings to create a watertight seal without torches or glue. Push the slip coupling onto the cut pipe end using a disconnect clip, align the matching replacement pipe section, and slide the coupling back over the joint until it meets your insertion depth mark.
- Solvent Welding (PVC and CPVC): Clean the outside of the pipe and inside of the replacement socket with CPVC/PVC purple primer to soften the plastic. Apply a uniform layer of solvent cement over the primer, push the fitting onto the pipe with a quarter-turn twist to distribute cement, and hold the joint firmly for 30 seconds. Allow CPVC pressurized supply lines to cure for a minimum of 2 hours before restoring line pressure (15 minutes for non-pressurized drain pipes).
- PEX Crimp Connections: Slide a copper crimp ring over the flexible PEX tube, push the barbed brass fitting into the pipe end, and compress the ring squarely using a calibrated PEX crimping tool. Check your connection using a go/no-go crimp gauge; the gauge slot must slide cleanly over the compressed ring to ensure a tight seal.
- Threaded Steel Fitting Replacement: For galvanized line breaks, unthread damaged sections back to sound pipe using two pipe wrenches in opposing directions. Coat new replacement male pipe threads with 3 to 4 wraps of PTFE thread seal tape, apply thread sealant paste, and tighten the joints down firmly.
Step 5: Restore Water Flow and Inspect for Remaining Leaks
After completing the repair, bring your plumbing lines back up to pressure slowly:
- Clear Downstream Fixtures: Leave an aerated faucet or hose bib open downstream from your repair.
- Slowly Turn On Main Water: Slowly open the main water shutoff valve a quarter-turn at a time. Rushing full water pressure into an empty line creates air pockets and water hammer shocks that can dislodge fresh seals.
- Purge Air and Check Connections: Allow water to flow out of the open downstream faucet until spitting air clears into a smooth stream, then turn the faucet off.
- Visual Inspection and Drying: Inspect your new fitting joints with a dry paper towel and flashlight. Rub the towel around every joint; even a microscopic seep will show up immediately on dry paper. Inspect connected fixtures for signs of trouble, such as our recommended ways to stop water heater check valve leaks.
- Dry the Structure: Use shop vacuums, dehumidifiers, and high-velocity fans to dry all wet drywall, insulation, and subflooring within 24 to 48 hours to prevent mold colonization.
Detecting Hidden Leaks and Signs of Water Damage
Not all pipe breaks produce an obvious spray under a vanity. Hidden leaks inside wall cavities, crawlspaces, and concrete building foundations can leak for months before showing obvious symptoms.
Key warning signs that you have a hidden plumbing leak include:
- Unexplained Water Bill Increases: A sudden spike in monthly water consumption without added household use points directly to a silent leak.
- Hissing or Trickling Sounds: Hearing faint rushing water behind sheetrock when all household plumbing fixtures are turned off.
- Musty Odors and Mildew: Damp, earthy smells near baseboards, closets, or bathrooms that return after regular cleaning.
- Structural Wall Damage: Blistering paint, peeling wallpaper, spongy drywall, or sagging ceiling plaster.
- Floor Temperature Changes: Warm or hot sections on tile, hardwood, or laminate flooring, which often point to a hot water copper line leaking below a concrete slab.
How to Detect a Hidden Leaky Water Pipe in Walls or Slabs
Locating leaks buried beneath concrete or sealed inside walls without unnecessarily damaging your home requires specialized diagnostic tools:
- Acoustic Listening Equipment: Plumbers use sensitive ground microphones and acoustic amplifiers to listen to the sound of pressurized water escaping pipes beneath concrete slabs and wall framing.
- Thermal Imaging Cameras: Infrared cameras detect fine temperature variations across walls and floors. Hot water line breaks show up as bright, radiating thermal blooms, while cold water line leaks show up as cool moisture spreads.
- Moisture Meters: Pinless and probe moisture meters calculate exact moisture content inside framing timber, plaster, and subflooring, pinpointing the leak path behind dry-looking surfaces.
Performing a Simple 15-Minute Water Meter Test
Before calling for professional leak detection, run this 15-minute water meter test to confirm whether your home has a pressurized water leak:
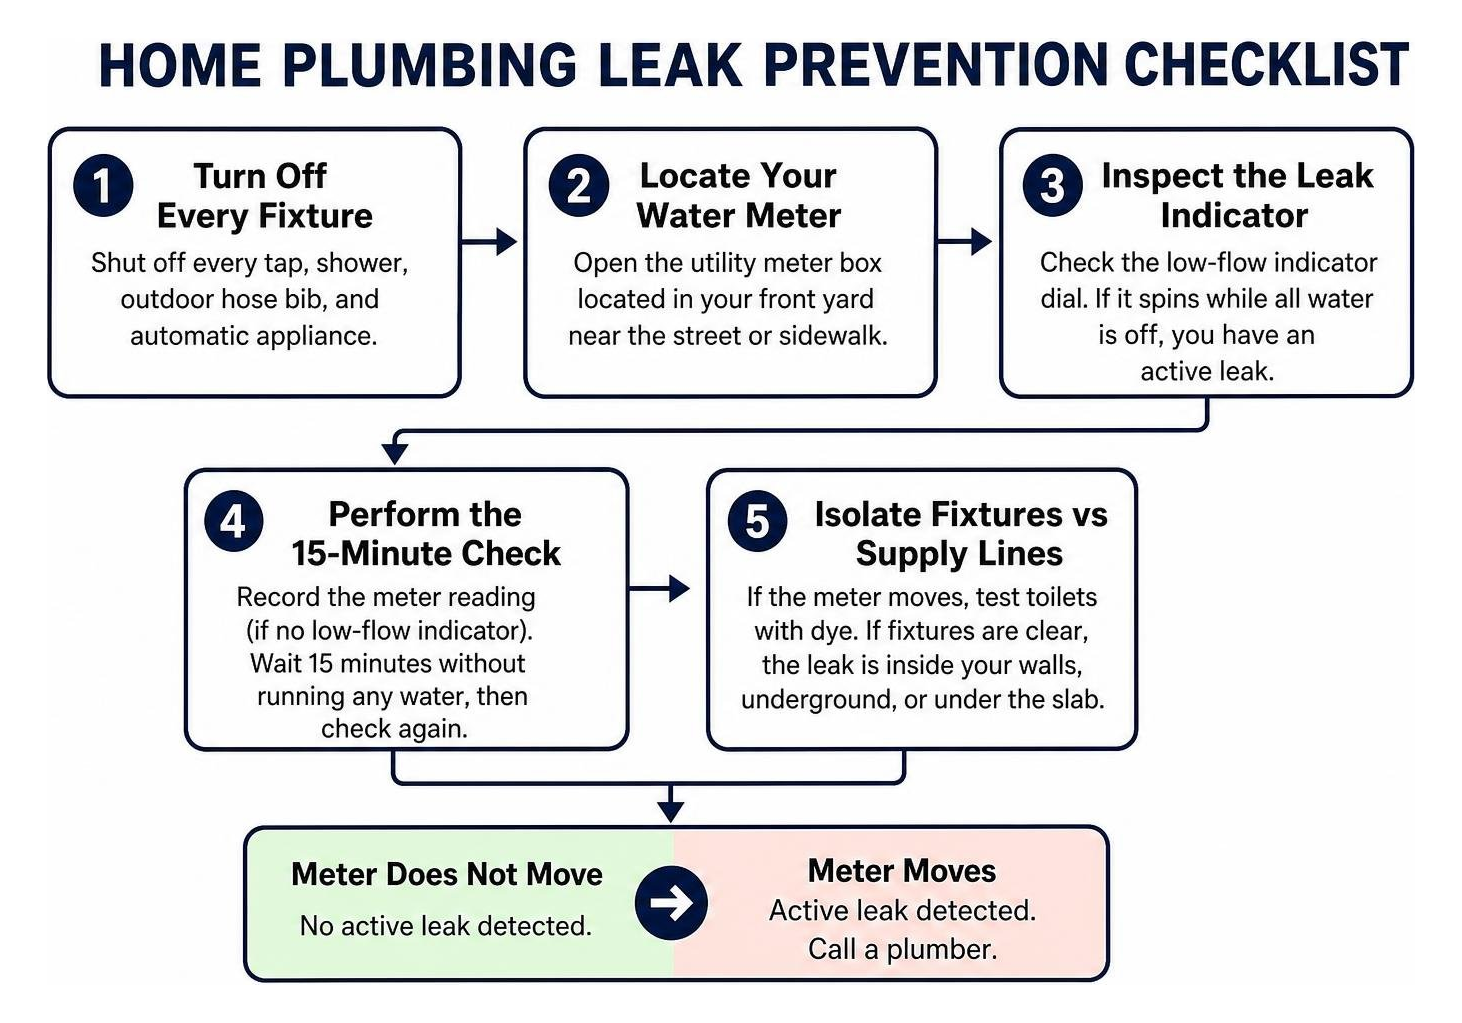
- Turn Off Every Fixture: Shut off every tap, shower, outdoor hose bib, and automatic appliance (ice makers, water softeners, lawn irrigation, and washing machines).
- Locate Your Water Meter: Open the utility meter box located in your front yard near the street or sidewalk.
- Inspect the Leak Indicator: Look closely at the meter face. Most meters feature a small triangular or star-shaped low-flow indicator dial that spins when even tiny amounts of water move through the meter. If this gear rotates while all water is off, you have an active leak.
- Perform the 15-Minute Check: If your meter uses a digital display or sweep hand without a low-flow indicator, record the exact current reading. Wait 15 minutes without running any water, then check the numbers again. If the reading changes, water is escaping somewhere on your property.
- Isolate Fixtures vs Supply Lines: If your meter shows continuous flow, perform a quick toilet dye test by dropping food coloring into each toilet tank. If color seeps into the bowl within 15 minutes, your flapper valve is worn. To fix it, follow our guide on how to fix a leaking toilet valve in 5 quick steps. If all fixtures test sound, the leak is located inside your walls, underground, or under the slab foundation.
When to Call a Plumber and How to Prevent Future Leaks
While patching an accessible under-sink supply line is well within reach for most DIYers, certain plumbing challenges require a licensed professional:
- Underground and Slab Leaks: Repairs beneath structural concrete require certified acoustic detection, precision breakout, or overhead PEX rerouting.
- Aging Galvanized Systems: Trying to patch fragile galvanized steel often breaks old threads further down the line, requiring professional repiping.
- Leaks Inside Enclosed Walls and Ceilings: Cutting into structural framing or working around electrical wiring is best handled by licensed plumbers.
- Main Line Repairs: High-pressure main water service lines require specialized materials and utility coordination.
Proactive Steps to Prevent Future Plumbing Leaks
- Regulate Water Pressure: Install a Pressure Reducing Valve (PRV) if your incoming municipal water pressure exceeds 75 to 80 PSI.
- Install Smart Water Monitoring Systems: Whole-home smart flow systems like Leak Defense Smart Home Systems continuously monitor water flow and automatically shut off your main supply line the moment an unusual drop in pressure or continuous flow is detected.
- Address Fixture Drips Early: A slowly dripping faucet wastes over 1,000 gallons of water a year and wears down valve seats; schedule an inspection or learn when to call for faucet leak repair from a licensed plumber.
- Insulate Exposed Plumbing: Insulate pipes in unheated crawlspaces, exterior walls, and attics to protect against temperature swings.
- Schedule Annual Inspections: Have a licensed professional inspect your water heater valves, supply lines, and pressure regulators annually to catch wear before leaks happen.
Frequently Asked Questions About Pipe Leak Repair
Can I temporarily fix a water pipe without shutting off the main water supply?
You should never attempt a permanent or structural pipe repair while water is flowing under full line pressure. Standard residential water pressure (50 to 70 PSI) will push away adhesives, blow out epoxy putties before they cure, and spray water across your workspace, creating electrical hazards and water damage.
However, if you are dealing with a minor trickle or low-pressure pinhole drip and cannot access the main valve right away, an open-hinged rubber pipe repair clamp can be bolted over the pipe under active flow as an emergency containment measure.
For commercial or industrial situations, specialized inflatable or mechanical pipe isolation plugs are inserted downstream to block internal flow. In residential settings, shutting off the water at the main valve is always the safest and most effective first step.
What is the most effective DIY repair for a copper pinhole leak?
The most reliable DIY repair for a copper pinhole leak is cutting out the oxidized pipe section and installing a push-to-connect slip coupling (such as a SharkBite fitting) or sweating in a new copper repair sleeve.
External surface patches like epoxy putty, rubber tape, or clamp sleeves only seal the exterior opening. Pinhole leaks are caused by interior pitting corrosion that thins the surrounding copper tubing.
A patch may seal today’s drip, only for another pinhole to break through an inch away days later. Cutting out at least 2 inches of pipe on either side of the leak and installing a full-flow coupling solves the problem for good.
Are there financial assistance programs available to repair residential water leaks?
Yes, many municipal water utilities and local government agencies offer financial assistance, rebate programs, or billing adjustment credits for homeowners dealing with unexpected leaks.
Cities frequently sponsor initiatives like financial assistance programs for residential water leak repair, which assist income-qualified property owners with grants or free repairs for broken underground service lines, running toilets, and failing indoor pipes.
Additionally, most local water providers offer “leak forgiveness” billing credits. If you provide proof of a completed professional repair (such as an itemized plumber invoice), the utility will often adjust your inflated water bill back down to your baseline average. Check with your local city water department to explore available assistance programs.
Conclusion
Stopping a leaking pipe quickly protects your home from costly structural damage, wood rot, and hazardous mold growth. Using emergency clamps, silicone wrap, or push-to-connect couplings gives you the tools to manage unexpected plumbing failures safely.
However, temporary patches are not meant to last forever. If your home is experiencing recurring copper pinholes, dropping water pressure, or hidden moisture under your foundation, turn to a team with the right diagnostic tools and experience.
With over 21 years of trusted local plumbing experience across Orange County, our team at Level Up Plumbing is here to help. Reach out to schedule professional Huntington Beach slab leak detection and repair to keep your plumbing system running smoothly for years to come.