
Why a Leaking Shower Head Costs You More Than You Think
A leaking shower head is one of those problems that’s easy to ignore — until you see your water bill.
Here’s how to fix it fast:
- Turn off the water supply at the shower valve or main shut-off.
- Remove the shower head using an adjustable wrench and a protective cloth.
- Soak it in white vinegar for 30–60 minutes to dissolve mineral buildup.
- Replace the washer or O-ring if worn, cracked, or flattened.
- Wrap threads with Teflon tape (3–4 clockwise wraps) before reinstalling.
- Reattach and test — if it still drips, the valve cartridge may need replacing.
That’s the short version. The rest of this guide walks you through each step in detail, including how to diagnose where the leak is actually coming from.
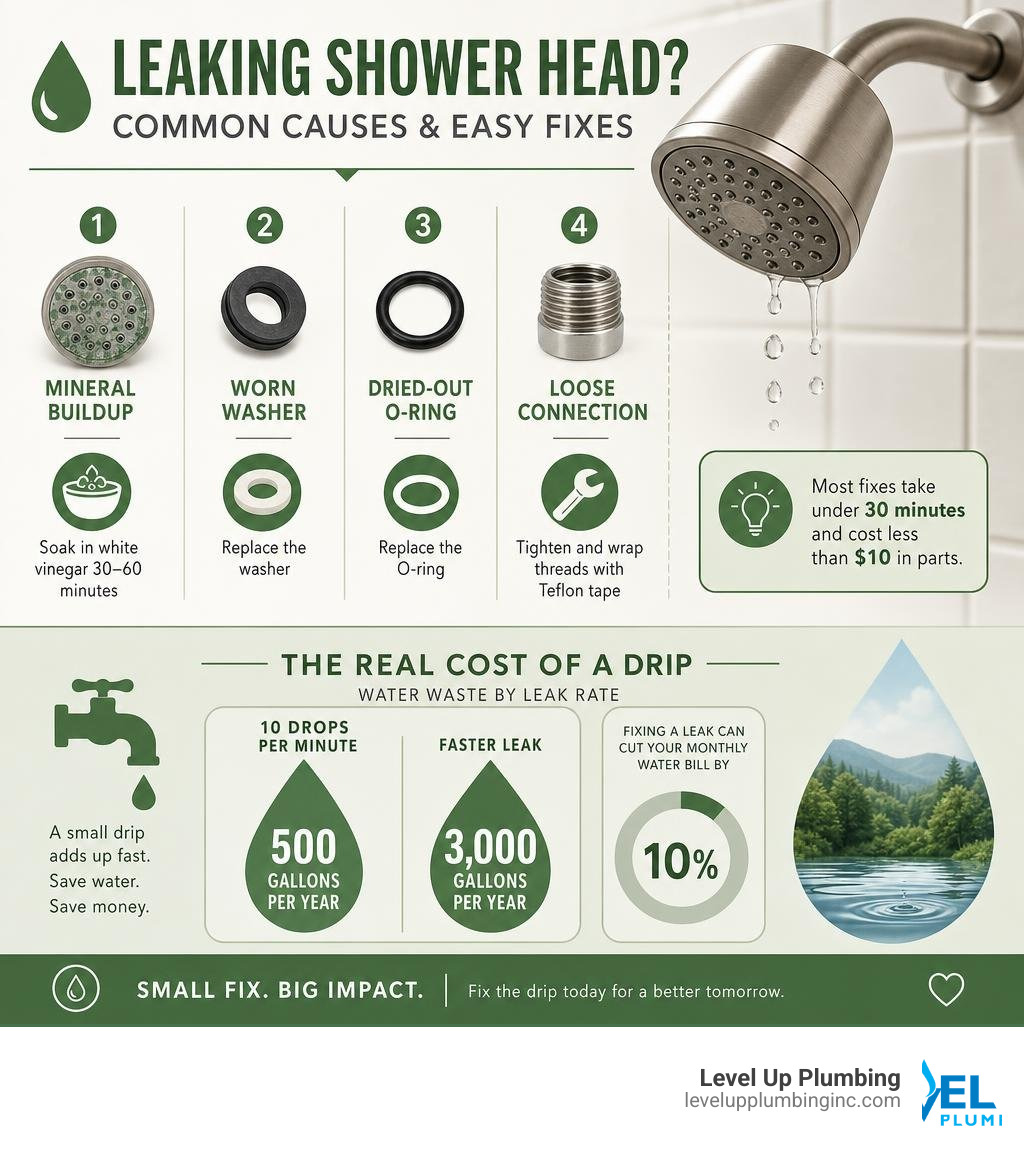
That steady drip you’ve been putting off? According to the EPA, a shower head dripping at just 10 drops per minute wastes more than 500 gallons of water per year. A faster leak can push that number to 3,000 gallons annually — and fixing it can cut your monthly water bill by around 10%.
In Southern California, where water costs and conservation both matter, that’s not a small thing.
The good news: most shower head leaks come down to a handful of fixable causes — mineral buildup, a worn washer, a dried-out O-ring, or a loose connection. Most repairs take under 30 minutes and cost less than $10 in parts.
I’m Tiffany Miley, owner of Level Up Plumbing in Huntington Beach, and in over 21 years of working in Southern California’s trades and service industries, I’ve seen a leaking shower head go from a minor drip to a mold problem behind the wall more times than I can count. Let’s make sure that doesn’t happen to you.
Leaking shower head helpful reading:
How to Diagnose a Leaking Shower Head
Before you run to the garage for your wrench, you need to understand what you are dealing with. Proper leak detection is the foundation of water conservation. If you try to fix the wrong part of your shower, you will end up wasting time, getting frustrated, and potentially making the leak worse.
Taking a proactive approach to leak detection keeps your utility bills low and protects your home’s structure. If you suspect water is escaping elsewhere in your house, you can learn more about home water leaks from local municipal resources to keep your entire system in top shape.
Common Causes of a Leaking Shower Head
When a shower head starts dripping, it is usually down to one of four common culprits:
- Limescale and Mineral Buildup: Southern California is famous for its hard water. Over time, calcium and magnesium deposits collect inside the tiny nozzles of your shower head. This buildup blocks the natural flow of water, creating high internal pressure that forces water to leak out of the swivel joint, the seams, or the threaded connection.
- Worn Rubber Washers: Inside the connection between your shower head and the shower arm sits a small rubber washer. Its job is to create a watertight seal. Over 8 to 12 years of constant exposure to water and temperature shifts, this rubber becomes brittle, cracks, flattens, or disintegrates entirely.
- Degraded O-rings: Similar to washers, O-rings are small rubber loops that seal internal connections, especially in handheld shower hoses or multi-function shower heads. When these degrade, water leaks from the body of the fixture rather than the spray nozzles.
- Damaged Flow Cartridge: If your shower drips constantly even when the handle is turned completely off, the issue isn’t the shower head itself. It is the cartridge inside the shower valve behind your wall. This cartridge controls the flow of water, and when its seals fail, water slowly creeps up the pipe and out of the shower head.
Pinpointing the Source: Shower Head, Valve, or Behind the Wall?
To fix a leak fast, you must pinpoint exactly where the water is escaping. Use this simple diagnostic test:
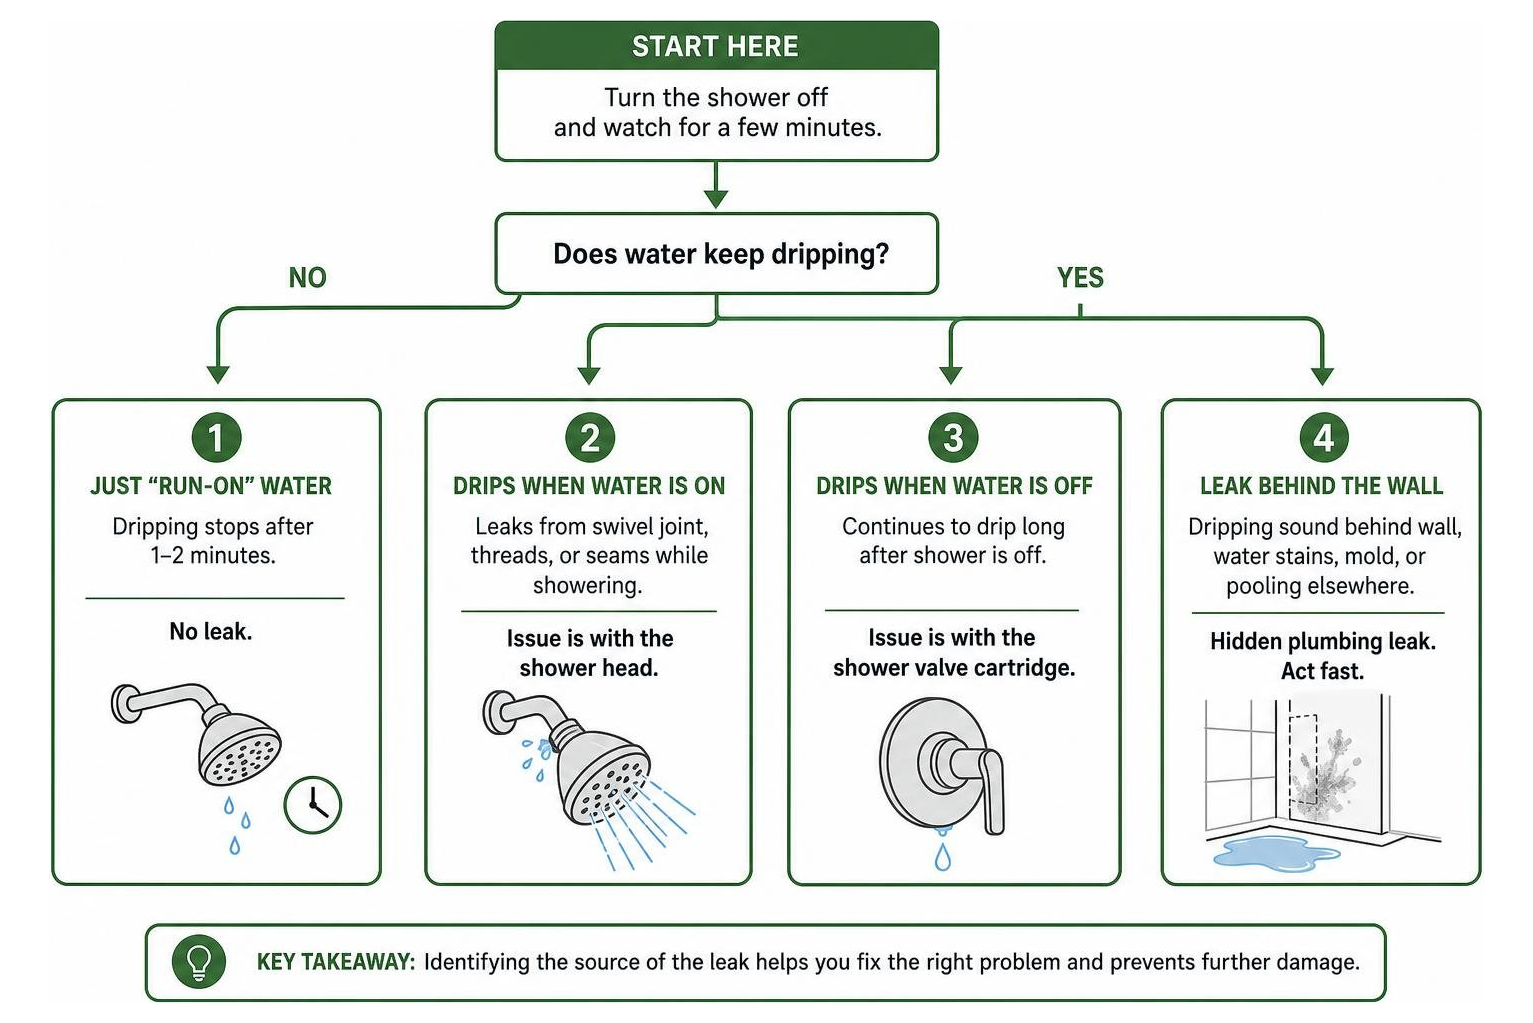
Turn the shower off and watch it for a few minutes.
- Is it just “run-on” water? A little dripping immediately after you turn off the shower is completely normal. Shower heads can hold a surprising amount of water in their chambers. If the dripping stops entirely after a minute or two, you do not have a leak.
- Does it drip when the water is ON? If water sprays out of the swivel joint, the threads connecting it to the metal arm, or the seams of the plastic casing while you are showering, the problem is localized to the shower head. This is usually caused by mineral buildup, a bad washer, or degraded plumber’s tape.
- Does it drip when the water is OFF? If the shower head continues to drip hours after your shower, the culprit is a failing shower valve cartridge or worn seats and springs. The valve is failing to shut off the water supply completely.
- Is the leak behind the wall? This is the most dangerous scenario. If you hear a faint dripping sound behind the drywall when the shower is off, notice water pooling on the floor in an adjacent room, or spot water stains and mold growth on the ceiling below the bathroom, you have a hidden plumbing leak.
If you suspect a hidden leak, you must act fast. Knowing how to fix leak quickly and safely can save you thousands of dollars in drywall repairs and mold remediation.
Tools, Materials, and Safety Precautions
Like any DIY home improvement project, having the right tools on hand makes the job much smoother. You do not need an expensive plumbing rig to tackle a leaking shower head — most of these items are already sitting in your garage or under your kitchen sink.

Essential Tools and Materials
Before you begin, gather these items:
- Adjustable wrench or channel locks: To loosen the shower head connection.
- Microfiber cloth or old rag: Wrap this around the metal connections before using your wrench. This prevents the metal teeth from scratching the beautiful chrome, brushed nickel, or matte black finish of your fixtures.
- Screwdriver: (Flathead and Phillips) You may need this if you have to remove the handle to access the valve cartridge.
- Utility knife: Useful for scraping away old, crusty plumber’s tape from the threads.
- Distilled white vinegar: The ultimate, non-toxic weapon against stubborn mineral scale.
- An old toothbrush or small scrub brush: To clean out clogged nozzles.
- Replacement rubber washers and O-rings: Keep a multi-pack of universal sizes handy.
- Plumber’s tape (Teflon tape): Standard white PTFE tape to seal the threaded joints.
- Strap wrench (optional): Excellent for removing polished decorative bonnets without scratching them.
For a detailed look at selecting parts and preparing your workspace, you can review this step-by-step guide to fixing leaks to ensure you have everything lined up perfectly.
Safety Precautions for a Leaking Electric Shower
If your home utilizes an electric shower — which is a unit that heats cold water on demand using an internal electric heating element — you must take extreme safety precautions. Water and electricity are a deadly combination.
- Isolate the Power: Never attempt to disassemble or repair an electric shower without first turning off the dedicated circuit breaker at your home’s main electrical panel.
- Turn Off the Water: Shut off the local isolation valve leading to the unit.
- Confirm Power is Off: Use a non-contact voltage tester to verify there is absolutely no electrical current running to the shower unit before unscrewing the cover.
- Check for Internal Leaks: If you notice water dripping from the casing of an electric shower unit, do not use it. Internal leaks can short out the electrical components, posing a severe shock hazard. Call a licensed professional immediately.
How to Fix a Leaking Shower Head Fast
Now that you have diagnosed the issue, gathered your tools, and taken safety precautions, it is time to get to work. Let’s walk through the exact steps to stop that annoying drip once and for all.

Step-by-Step Guide to Fixing a Leaking Shower Head
If your leak occurs when the water is turned on, or if mineral buildup has clogged your nozzles, follow this simple cleaning and restoration process:
- Shut Off the Water: While you can technically clean a shower head just by turning off the shower handle, it is safest to turn off the water supply at the local isolation valve or the main water shut-off for your home. This prevents any accidental water blasts if someone walks into the bathroom and turns the handle.
- Protect the Drain: Lay a bright towel over the shower drain. This catches any tiny screws, washers, or O-rings you might drop during disassembly, preventing them from taking a one-way trip down the pipe.
- Remove the Shower Head: Wrap your metal shower arm with a rag to protect the finish. Grip the shower arm firmly with one hand (or a pair of pliers) to prevent it from twisting inside the wall. Use your adjustable wrench to turn the shower head connecting nut counterclockwise until it detaches.
- Prepare the Vinegar Soak: Fill a plastic bag, bucket, or bowl with warm white vinegar. Submerge the entire shower head in the vinegar. If your shower head is stuck on the arm and you cannot remove it, fill a plastic bag with vinegar, slip it over the fixture, and secure it tightly with a rubber band or zip tie.
- Let It Dissolve: Allow the shower head to soak for at least 30 to 60 minutes. If you have heavy limescale, you can leave it overnight. The mild acetic acid in the vinegar will break down the calcium carbonate without damaging the metal or plastic finish.
- Scrub and Clear: Remove the shower head from the soak. Use an old toothbrush to scrub away the softened mineral deposits. For stubborn, clogged spray holes, gently clear them out using a toothpick, safety pin, or sewing needle.
- Rinse Thoroughly: Flush the shower head with hot water to wash out all the loosened grit from the inside.
Replacing the Washer, O-Ring, or Cartridge
While your shower head is soaking, inspect the internal rubber components.
Look inside the threaded connector of the shower head. You will see a flat rubber washer or a round O-ring. Use a small flathead screwdriver or utility knife to gently pry it out.
- Inspect the rubber: Is it cracked, stiff, flattened, or showing signs of dry rot? If so, it can no longer hold a seal.
- Find a match: Take the old washer to your local hardware store in Huntington Beach, Cypress, or Garden Grove to ensure you buy an exact match. The thickness and diameter must match the original perfectly to prevent leaks.
- Seat the new washer: Push the new, lubricated washer or O-ring firmly into the recess of the shower head. Make sure it sits completely flat and is not twisted or pinched.
If you are comfortable tackling DIY plumbing tasks around your home, keeping your seals fresh is a great skill to have. For example, if you have other fixtures dripping, you can apply similar logic to learn how to fix a leaking toilet valve to keep your entire bathroom running efficiently.
Applying Plumber’s Tape and Reassembling
Before you screw the shower head back onto the arm, you must prepare the threads to ensure a watertight seal.
- Clean the Threads: Use your utility knife or a stiff brush to scrape away any old, shredded Teflon tape or mineral crust from the male threads of the metal shower arm. Wipe it clean with a dry rag.
- Apply the Tape: Wrap standard white Teflon tape clockwise around the threads. Why clockwise? Because when you screw the shower head back on (which turns clockwise), the motion will tighten the tape. If you wrap it counterclockwise, the shower head will unravel the tape as you tighten it.
- Use the Right Amount: Wrap the tape around the threads 3 to 4 times. Pull it snug so it sinks into the grooves of the metal threads. Tear the excess tape away and smooth down the loose end.
- Reinstall the Shower Head: Thread the shower head back onto the arm by hand, turning it clockwise.
- Tighten Carefully: Once it is hand-tight, wrap your rag around the connecting nut and give it a final quarter-turn to half-turn with your adjustable wrench. Do not overtighten! Over 40% of cracked plastic shower head housings are caused by homeowners over-torquing the connection with a wrench.
- Test Your Work: Remove the towel from the drain, turn the water supply back on, and run the shower. Check closely for any seeping water around the connection or the nozzles.
Troubleshooting, Prevention, and Professional Help
Sometimes, even after a thorough cleaning and a brand-new washer, that stubborn drip persists. Let’s look at how to troubleshoot persistent leaks, prevent future mineral buildup, and identify when it is time to put down the wrench and call in the pros.
What to Do If the Shower Head Still Leaks After Replacing the Washer
If you turn on the water and see a steady stream escaping from the connection even with a new washer, check for these common mistakes:
- Cross-Threading: If the shower head was screwed on at a slight angle, the threads will not align correctly, leaving gaps for water to escape. Unscrew the head, check the metal threads for damage, and carefully re-thread it straight.
- Incorrect Washer Size: If the new washer is even a fraction of a millimeter too thin or too small, water pressure will easily push past it. Double-check your size match.
- Debris in the Connection: A tiny speck of sand, rust, or mineral scale trapped under the rubber washer can prevent it from sealing flat against the metal shower arm. Take it apart, clean the seating area, and reassemble.
- System Flushing: Before putting the shower head back on, always run the water through the bare shower arm for 10 to 15 seconds. This flushes out any loose rust or pipe scale before it can clog your newly cleaned nozzles.
If you enjoy troubleshooting your home’s water lines, you might also want to read up on how to fix a leaking drain pipe joint fast to keep your drainage system as dry as your supply lines.
Fixing a Leaking Shower Valve or Cartridge
If your shower head continues to drip when the handle is turned completely off, you are dealing with a faulty shower valve cartridge. This is a slightly more advanced DIY project, but still highly manageable.
- Turn Off the Main Water: You must shut off the main water supply to your home and bleed the pressure by opening the lowest faucet in the house.
- Remove the Handle: Use an Allen wrench or screwdriver to loosen the set screw holding your shower handle in place. Pull the handle off.
- Remove the Faceplate (Escutcheon): Unscrew the decorative metal plate against the tile wall.
- Remove the Locking Clip or Bonnet Nut: Depending on your brand (Moen, Delta, Kohler, etc.), you will see a metal clip or a brass bonnet nut holding the cartridge in place. Remove it carefully.
- Pull the Cartridge: Use cartridge pullers or pliers to pull the old cartridge straight out of the brass valve body.
- Replace and Flush: Take the old cartridge to a local plumbing supply store to get an exact replacement. Before sliding the new cartridge in, flush the valve body with water to clear out any sediment. Slide the new cartridge in, secure it, and reassemble the handle.
If you find that the leak has trickled down and affected your tub drainage system as well, our guide on how to fix leaking bathtub drain pipe can walk you through repairing your tub drain lines step-by-step.
Repair vs. Replace: When to Get a New Shower Head
Is it worth repairing your old shower head, or should you buy a new one? Consider these factors:
- Fixture Age: If your shower head is over 10 years old, the plastic casing may be degraded, and internal seals might be failing.
- Physical Damage: If you notice cracks along the seams of the shower head body, or if the mode selector dial is seized up, it cannot be repaired.
- Cost-Benefit: A standard, high-quality replacement shower head costs between $25 and $50. If you are spending $15 on specialty washers, O-rings, and specialty tools, it is often more cost-effective and less frustrating to simply replace the entire unit.
- Efficiency Upgrade: Upgrading to a modern, WaterSense-certified low-flow shower head can dramatically reduce your water consumption while maintaining excellent, satisfying water pressure.
Preventive Maintenance and Mineral Buildup Prevention
To keep your shower head running beautifully and prevent future leaks, establish a simple maintenance routine:
- Monthly Descaling: Do not wait for your shower head to clog. Once a month, wipe down the rubber nozzles with a damp cloth to break up fresh calcium deposits.
- The Vinegar Bag Trick: Every six months, tie a plastic bag filled with white vinegar around the shower head and let it soak for an hour to keep internal passages clear.
- Install a Water Softener: If you live in Orange County, CA, where hard water is a constant battle, installing a whole-home water softener is the ultimate solution. It removes calcium and magnesium before they ever reach your fixtures, extending the life of your appliances, pipes, and shower cartridges by years.
When to Call a Professional Plumber
While a basic leaking shower head is a fantastic DIY weekend project, some situations require the expertise of a licensed professional:
- Leaks Behind the Wall: If you suspect water is leaking behind your shower wall, do not wait. Hidden leaks can rot structural studs, ruin drywall, and cause toxic mold growth.
- Seized Valve Parts: If you try to replace a cartridge and the brass bonnet nut is completely seized or corroded, forcing it can snap the copper pipes inside the wall, turning a simple repair into a major plumbing emergency.
- Polybutylene Pipes: If your home was built between 1978 and 1995 and utilizes polybutylene piping, these pipes are highly prone to sudden, catastrophic failure and should always be handled by a professional.
If you are dealing with a stubborn leak, a seized valve, or simply want the peace of mind that comes with professional installation, our expert faucet leak repair services are here to help.
Frequently Asked Questions about Shower Leaks
Is a dripping shower head considered a plumbing emergency?
Generally, a slow, dripping shower head is not an immediate plumbing emergency, but it should not be ignored. Over time, that slow drip wastes thousands of gallons of water, spikes your utility bills, and creates a humid environment that promotes mold and mildew growth. However, if the shower valve fails completely and you cannot shut the water off at all, that is a plumbing emergency that requires immediate professional attention.
How often should I clean my shower head to prevent leaks?
We recommend a quick wipe-down of the rubber nozzles once a month to prevent calcium buildup. A deep clean — soaking the shower head in white vinegar — should be performed every six months. If you live in an area with exceptionally hard water, you may need to deep clean it every three months to keep the spray pattern even and prevent pressure leaks.
Can hard water cause my shower valve cartridge to fail faster?
Yes, absolutely. Hard water contains high concentrations of dissolved minerals like calcium and magnesium. As water flows through your shower valve, these minerals precipitate out and form a hard, crusty scale on the delicate rubber seals and moving parts of your valve cartridge. This abrasive scale tears the rubber O-rings, leading to premature valve failure and a constant drip from your shower head.
Conclusion
A leaking shower head is an annoying, water-wasting hassle, but in most cases, it is a simple fix that you can easily handle yourself with basic tools and a little patience. By cleaning out mineral deposits, replacing worn washers, and applying fresh Teflon tape, you can save money, conserve water, and restore peace and quiet to your bathroom.
However, if your leak is coming from behind the wall, if your shower valve is seized, or if you simply prefer to have the job done right the first time by local experts, we are here for you.
At Level Up Plumbing, we are proud to be a woman-owned business serving Huntington Beach, Cypress, Garden Grove, and the greater Orange County, CA area. With over 21 years of local expertise and award-winning customer service, we treat your home with the care and respect it deserves.
Don’t let a small drip turn into a major headache. Schedule a professional leak inspection with Level Up Plumbing today, and let us help you level up your home’s plumbing system!