
Stop a Leak With Garbage Disposal Seal Replacement
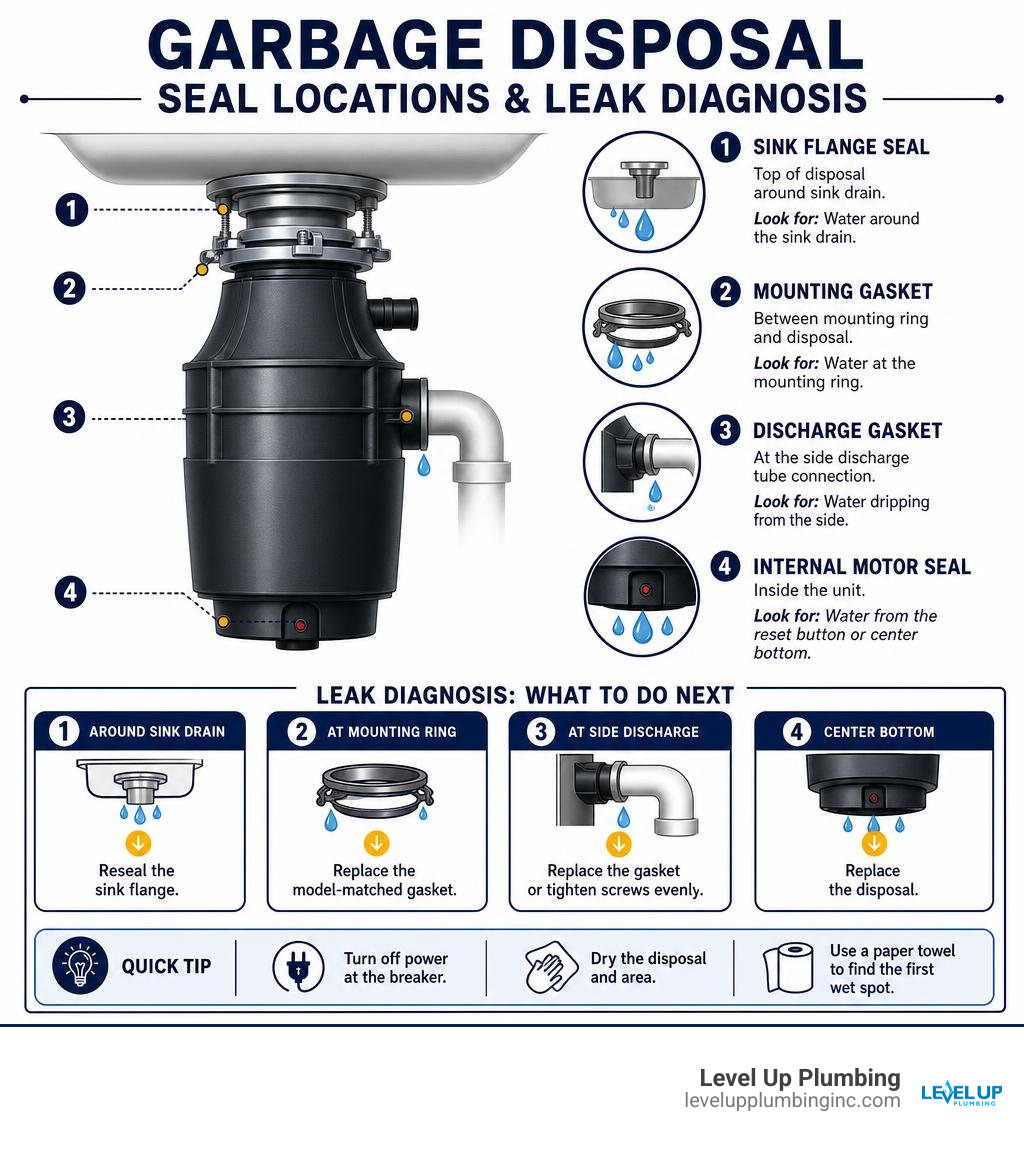
Garbage disposal seal replacement can stop many under-sink leaks in less than an hour when the problem is at the sink flange, mounting assembly, or drain connection. First, turn off power at the circuit breaker, dry the disposal, and use a paper towel to find the first wet spot – a top or side leak is often repairable, while water dripping from the center bottom of the unit usually means the internal motor seal has failed and the disposal needs replacement.
| Where water appears | Likely cause | Usual next step |
|---|---|---|
| Around the sink drain or top of disposal | Worn flange seal or old putty | Reseal the sink flange |
| At the mounting ring below the sink | Damaged mounting gasket | Replace the model-matched gasket |
| At the side discharge tube | Worn rubber drain gasket or loose screws | Replace gasket or tighten evenly |
| From the reset button or center bottom | Failed internal motor seal | Replace the disposal |
A small drip can damage cabinet floors, create odors, and worsen over time. The good news: most external seals wear out before the disposal itself, which can otherwise last 10 to 15 years with proper care.
I’m Tiffany Miley, owner and president of Level Up Plumbing, with more than 21 years in Southern California trades and service work. I have helped homeowners make smart, practical decisions about garbage disposal seal replacement, leak repairs, and when replacing an aging unit is the safer choice.
Discover more about garbage disposal seal replacement:
How to Identify Which Garbage Disposal Seal Is Leaking
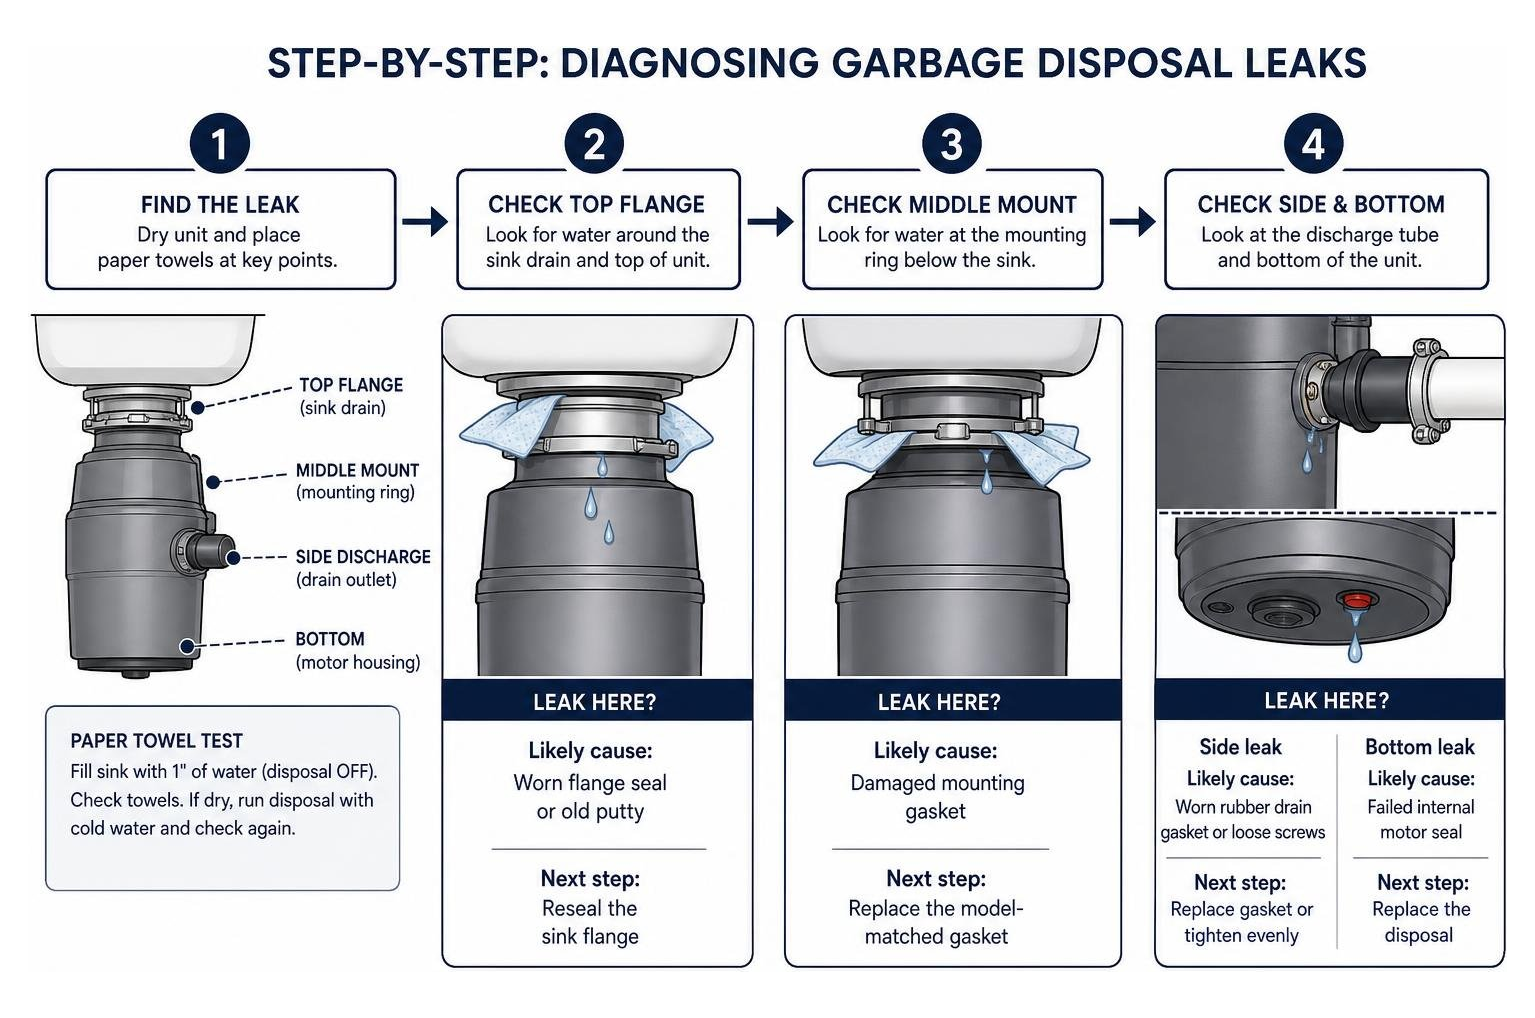
Before taking anything apart under your sink, you need to pinpoint the exact source of the leak. A garbage disposal has four primary leak points: the top sink flange, the middle mounting gasket (or splash guard), the side discharge/dishwasher connections, and the bottom motor housing.
The easiest way to locate a leak is by performing a paper towel test:
- Dry the entire garbage disposal unit, mounting assembly, and surrounding plumbing with a dry cloth.
- Place dry paper towels under each joint—one beneath the sink drain, one directly under the middle mounting collar, and one on the cabinet floor under the unit.
- Fill the sink basin with an inch of standing water with the disposal turned off. Check the paper towels for top-flange drips.
- If no water appears, turn on the disposal while running cold water to test for leaks that only occur during active grinding and vibration.
Diagnosing Top Flange vs. Middle Mount Leaks
A top sink flange leak happens right where the metal drain collar sits against your sink basin. Water leaking here will trickle down the exterior top of the disposal body. This is typically caused by degraded plumber’s putty, a worn rubber flange seal, or mounting bolts that have vibrated loose over time.
A middle mount leak occurs a few inches lower, right at the mounting ring connecting the disposer to the sink assembly. If you notice water leaking around this collar—especially while running water or during heavy grinding—the culprit is usually a cracked rubber mounting gasket or a deteriorated splash guard baffle.
When Leak Repair Is Impossible: Bottom Motor Seal Failures
If you notice water dripping directly from the center bottom of the shell, the internal reset button, or the motor housing seams, perform a quick reality check. This indicates that the internal shaft seal has failed, allowing water to pass through the motor cavity.
Internal motor seals sit inside a sealed housing with factory-installed bearings and cannot be replaced with basic home tools. Attempting to caulk or epoxy the bottom shell will not fix the underlying issue and can lead to electrical shorts or total motor failure. To learn more about why bottom leaks mean it is time for a new unit, read this detailed breakdown on How to Fix a Garbage Disposal Leaking From the Bottom. When an internal seal fails, replacing the full unit is the safest and most reliable solution.
Essential Tools for Garbage Disposal Seal Replacement
Completing a garbage disposal seal replacement is a straightforward DIY project that requires only a few basic household tools and supplies:
- Hex wrench (or garbage disposal jam wrench / Allen key)
- Channel-lock pliers or adjustable wrench
- Flathead and Phillips screwdrivers
- Plastic putty knife (to avoid scratching sink surfaces)
- Small bucket and old towels
- Model-matched replacement gasket or splash guard
- Plumber’s putty or 100% silicone sealant (depending on sink material)
| Seal Material | Typical Lifespan | Best Use Case | Key Advantage |
|---|---|---|---|
| Plumber’s Putty | 3 – 5 Years | Standard stainless steel sinks | Stays pliable, easy to clean and remove later |
| Rubber Gasket | 3 – 5 Years | Putty-free flange installations | Quick installation, mess-free application |
| Fiber Gasket | 3 – 5 Years | Lower mounting ring cushion | Provides firm seal between ring and flange |
| 100% Silicone | 5 – 7 Years | Natural stone, granite composite, quartz | Won’t leach oils or stain porous sink materials |
Step-by-Step How-To Guide for Seal Replacement
Once you have gathered your tools and replacement parts, follow these step-by-step instructions to replace your garbage disposal seals.
Sink Flange Garbage Disposal Seal Replacement
If water is leaking around the sink drain opening, resealing the sink flange is necessary:
- Disconnect Electrical Power: Turn off power to the disposal at your main circuit breaker panel. Unplug the unit from the wall outlet beneath the sink. If your unit is hardwired, verify power is off using a non-contact voltage tester before touching any wires.
- Disconnect Plumbing Lines: Place a bucket beneath the unit. Use pliers to loosen the hose clamp on the dishwasher inlet hose (if attached) and remove the hose. Unbolt the side discharge tube pipe flange connecting the disposal to the P-trap.
- Drop the Disposal Unit: Support the weight of the disposal from underneath with one hand or a small jack. Insert a screwdriver or hex wrench into the lower mounting ring ear and twist counter-clockwise to unlock the unit from the sink assembly. Carefully lower the disposal and set it aside.
- Remove the Old Sink Flange: Snap off the lower metal ring, snap ring, and support ring under the sink. Push the sink flange up through the sink hole from below.
- Clean the Surfaces: Use a plastic putty knife to scrape away all old plumber’s putty, silicone, or degraded rubber pieces from both the top and underside of the sink drain hole. Thoroughly clean and dry the surface.
- Apply Fresh Sealant: Roll a generous rope of plumber’s putty about 1/8 to 1/4 inch thick. Wrap it evenly around the underside lip of the new or cleaned sink flange. (For granite or stone sinks, use 100% silicone caulk instead).
- Seat and Secure the Flange: Press the flange firmly down into the sink drain opening. From under the sink, slide on the fiber gasket, backup ring, and metal mounting ring, then snap the spring ring back into its groove. Tighten the three mounting bolts evenly in a crisscross pattern until the flange is snug against the sink.
- Wipe Away Excess: Clean off any putty or silicone that squeezes out around the top of the drain. For a complete visual walkthrough on servicing these upper components, review this guide on How to check and replace your garbage disposal seal to prevent leaks.
Mounting Gasket and Splash Guard Replacement
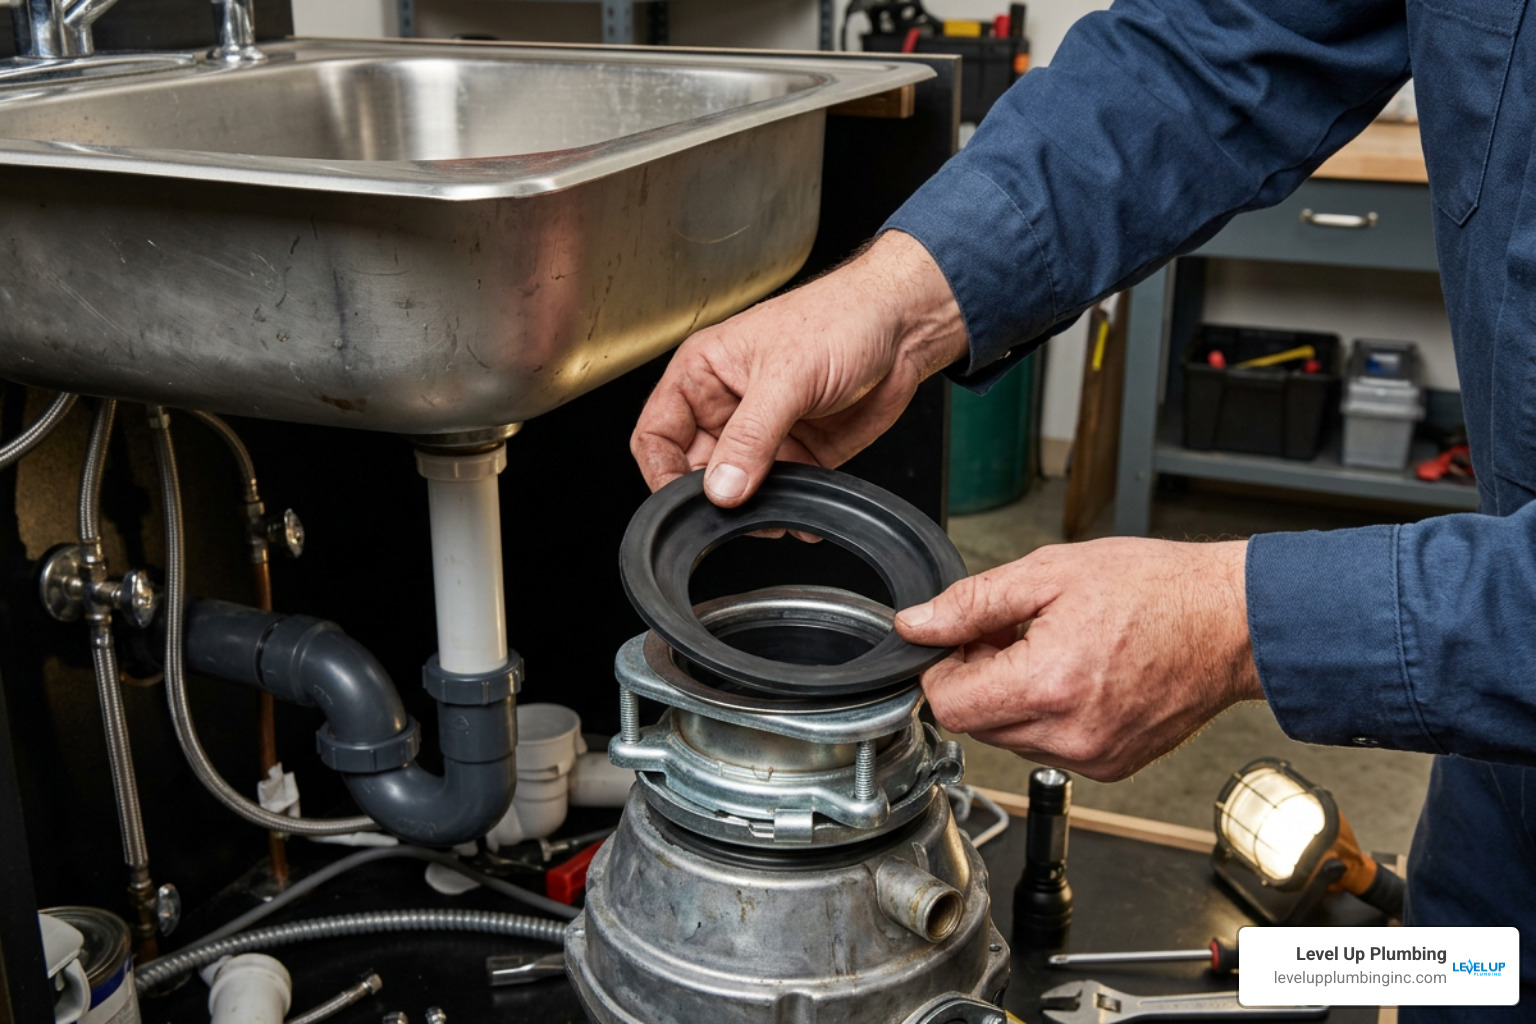
Replacing the middle mounting gasket or removable top rubber splash guard takes only a few minutes once the unit is unlatched:
- Remove the Old Mounting Gasket: Peel the old rubber mounting gasket or splash guard off the top lip of the disposal housing.
- Inspect and Clean the Lip: Wipe away food debris, sludge, or hard water mineral buildup around the top collar of the disposal using a damp rag and dish soap.
- Install the New Gasket: Push the fresh, model-compatible rubber gasket securely over the upper rim of the unit. Ensure the rubber lip sits flush all the way around the neck.
- Remount the Disposal: Align the disposal under the mounting assembly. Lift the unit, engage the mounting ears into the mounting ring sloped ramps, and rotate the locking ring clockwise using your hex wrench until it securely locks into place. For detailed step-by-step guidance on selecting gasket options, consult this Garbage Disposal Gasket: Replace and Seal Guide.
- Reconnect Plumbing: Reattach the side discharge tube using a fresh rubber discharge gasket, tightening the screws evenly. Reconnect the dishwasher hose and clamp.
- Test for Leaks: Turn on the water supply, fill the sink basin, and release the water while inspecting all connection points below with a dry paper towel. Once satisfied, plug the disposal back in and turn on the circuit breaker.
Critical Mistakes to Avoid During Installation
Avoid these common mistakes when performing a garbage disposal seal replacement:
- Caulking Bottom Shell Leaks: Applying silicone or sealant to the exterior shell of a bottom-leaking unit does not solve the underlying issue. Water trapped inside the motor housing will ruin internal components and create an electrical hazard.
- Forgetting the Dishwasher Knockout Plug: If you end up installing a brand-new disposal unit during your repair, remember to knock out the plastic inlet plug inside the dishwasher nipple using a screwdriver and hammer before hooking up the drain hose. Leaving this plug intact will cause your dishwasher to back up and overflow.
- Using Plumber’s Putty on Natural Stone Sinks: Standard plumber’s putty contains petroleum oils that can permanently stain granite composite, marble, or solid-surface sinks. Always use 100% silicone sealant for porous or stone composite sinks.
- Uneven Mounting Screw Tightening: Tightening mounting assembly bolts unevenly causes the sink flange to sit crooked, creating gap paths where water can leak under standing sink pressure. Always tighten bolts evenly in a star or crisscross pattern.
Frequently Asked Questions
How often should garbage disposal seals be replaced?
Standard rubber gaskets and plumber’s putty seals under a kitchen sink typically last between 3 and 5 years before hardening, cracking, or losing their sealing ability. Synthetic materials like neoprene or silicone seals can last 7 to 10 years. Because an average garbage disposal unit has an operational lifespan of 10 to 15 years, expect to replace the external rubber gaskets at least once or twice during the appliance’s lifetime.
Can I use plumber’s putty instead of a rubber gasket for the sink flange?
Yes, traditional plumber’s putty is the standard choice for sealing metal sink flanges on stainless steel sinks. It creates a flexible, long-lasting watertight seal and remains easy to remove during future maintenance. However, if your disposal manufacturer explicitly includes a pre-molded rubber putty-free sink seal, or if you have a granite or natural stone sink, use the provided rubber gasket or 100% silicone instead of putty to prevent material staining and maintain warranty coverage.
Troubleshooting Issues After Garbage Disposal Seal Replacement
If you still notice small drips under the sink after replacing your garbage disposal seal:
- Check Ring Alignment: Verify that the three-bolt mounting ring is completely level and that the snap ring is fully seated in its groove.
- Inspect for Over-Tightened Screws: Over-tightening mounting screws can warp plastic backup rings or crush fiber gaskets, leading to slow drips.
- Check Vibration Separation: Ensure the discharge tube plumbing connections are not under excessive tension, which can pull the side rubber gasket out of alignment during disposal operation.
Conclusion
Replacing a leaking garbage disposal seal is an achievable DIY task that can save you substantial time and money while protecting your kitchen cabinetry from moisture damage. Addressing a minor top or side leak early prevents water damage from worsening and extending into surrounding floor structures.
If you encounter persistent leaks, corroded mounting hardware, or an internal motor seal failure, our team at Level Up Plumbing is here to assist. With over 21 years of local expertise serving Orange County homeowners in Huntington Beach, Cypress, Garden Grove, and surrounding areas, we deliver prompt, dependable plumbing solutions tailored to your home. Contact us today to learn more about our comprehensive Orange County leak repair services.