
Stop a Dripping Gutter Joint Before It Causes Bigger Damage
A dripping gutter joint is usually fixable with a careful cleaning, the right gutter-rated sealant, and a dry afternoon. First, make sure the water is truly escaping at the seam – not overflowing from a clog, running back from a poor slope, or leaking from an end cap or downspout outlet.
- Check the joint during rain or run a hose through the gutter on a dry day.
- Look for water dripping from the inside seam, dark streaks on the gutter exterior, or wet fascia directly behind the joint.
- Address the drip promptly. Repeated runoff can damage siding, soften fascia boards, and send excess water toward the foundation.
Most gutter-joint leaks happen when old sealant cracks, debris holds water at the seam, or a loose hanger lets the gutter shift. The good news: a sound gutter section with one failed seam often needs a targeted repair, not a full replacement.
I am Tiffany Miley, owner and president of Level Up Plumbing, with more than 21 years in Southern California trades and home-service work. While a dripping gutter joint may look minor, I have seen how overlooked water problems can turn into costly damage – so the next steps focus on finding the true cause before sealing anything.
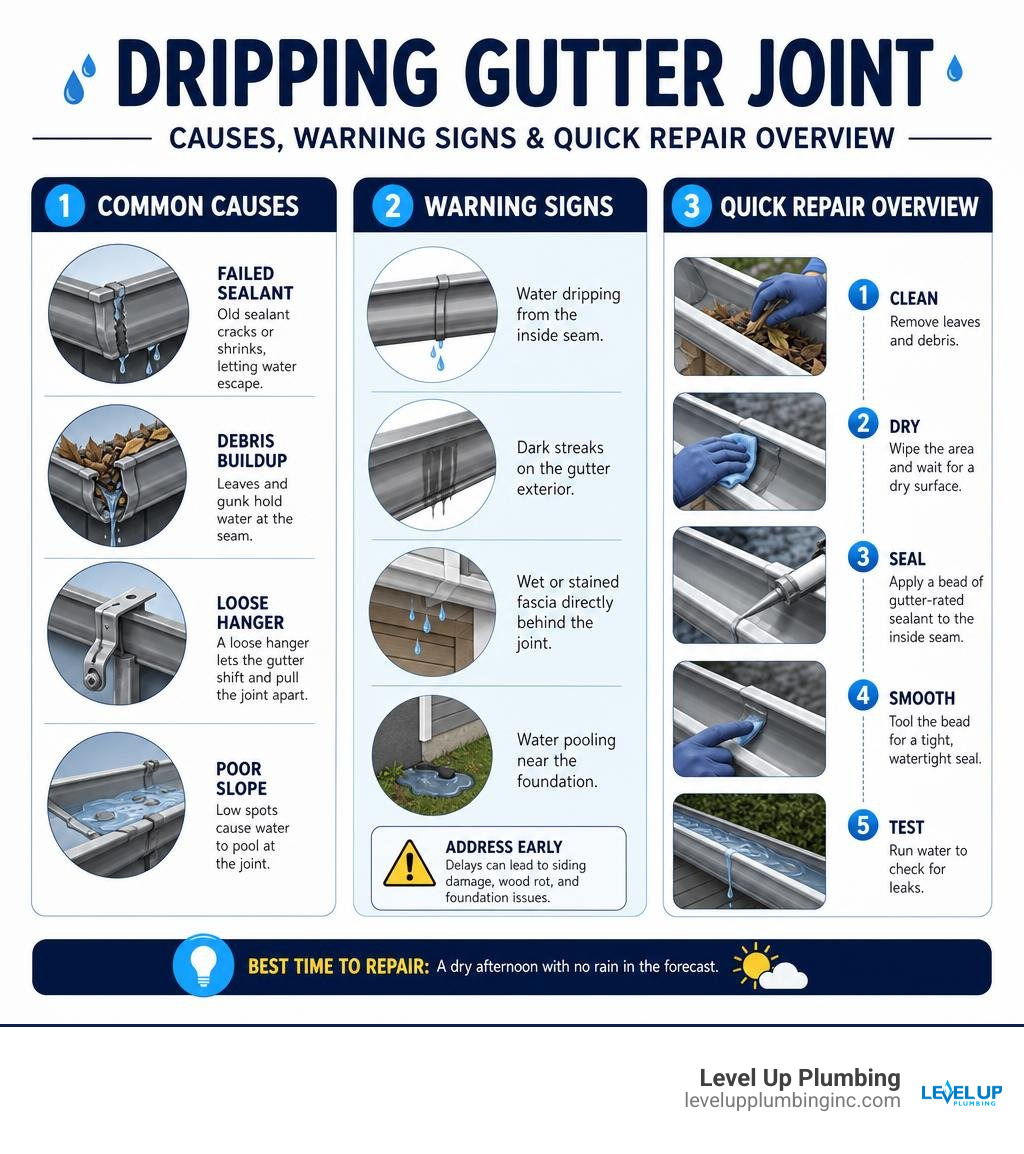
Simple guide to dripping gutter joint terms:
Understanding Gutter Joint Failures and Hidden Costs
When a dripping gutter joint first develops, it usually looks like nothing more than an annoying pitter-patter during a light rain shower. However, as experienced professionals serving communities from Huntington Beach to Garden Grove and Cypress, we know that unchecked roof runoff rarely stays a small problem. Water always finds the path of least resistance, and when your gutter seams fail, that path leads right into the structural components of your home.
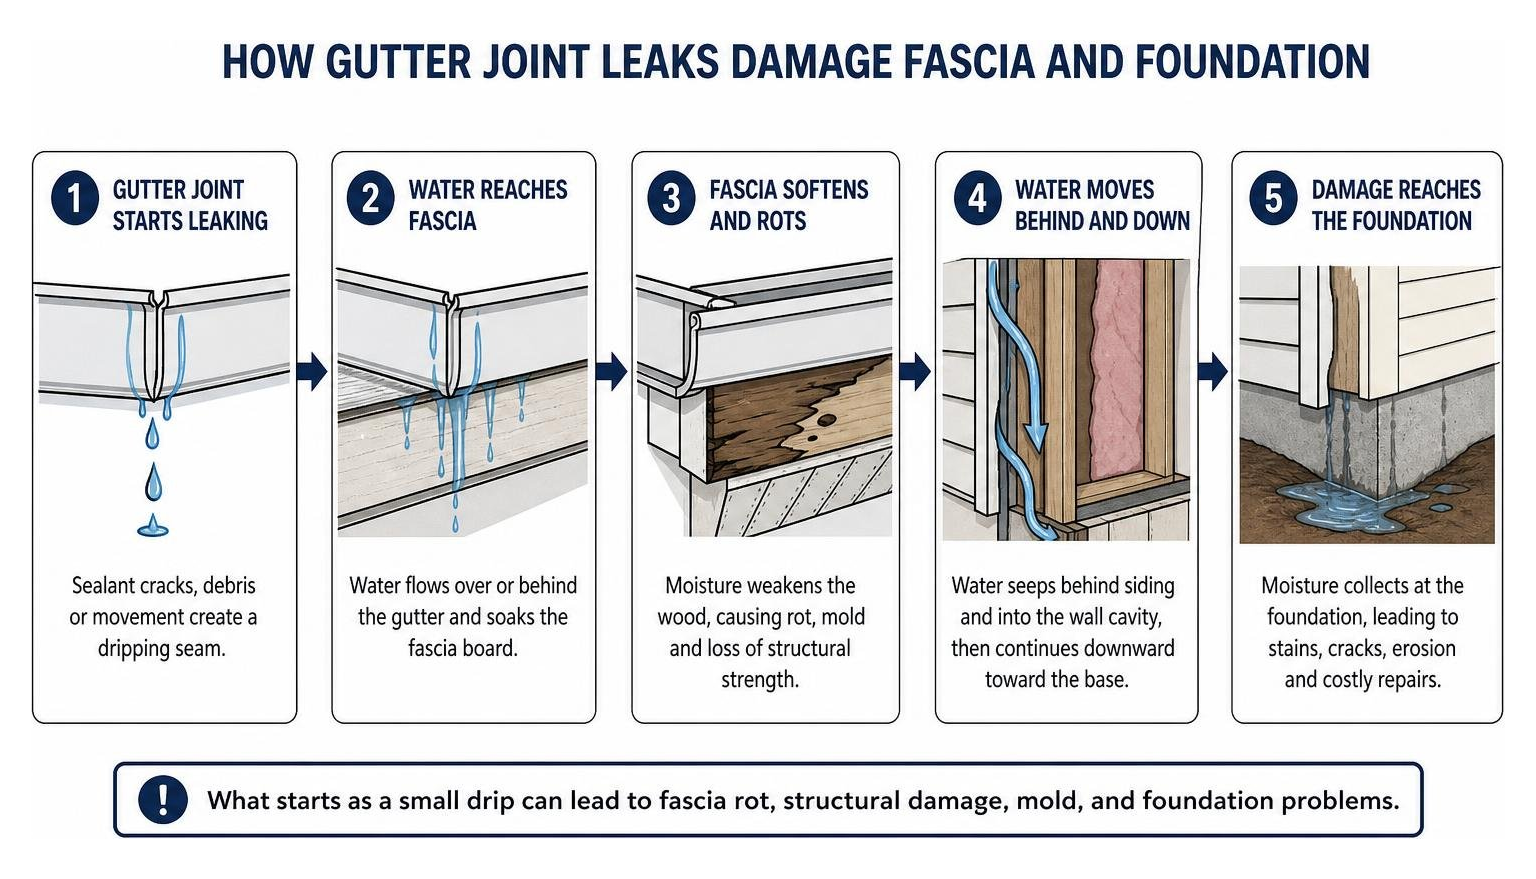
Sectional aluminum gutters expand and contract constantly with changes in temperature. This phenomenon, known as thermal cycling, puts intense pressure on the adhesive seals connecting individual 10-foot or 12-foot trough sections. Direct summer sunlight can heat aluminum metal channels to extreme temperatures during the day, only for them to cool down rapidly after sunset. Over time, this mechanical flexing stretches and tears aging elastomeric caulk. When you combine this physical movement with UV degradation and standing water, the seam seal eventually dries out, cracks, and detaches from the oxidized metal.
If you let a gutter seam continue dripping, the financial and structural consequences compound rapidly:
- Fascia Board Rot: The fascia board is the horizontal wooden surface directly mounted behind your gutters. When water leaks from a rear seam corner or overflows past the back edge, the wood absorbs moisture continuously. Over a few seasons, dry rot takes hold, weakening the wooden structure until it can no longer support the weight of the gutter brackets.
- Siding Damage and Wood Decay: Water escaping from a joint trickles down the face of exterior stucco, vinyl, or wood siding. This leaves unsightly dark mineral streaks, strips away paint, and causes underlying wall framing to decay.
- Erosion and Foundation Settling: Gutters are engineered specifically to collect roof runoff and channel it away from your home’s foundation. A leaking mid-run seam allows concentrated water streams to drop directly near the slab or basement wall. Over time, this constant dripping saturates the surrounding soil, creating hydrostatic pressure that can trigger foundation cracks, interior slab moisture, or basement leaks.
Taking care of moisture issues promptly is the key to protecting your home’s integrity. For step-by-step guidance on handling emergency water leaks throughout your property, check out our guide on how to fix a leak quickly and safely at the same time.
Primary Causes of a Dripping Gutter Joint
Understanding why your gutter joint failed in the first place ensures that your repair addresses the root problem rather than just putting a temporary band-aid on a broken system. Here are the primary culprits behind a dripping gutter joint:
- Thermal Cycling and Expansion: Metal channels expand in heat and contract in cold. Because aluminum and steel sections move back and forth continuously, rigid sealants eventually lose their elasticity and pull away from the metal wall.
- UV Degradation and Sealant Aging: Standard caulks and low-grade adhesives harden under relentless ultraviolet light exposure. Over a span of several years, sun exposure turns flexible sealant into a brittle, crumbly material that snaps under the slightest pressure.
- Trapped Sludge and Debris: When leaves, twigs, and pine needles accumulate near a seam, they trap wet organic sludge directly over the joint. This standing pool exerts continuous hydrostatic pressure on the rubberized seal while creating a damp environment that accelerates metal oxidation.
- Improper Gutter Slope (Pitch): Gutters must feature a consistent downhill pitch toward the downspouts—specifically dropping about a quarter-inch for every 10 feet of horizontal run. If loose hangers cause a section to sag, water pools at the joint rather than draining away.
- Galvanic Corrosion: When dissimilar metals come into contact (such as steel screws used in aluminum gutters, or copper flashing touching standard gutters), a chemical reaction known as galvanic corrosion occurs that weakens the surrounding metal, creating microscopic pinholes along the seam.
How to Inspect and Locate a Dripping Gutter Joint
Before grabbing your ladder and caulk gun, you need to pinpoint the exact source of the leak. Water can travel several feet along the underside of a metal trough before finally dropping off, making a ground-level drip misleading.
To accurately locate a leaking joint:
- Perform a Ground-Level Inspection: Walk around your property after a rainstorm or while running a garden hose into the gutter channel. Look for water droplets forming along seam rivets, dark rust stains running down the outer fascia, or green algae growth on the wall directly beneath a connection point.
- Conduct a Dry-Weather Hose Test: Do not wait for the next storm to inspect your roof drainage. On a clear day, set up a garden hose at the highest point of your gutter run. Turn on a steady stream of water and watch the underside of the seams carefully to trace the exact entry point of the leak.
- Inspect Downspout Outlets and Corners: Verify that the leak is truly originating from a joint seam rather than a clogged drop outlet or an overflowing corner miter. If downspout elbows are packed with debris, water will back up into the entire trough run and force its way through the nearest weak seam.
How to Repair a Dripping Gutter Joint Step-by-Step
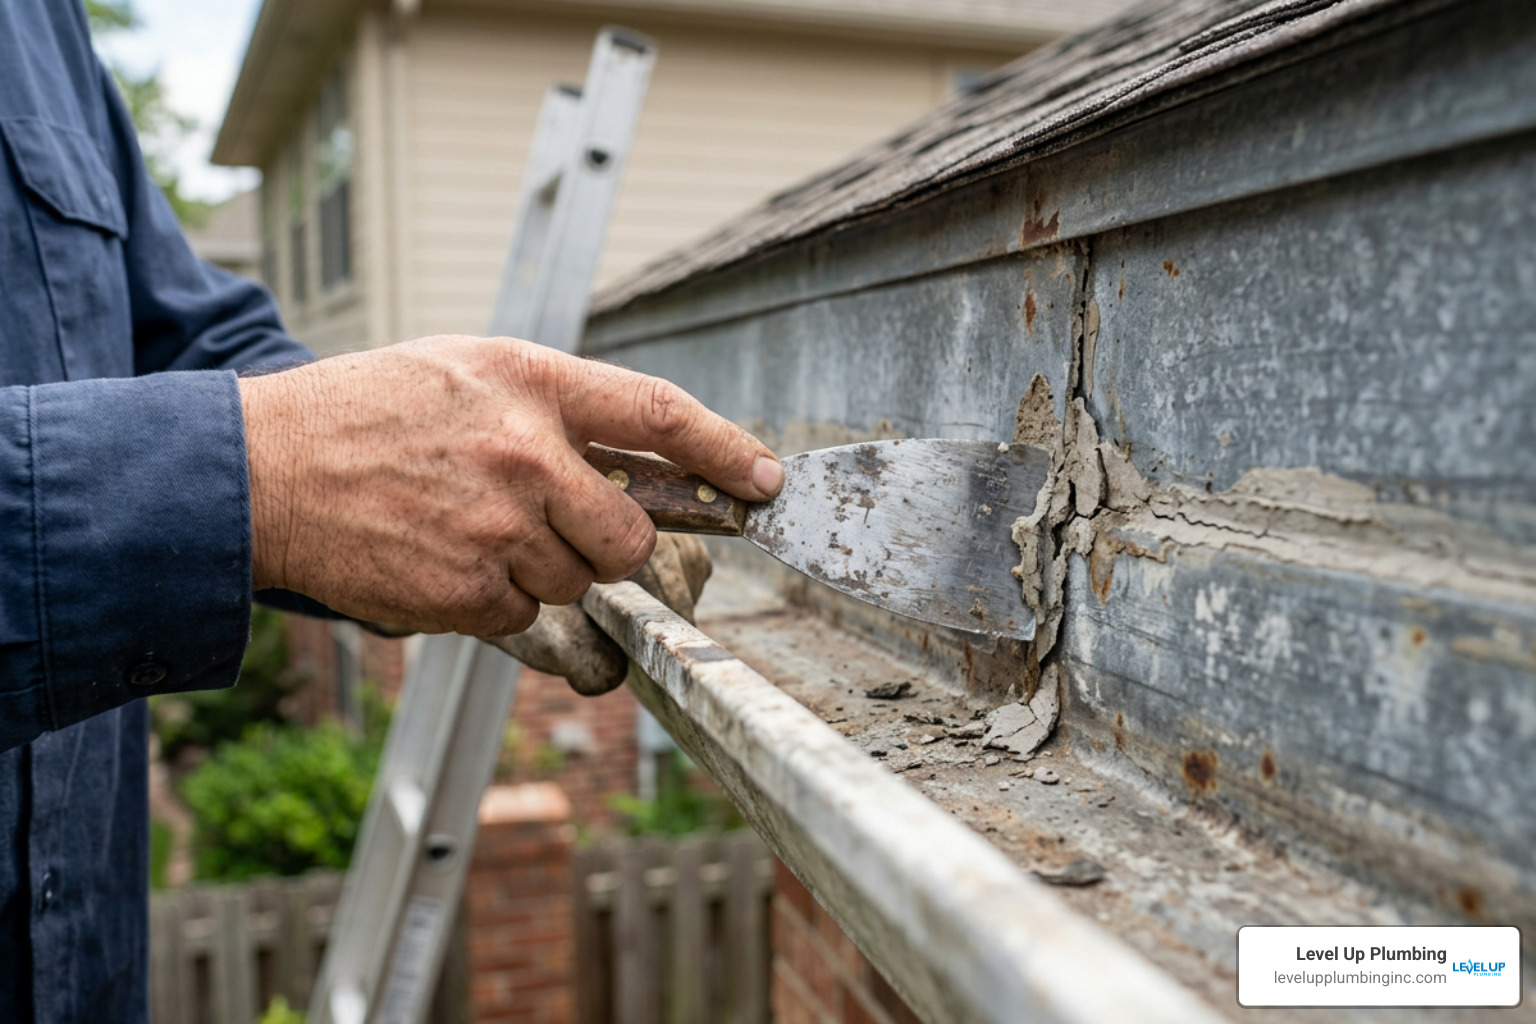
Fixing a dripping gutter joint is a manageable DIY project that can be completed in an afternoon with basic hand tools. To achieve a watertight seal that holds up against weather exposure, follow this step-by-step repair process.
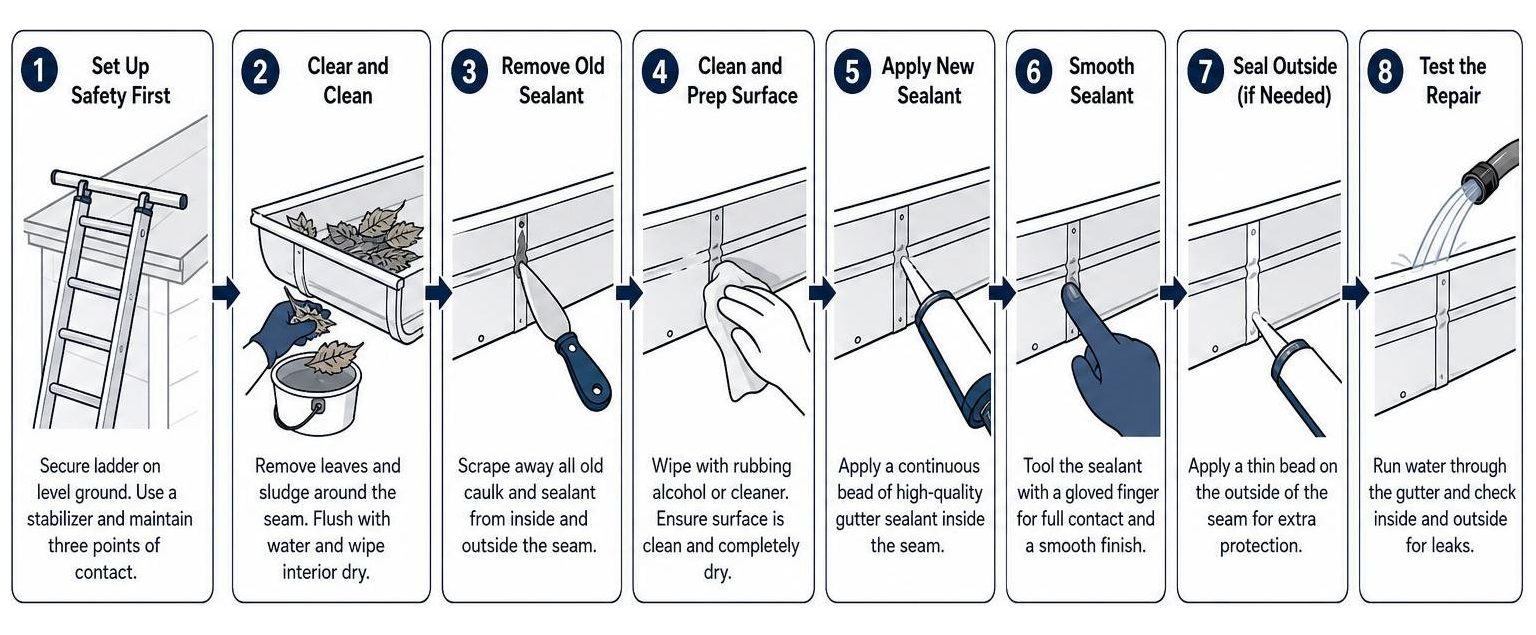
Step 1: Set Up Ladder Safety First
Place your extension ladder on firm, level ground. Use a ladder standoff or stabilizer bracket to avoid crushing the outer lip of your metal gutters. Always maintain three points of contact while climbing, and never lean over the side rails to reach a distant seam.
Step 2: Clear and Clean the Seam Area
Scoop out all wet leaves, pine needles, and accumulated sludge at least two feet on either side of the leaking joint. Flush the channel with clean water from a hose to clear away residual silt, then wipe the interior dry with clean rags.
Step 3: Remove All Old, Failed Sealant
This is the single most important step in the entire process. New sealant will never bond to old, failed caulk. Use a stiff putty knife or plastic scraper to slice away dried sealant, and scrub oxidized aluminum particles off the surface using a wire brush or coarse abrasive pad.
Step 4: Degrease and Prep the Metal Surface
Moisten a clean rag with isopropyl alcohol or mineral spirits and thoroughly wipe down the interior metal seam. This removes oils, microscopic dirt, and water spots, creating a clean surface that maximizes sealant adhesion. Allow the alcohol to evaporate completely.
Step 5: Mechanically Secure Separated Sections (If Needed)
If the overlapping metal sections have physically pulled apart or loose rivets are missing, the joint will continue to flex and crack any fresh sealant. Drive two or three short, stainless steel self-tapping sheet metal screws through the pre-existing holes or overlapping walls to pull the metal plates tight together.
Step 6: Apply High-Grade Butyl Rubber Sealant
Working strictly on the interior channel of the gutter, squeeze a continuous, generous bead of professional-grade butyl rubber gutter sealant directly over the seam line and around any newly installed screw heads. Make sure the sealant extends up the front and rear vertical walls of the gutter trough.
Step 7: Tool the Sealant Smooth
Dip a gloved finger or caulking tool into soapy water and firmly press the sealant bead into the joint gap. Tool the surface into a smooth, concave profile. This forces the adhesive deep into microscopic crevices and prevents sharp edges that could trap future floating debris.
Step 8: Allow Full Curing Before Water Exposure
Let the new butyl rubber sealant cure undisturbed for 24 to 48 hours before testing or exposing it to rain. Once cured, run a garden hose through the channel to verify that your repair is completely watertight.
Best Tools and Sealants for Long-Lasting Gutter Repairs
Using the right materials determines whether your joint fix lasts for many years or fails during the next heavy rainfall. Many homeowners default to standard household silicone caulk or thick roofing tar, but these products are rarely suited for metal joint repair.
| Sealant Type | Expected Lifespan | Temperature Flexibility | Metal Adhesion | Primary Recommended Use |
|---|---|---|---|---|
| Butyl Rubber Sealant | 5 – 10 Years | -40°C to +80°C (Excellent) | Superior | Metal-to-metal gutter joints, end caps, and lap seams |
| Silicone Caulk | 1 – 3 Years | Moderate | Poor on Oxidized Metal | Temporary household sealing (Not recommended for metal gutters) |
| Plastic Roofing Cement | 2 – 5 Years | Poor in Heat | Fair | Heavy patching over large rusted holes or emergency flashings |
Why Butyl Rubber Sealant Is the Top Choice
Butyl rubber gutter sealant is the industry standard for sectional aluminum and galvanized steel gutters. Unlike standard household caulking, high-grade butyl formulas remain elastomeric across extreme temperatures ranging from -40°C up to +80°C. This allows the sealant to stretch and compress along with the expanding metal without shearing or pulling away from the aluminum surface. Furthermore, butyl rubber adheres exceptionally well to oxidized outdoor metal without requiring chemical primers.
Why Silicone and Exterior Sprays Fail
While standard silicone caulk works wonders around indoor bathroom fixtures, it performs poorly on exterior metal gutters. Outdoor silicone struggles to maintain long-term adhesion to bare or oxidized aluminum exposed to direct sunlight and UV radiation. Within one or two seasons, temperature swings cause silicone beads to peel off in continuous rubbery strips. Similarly, rubberized aerosol spray coatings only deposit a thin surface film on the outside of the gutter, failing to penetrate deep inside the overlapping joint where water actually collects.
The Golden Rule: Always Seal from the Interior
Never attempt to fix a leaking seam by slathering sealant exclusively on the outside or underside of the gutter. Water flows along the inside channel of your drainage system; if you seal only the exterior, runoff still enters the seam, pooling between the metal layers and rotting the fascia board from behind.
For other pipe and joint repair techniques around your property, explore our article on how to fix a leaking drain pipe joint fast.
Gutter Joint Repair vs. Full Replacement: When to Call a Pro
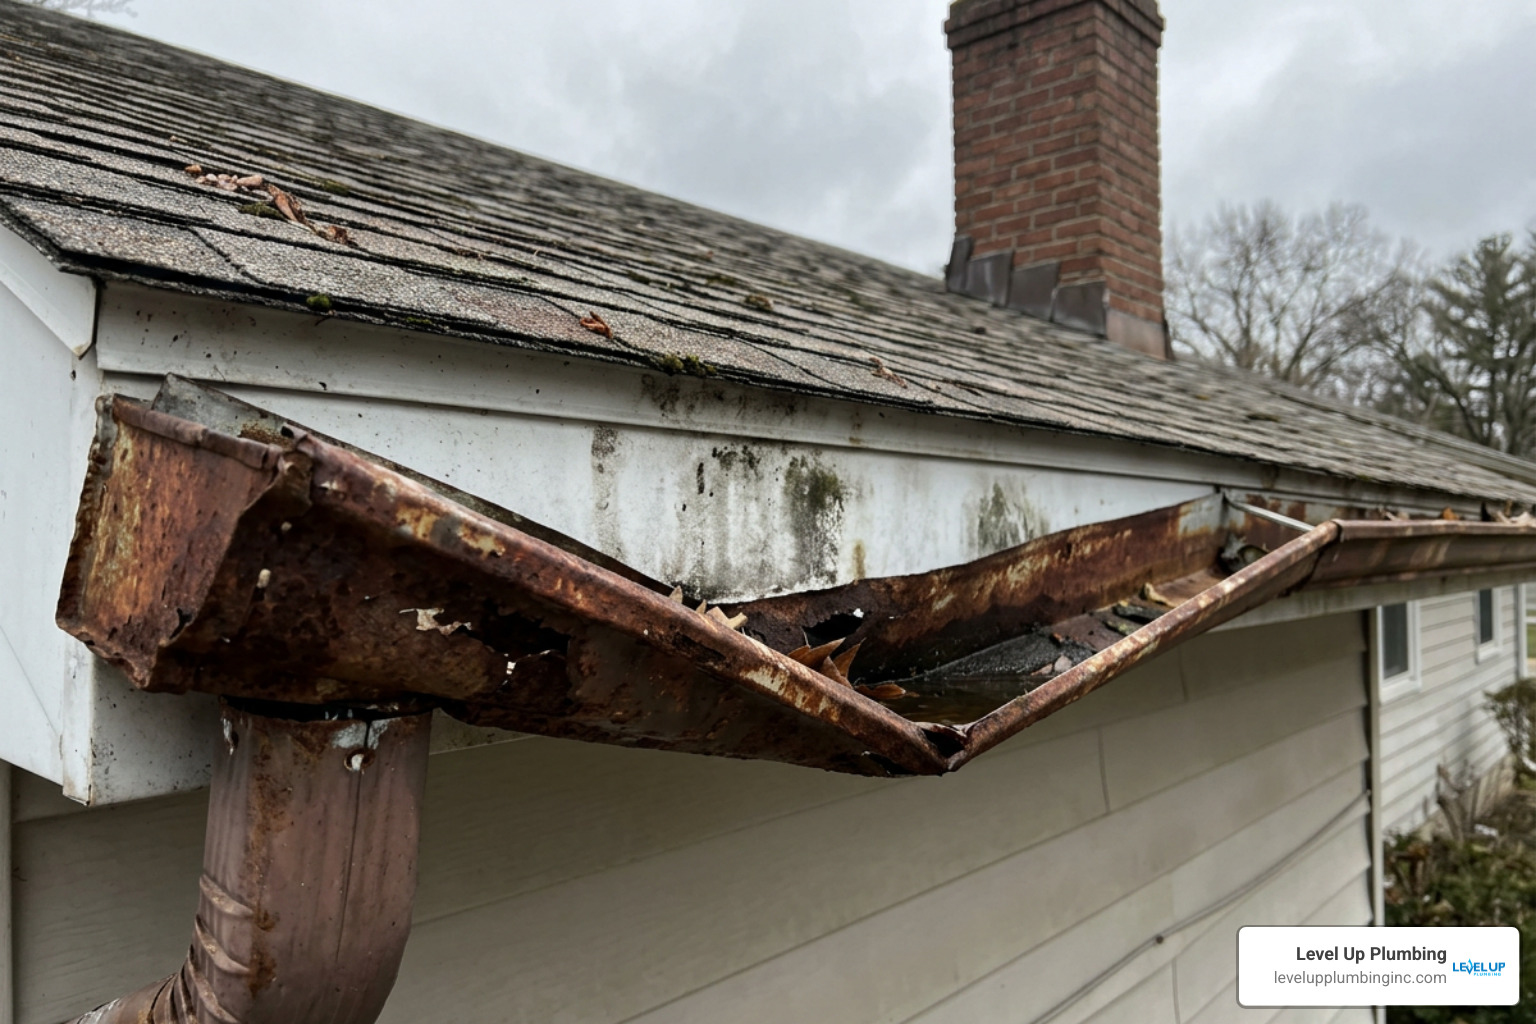
While sealing a single dripping gutter joint is an easy weekend DIY task, there comes a point where repeatedly patching an aging system yields diminishing returns. Knowing when to repair versus when to upgrade saves you significant time, money, and frustration.
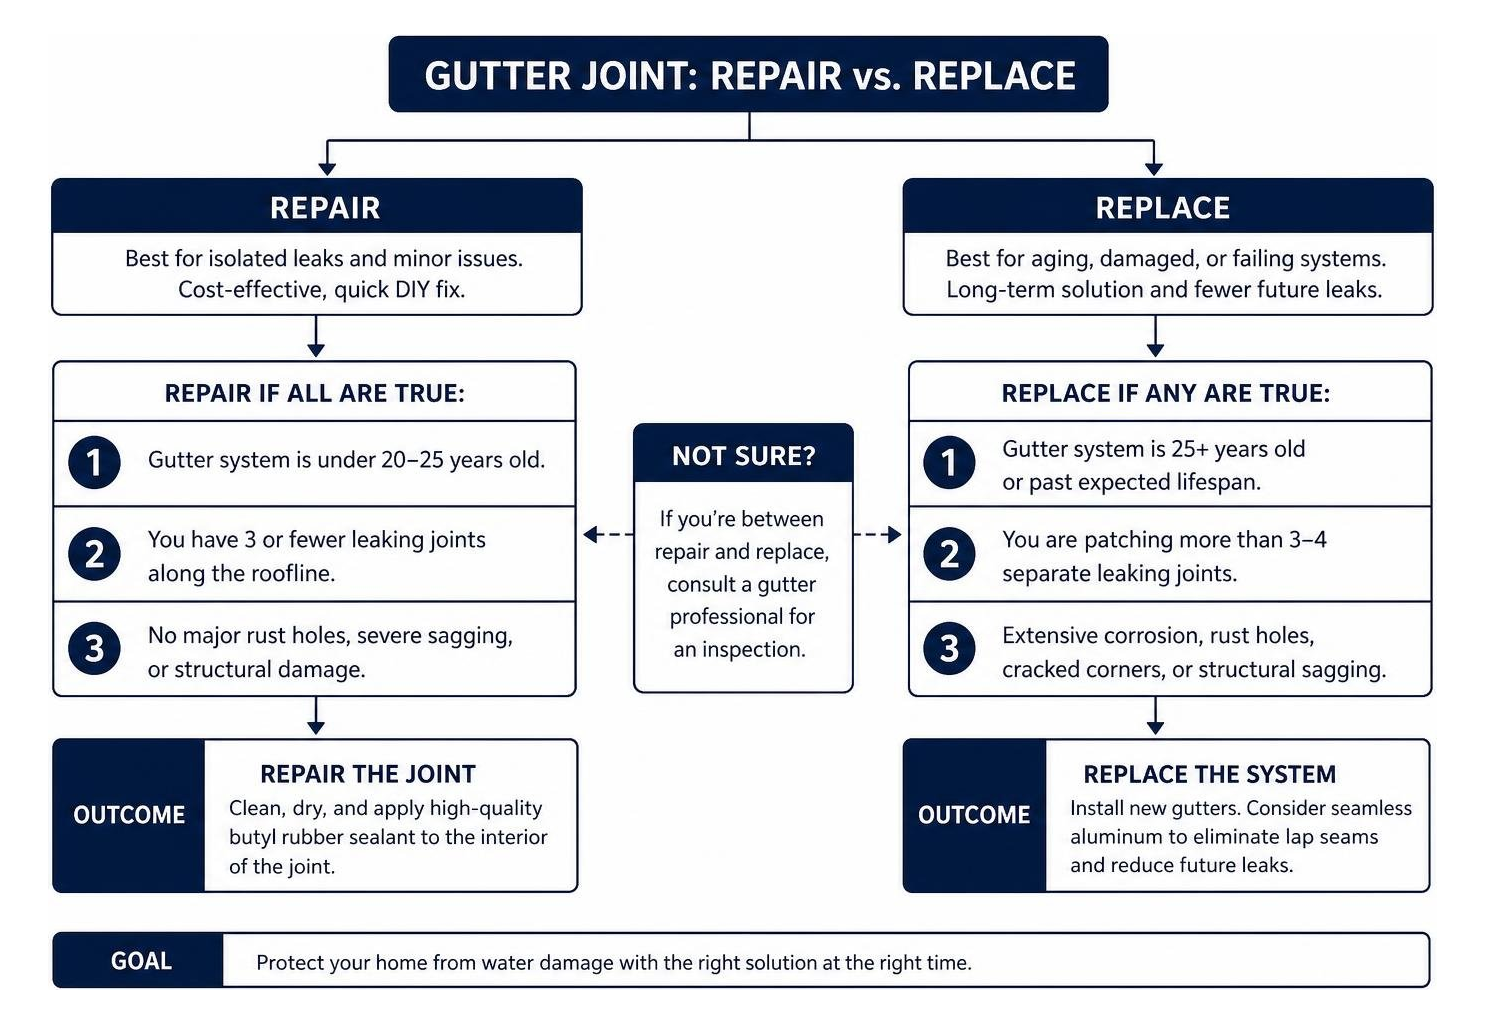
Consider a full system replacement under the following conditions:
- System Lifespan Exceeded: Standard sectional aluminum gutters last approximately 20 to 30 years, whereas most factory and applied sealants last between 10 and 20 years. If your gutters are past 25 years old, the metal itself may have become porous or oxidized to a degree that prevents new sealants from bonding.
- The “3 to 4 Joint” Rule: If you find yourself patching more than three or four separate leaking seams along a single roofline, the entire sectional system is likely structurally compromised. Upgrading to custom-fit seamless aluminum gutters eliminates sectional lap seams entirely along straight runs, drastically reducing potential leak points.
- Extensive Corrosion or Sagging: If inspection reveals widespread rust holes, cracked corner miters, or structural sagging that cannot be corrected by tightening support brackets, local replacement is necessary.
- Safety Hazards: Working on tall two-story rooflines, steep pitches, or tricky multi-level home designs presents serious ladder safety hazards. If accessing your leaking joint requires unsafe reaching or awkward extension ladder setups, it is always best to leave the work to experienced professionals.
Frequently Asked Questions
How long does a repaired gutter joint typically last?
A properly executed gutter joint repair using high-quality butyl rubber sealant typically lasts between 5 and 10 years. In regions with mild weather, high-grade sealant applications can easily reach up to 10 years of service. However, harsh climate conditions, severe UV exposure, and freezing winter cycles can shorten sealant lifespan down to 3 to 7 years. You can maximize longevity by thoroughly removing old sealant, scrubbing the metal surface clean with alcohol, and conducting bi-annual gutter clearings.
Can I fix a leaking gutter joint by applying caulk on the outside?
No, applying caulk or rubberized spray strictly to the outside of a leaking gutter joint will not create a lasting seal. Because water flows along the interior trough of the gutter, exterior-only caulking fails to prevent runoff from penetrating the seam interface. Water will remain trapped between the overlapping metal layers, accelerating corrosion, rusting mechanical fasteners, and quietly leaking onto the fascia board behind the trough. Always clean and apply sealant to the inside channel of the gutter joint.
How do I prevent gutter joints from leaking in the future?
Preventing future gutter leaks requires simple, routine maintenance:
- Clean Gutters Bi-Annually: Clear out accumulated leaves, moss, and sediment at least twice a year—once in spring and once in late fall.
- Verify Correct Pitch: Ensure your gutters maintain a continuous downward drop toward downspouts (roughly 1/4 inch of fall for every 10 feet of horizontal guttering) so water never pools over seams.
- Inspect and Tighten Support Hangers: Loose or bent gutter hangers cause section sagging. Inspect hangers annually and tighten loose fascia screws or replace damaged brackets immediately.
- Install Quality Gutter Guards: Protective mesh or screen covers keep heavy foliage out of the trough, preventing wet sludge from holding water directly against joint seals.
To keep all the drainage and plumbing systems across your property running smoothly, check out our comprehensive drain preventative maintenance tips to keep your plumbing running smoothly.
Conclusion
Fixing a dripping gutter joint promptly is one of the most cost-effective home maintenance tasks you can perform. By spending less than an hour cleaning out old debris, removing failed caulk, and applying a fresh bead of butyl rubber sealant, you protect your siding, fascia boards, and home foundation from thousands of dollars in hidden water damage.
While managing minor gutter seam fixes is well within reach for most DIY enthusiasts, complex water leaks, underground drainage blockages, or structural plumbing issues often demand experienced professional care. At Level Up Plumbing, our team brings over 21 years of local expertise to homeowners across Orange County, CA. Whether you need assistance diagnosing persistent home leaks or require expert service, we are here to ensure your property remains safe, dry, and protected year-round.
If you are dealing with mysterious water leaks or structural moisture issues around your property, explore our comprehensive leak repair services or contact our friendly team today to schedule an inspection!