
Understanding Tap Types and Common Causes of Leaks
Before you grab a wrench and start disassembling your fixture, it helps to understand why kitchen taps leak in the first place and where that unwanted water is coming from. Identifying the exact spot where water escapes gives you a direct clue about which internal component has failed.
Here is how the leak location links directly to the culprit:
- Dripping Spout: If water continuously drips out of the spout while the handles are turned off tight, the internal seal that shuts off water flow has failed. On traditional taps, this means a worn rubber washer. On modern single-lever taps, it means a worn or cracked cartridge.
- Water Around the Handle: If water pools around the handle base when you turn the tap on, the stem seal or internal valve O-ring is damaged, allowing water to climb up the spindle.
- Water Leak at the Spout Base: If water seeps out around the swivel base of the spout where it meets the main tap assembly, the spout O-rings inside the body have worn down.
Understanding these mechanics is key to a smooth repair. As noted in this How to Fix a Leaking Kitchen Tap DIY Guide, pinpointing the precise symptom saves you from replacing parts that are still in perfect working order.
Beyond simple age, standard wear, and friction, hard water mineral buildup plays a major role in fixture failure across Southern California. Mineral deposits pit internal valve seats, preventing rubber washers from pressing flat. High home water pressure can also stress internal gaskets, causing premature seal degradation.
Identifying Compression Valves vs Ceramic Disc Cartridges
To choose the right replacement parts, you need to know which internal mechanism your tap relies on. Kitchen taps generally fall into two broad structural categories: traditional compression valve taps and modern cartridge taps (frequently using ceramic discs).
- Compression Valve Taps: These are traditional fixtures, usually featuring two separate hot and cold handles. They operate on a screw mechanism: turning the handle counterclockwise lowers a rubber washer onto a metal valve seat to stop water. Because they rely on physical pressure and rubber seals, they require a full turn or more to reach maximum water flow.
- Ceramic Disc Cartridge Taps: Modern mixer taps—especially single-handle styles or quarter-turn dual handles—use ceramic disc cartridges. Inside the cartridge, two highly polished ceramic discs slide across one another. Aligning the holes in the discs lets water flow, while sliding them apart seals the water off instantly. They reach full power with just a quarter or half turn of the handle.
Here is a quick side-by-side comparison to help you identify your tap mechanism:
| Tap Characteristic | Compression Valve Tap | Ceramic Disc Cartridge Tap |
|---|---|---|
| Handle Motion | Requires 1 to 2 full turns to turn on fully | Requires 1/4 to 1/2 turn to turn on fully |
| Primary Seal Material | Rubber washer | Twin smooth ceramic discs |
| Common Leak Cause | Degraded washer or pitted valve seat | Cracked or clogged cartridge unit |
| Repair Strategy | Swap inexpensive washer or re-seat valve | Replace entire drop-in cartridge assembly |
| Lifespan | Requires regular washer replacement every few years | Highly durable; lasts many years before wear |
Knowing whether you have a compression valve or a ceramic disc tap dictates your repair strategy. Traditional compression valves use inexpensive, standardized rubber washers, while ceramic disc taps require specific replacement cartridges matched to the tap’s exact make and model.
Step-by-Step Instructions to Fix Leaking Kitchen Tap Problems
Now that you know what kind of fixture you are working on, it is time to get your hands dirty. Preparing your workspace correctly prevents unexpected messes, water damage under the sink, or lost hardware down the drain.
Start by isolating the water. Look under your kitchen sink for the shut-off valves (isolation valves) located on the hot and cold water supply lines. Turn both knobs firmly clockwise until they stop. Once turned off, open your kitchen tap completely to release any remaining water pressure in the lines and drain residual water into the sink basin.
Next, block the sink drain! Cover the drain opening using a rubber sink stopper or lay down a thick shop towel across the basin. There is nothing more frustrating than dropping a small handle screw or retainer clip right down the garbage disposal.
If you want to dive deeper into shut-off safety and home preparation, our comprehensive guide on How to Fix Leak Quickly and Safely at the Same Time breaks down essential emergency precautions for every homeowner.
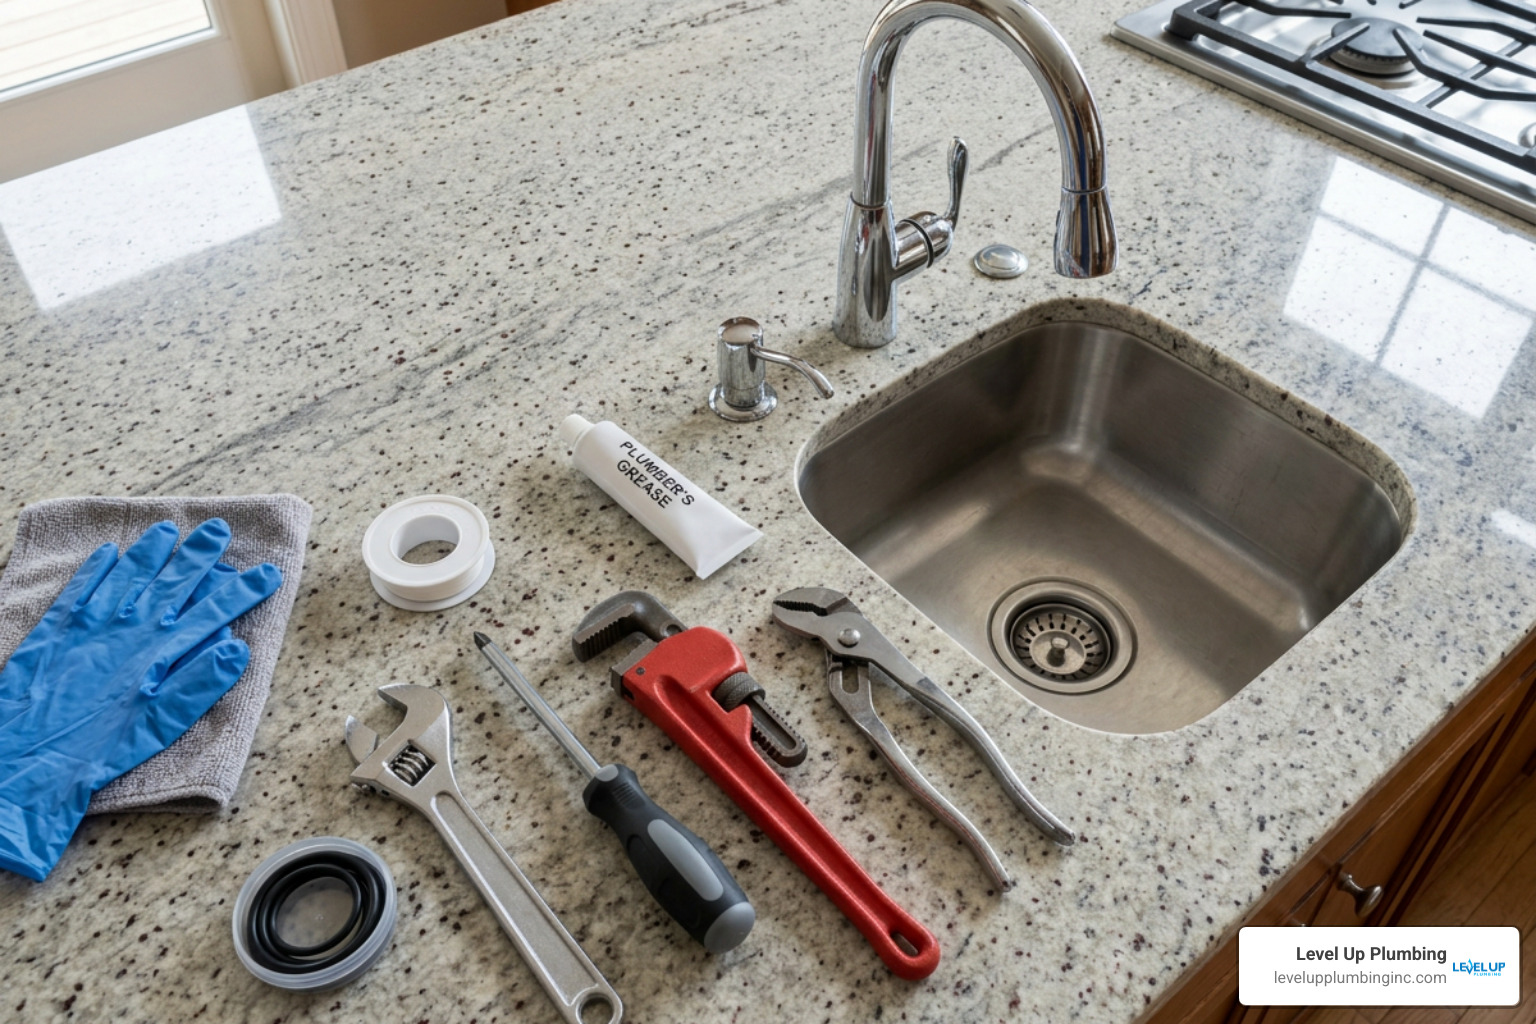
Tools Required to Fix Leaking Kitchen Tap Components
Before taking apart your fixture, gather your tools in advance so you do not have to abandon an open tap mid-project.
Here is your essential tap repair toolkit:
- Adjustable spanner / wrench: For loosening valve bonnet nuts without scratching brass threads.
- Flathead and Phillips screwdrivers: For removing handle caps and retaining screws.
- Allen (hex) key set: Essential for removing hidden grub screws on modern single-lever mixer taps.
- Needle-nose pliers: Helpful for lifting out stubborn jumper valves, washers, or cartridge clips.
- Utility knife or small flathead: Useful for carefully prying off decorative index caps (H/C indicators).
- Plumber’s silicone grease: Food-grade lubricant applied to new O-rings and spindle threads to ensure a smooth seal and prevent premature rubber binding.
- Fine-grit sandpaper or valve seat reamer: For smoothing out pitted metal valve seats in older compression taps.
- Matching replacement parts: Replacement rubber washers, O-ring kit, or brand-specific ceramic cartridge.
Replacing Washers and Cartridges to Fix Leaking Kitchen Tap Issues
Follow these 5 core steps to complete your fix leaking kitchen tap project safely and efficiently:
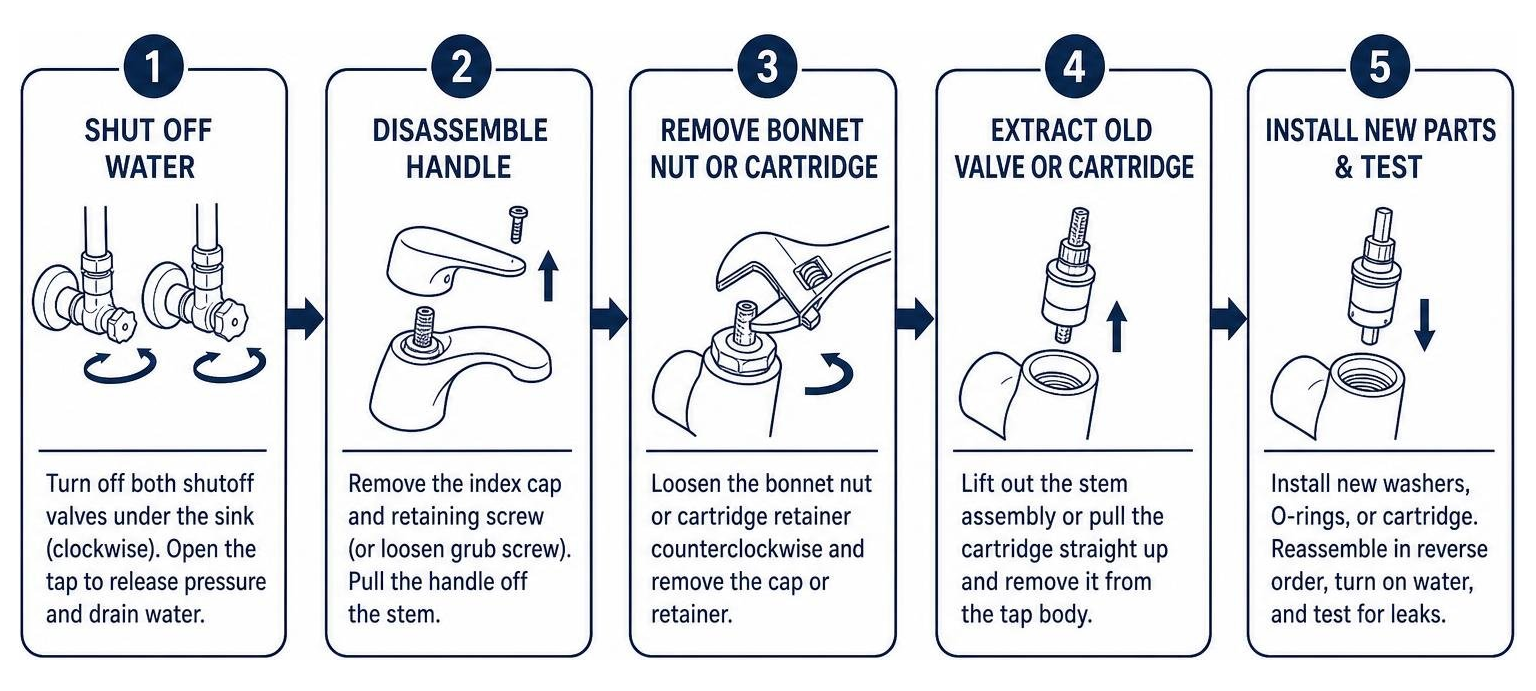
- Disassemble the Handle Assembly: Use a small flathead screwdriver or utility knife to gently pry off the decorative index cap on the tap handle. Unbolt the exposed retaining screw. If your tap features a modern lever handle, look for a small hole on the side or rear housing and loosen the internal grub screw using an Allen key. Pull the handle off the valve stem.
- Remove the Bonnet Nut or Cartridge Retainer: Slide off any decorative metal collar (escutcheon cap) covering the valve body. Use an adjustable wrench to loosen the brass bonnet nut or cartridge retaining nut by turning it counterclockwise. Pro tip: Hold the tap body firmly with your free hand while applying torque to the wrench so you don’t twist the under-sink pipe connections!
- Extract the Old Valve or Cartridge: Lift out the exposed stem assembly or pull the ceramic cartridge straight up out of the tap body. If you have a compression valve tap, you will see a rubber washer attached to the bottom of the stem (jumper valve) with a small brass screw or retaining stem.
- Inspect, Clean, and Swap the Worn Parts:
- For Compression Taps: Unscrew the bottom screw, swap out the hardened or split rubber washer with a fresh matching washer, and re-tighten the retaining screw. Check the rubber O-ring around the middle stem spindle; if cracked, roll a new silicone-greased O-ring into the groove. Check the valve seat inside the tap body. If it feels rough or pitted, smooth it down using fine-grit sandpaper or a valve seat tool.
- For Ceramic Cartridge Taps: Clean out any sand, mineral grit, or rust inside the tap housing. Coat the rubber seals on the base of your new replacement cartridge with a light film of food-grade silicone grease, alignment pins downward, and drop the new unit securely into place.
- For Base Spout Leaks: Pull the swivel spout straight up and off the tap body. Remove the worn rubber O-rings located in the grooves on the center shaft. Roll fresh O-rings coated in silicone grease into the grooves, then slide the spout back into place.
- Reassemble the Tap and Test Water Flow: Carefully thread the bonnet nut back onto the valve housing by hand to avoid cross-threading, then snug it firm with your adjustable spanner (avoid overtightening!). Reattach decorative collars, place the handle back on the spindle, and tighten the handle screw. Close the tap handle completely, then slowly turn your under-sink isolation valves back on. Check closely for any immediate weeping around nuts, then turn on the tap handle to clear air out of the line.
Troubleshooting Persistent Leaks and Tap Maintenance
What if you have carefully replaced the washer or dropped in a brand-new ceramic cartridge, but water continues to drip from the spout or leak around the handle base? Don’t panic. Persistent leaks after a repair usually point to one of a few common issues:
- Damage to the Internal Valve Seat: In compression taps, a fresh rubber washer cannot create a watertight seal against a metal seat that has been pitted or eroded by mineral deposits. If you did not smooth the seat during assembly, water will continue to bypass the new washer.
- Incorrect Cartridge Match: Ceramic cartridges may look almost identical on the outside, but minor differences in height, notch alignment, or bottom seal thickness can prevent full closure. Always ensure you purchase exact brand-and-model replacements.
- Overtightened Components: Cranking down too hard on bonnet nuts or handle screws can crush or distort fresh rubber O-rings and washers, creating new gaps for water to leak through. Hand-tight plus a quarter-turn with a wrench is usually sufficient.
- Excessive Water Pressure: Standard residential plumbing systems operate best between 40 and 60 PSI. If your home’s water pressure regularly surges above 80 PSI, high hydraulic force can push past even brand-new tap seals. Installing a pressure regulator at your main water meter protects every valve and appliance in your house.

Preventing future leaks boils down to simple routine maintenance. In regions with high mineral content, installing a whole-home water softener dramatically reduces scale buildup inside cartridges and valve seats, extending tap life by years. Additionally, avoid forcing tap handles shut with excessive muscle strength; gentle pressure is all a healthy seal needs to stop water flow.
If you have tried replacing parts and your tap still leaks, or if you suspect hidden corrosion within the faucet body itself, reading Faucet Leak Repair: How a Licensed Plumber Can Help You will help you determine the next best step for your home. You can also explore How a Licensed Plumber Can Help You Repair a Faucet for professional insights into fixture longevity.
Frequently Asked Questions
How much water does a leaking tap waste per year?
A tap that leaks at a rate of just one drip per second can waste between 12,000 and 13,000 litres of water every year (over 3,000 gallons). Beyond increasing utility costs, a constant drip causes unnecessary environmental waste and can gradually erode sink finishes or create hidden water damage inside base cabinets if the leak travels down the spout stem.
What size washer or ceramic cartridge do I need?
Standard compression tap washers typically come in common residential sizes such as 1/2-inch or 3/8-inch (or 12mm and 15mm depending on fitting standards). However, ceramic disc cartridges are highly specific to individual tap manufacturers and models. The easiest way to ensure an exact match is to turn off your water, remove the old washer or cartridge, and bring the physical part directly to your local hardware store or plumbing supply showroom to compare dimensions.
When should I hire a professional plumber instead of DIY?
While changing a washer or O-ring is a straightforward DIY task, you should hand the job over to a licensed professional plumber if:
- The tap body, brass threads, or supply lines beneath the sink show signs of severe corrosion or cracking.
- Water is leaking underneath the sink cabinet or soaking into subflooring.
- You cannot turn off the under-sink shut-off valves because they are frozen or seized.
- The leak persists after you have replaced the internal seals and cleaned the valve seat.
- You are uncomfortable taking apart modern high-end fixtures or pull-out spray hose mechanisms.
Conclusion
Taking the time to fix a leaking kitchen tap is one of the most satisfying and cost-effective DIY plumbing projects you can accomplish in an afternoon. By identifying your tap mechanism, shutting off the water supply safely, and replacing worn internal washers, O-rings, or ceramic cartridges, you can stop water waste immediately, save money on utility bills, and protect your kitchen cabinetry from moisture damage.
To recap the primary steps:
- Always turn off water isolation valves and plug the sink drain before disassembling components.
- Match handle symptoms directly to the internal component (spout drips = washers/cartridges; handle leaks = spindle O-rings; base leaks = spout O-rings).
- Use food-grade silicone grease on rubber seals and avoid overtightening brass nuts during reassembly.
- Keep up with regular fixture care, monitor house water pressure, and consider water softening if hard mineral scale is an ongoing challenge in your area.
If you run into stubborn fixture problems, cracked copper lines, or persistent leaks that go beyond simple washer replacement, our team at Level Up Plumbing is always here to help homeowners across Huntington Beach, Cypress, Garden Grove, and throughout Orange County. With over 21 years of trusted local expertise, we handle everything from quick kitchen repairs to comprehensive piping solutions.
If you suspect water damage has migrated behind walls or beneath your kitchen flooring, contact Level Up Plumbing or give us a call to get your home’s plumbing running smoothly again!