
Is Your Toilet Handle Broken? Here’s What to Do
Flush lever replacement is one of the simplest plumbing repairs a homeowner can do — and in most cases, you can finish the job in under 30 minutes with basic tools.
Here’s the quick version of how to replace a toilet flush lever:
- Turn off the water supply and flush the tank empty
- Disconnect the lift chain from the old lever arm
- Unscrew the mounting nut inside the tank (turn clockwise — it’s reverse-threaded)
- Pull out the old lever and insert the new one
- Reattach the chain, turn the water back on, and test the flush
That’s it. Keep reading for the full step-by-step breakdown, plus tips on choosing the right replacement handle for your toilet.
Whether your handle snapped off, feels loose, or you have to jiggle it every time to stop the water from running, a broken flush lever is a common and very fixable problem. It doesn’t mean you need a new toilet. In most cases, a replacement part from your local hardware store solves the issue quickly and affordably.
I’m Tiffany Miley, owner of Level Up Plumbing in Huntington Beach, CA — with over 21 years of experience in Southern California’s plumbing and trades industry, I’ve seen flush lever replacement jobs range from a simple five-minute fix to a situation that reveals a bigger underlying issue. I’ll walk you through exactly what to look for and how to handle it yourself — or know when to call a pro.
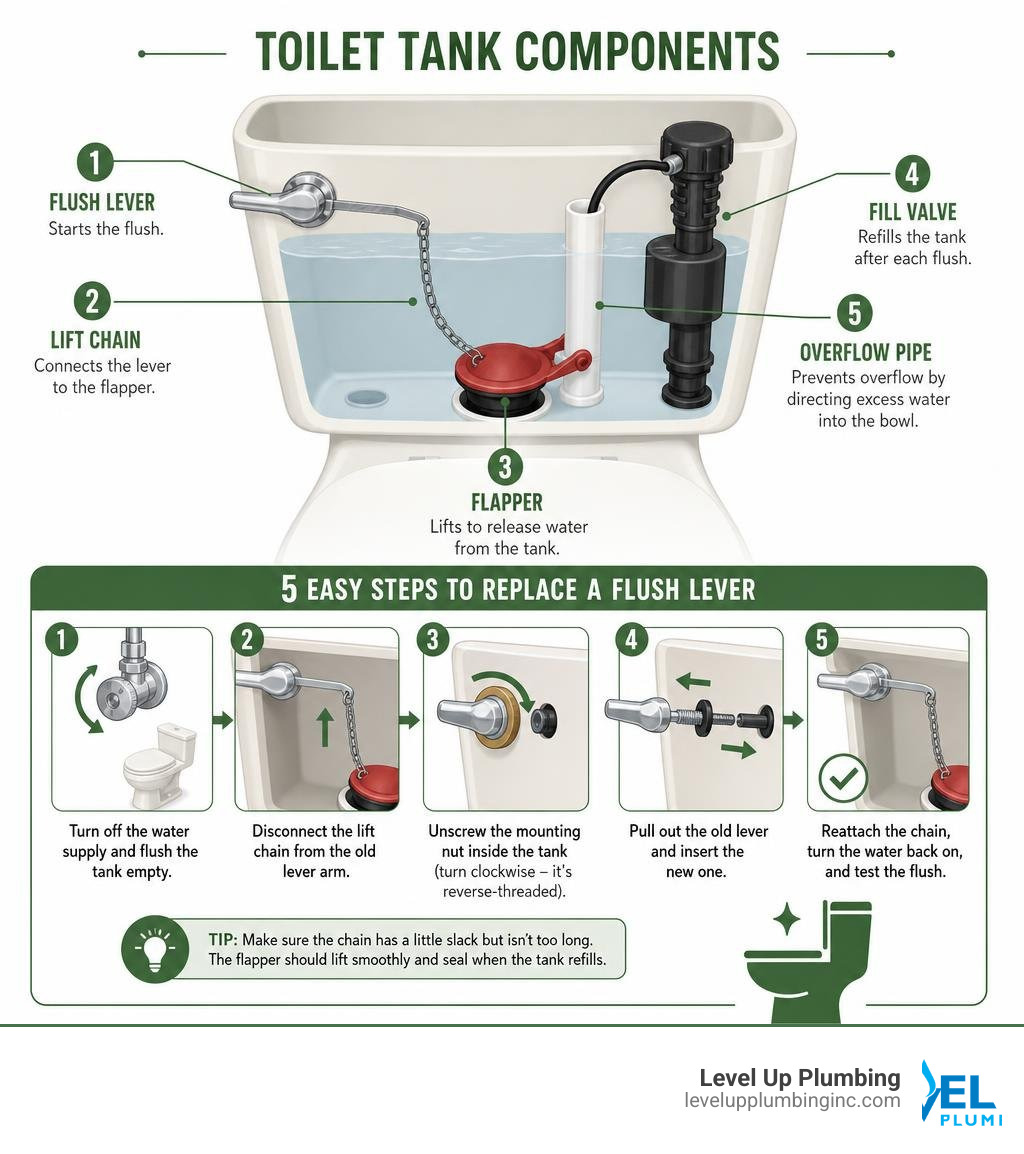
Handy flush lever replacement terms:
Signs You Need a Flush Lever Replacement
We often take our toilet handles for granted until they stop working. Because we use them multiple times every single day, the internal components are constantly subjected to water, humidity, and mechanical stress. Over time, these parts wear down, corrode, or simply snap.
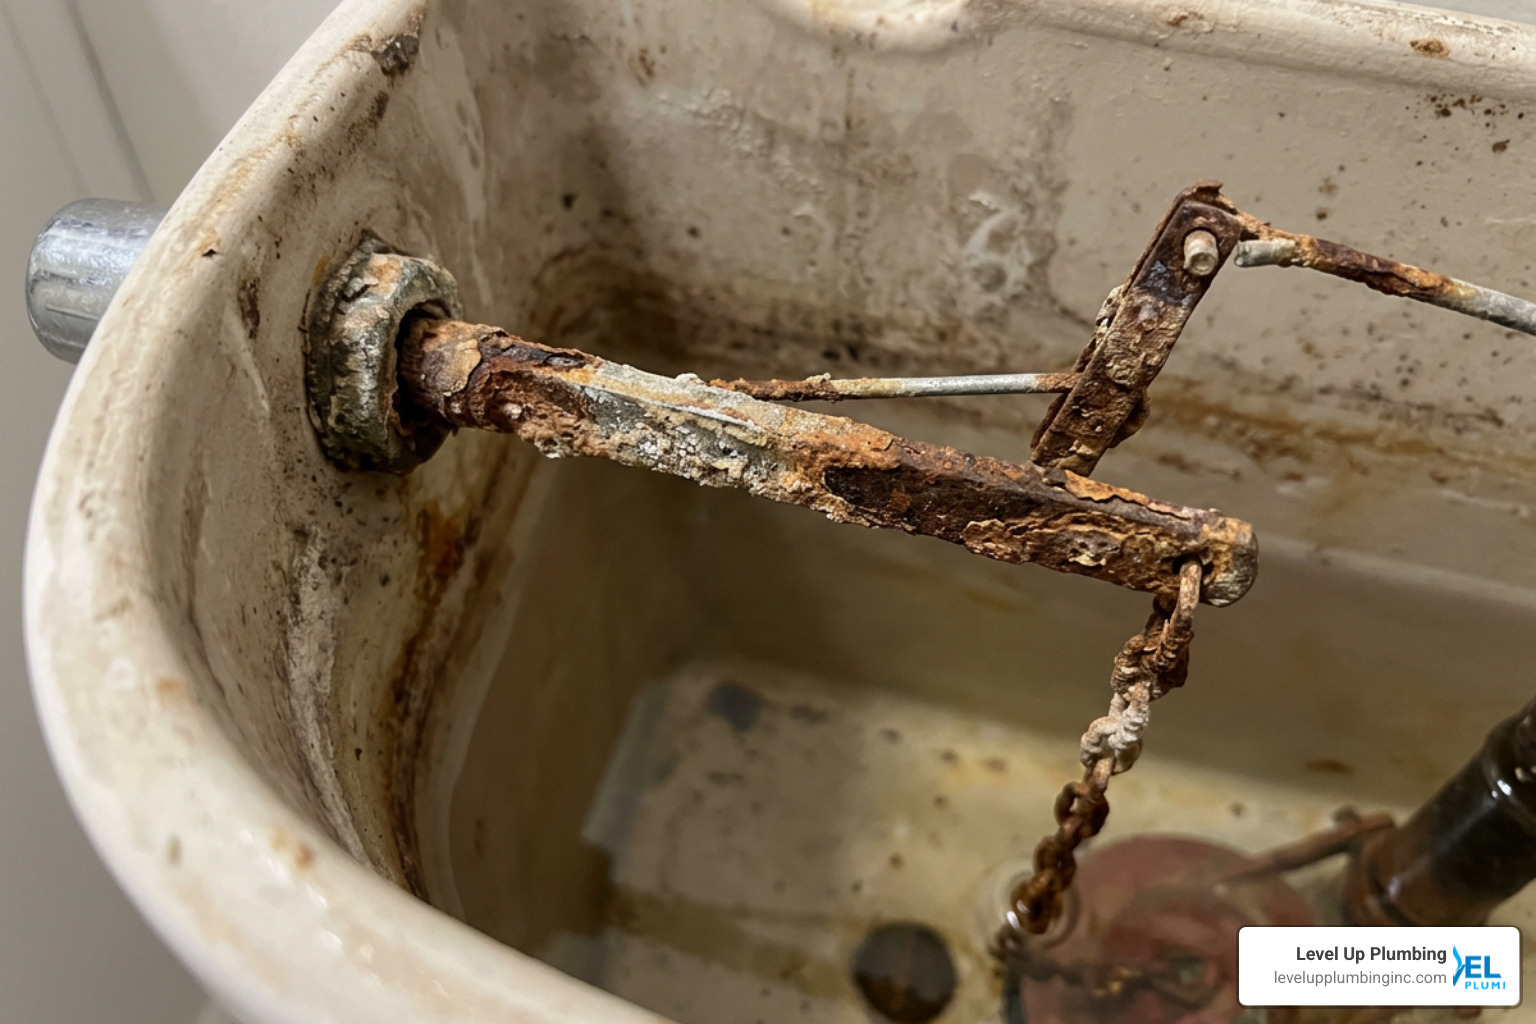
If you are experiencing any of the following symptoms, it is highly likely that a flush lever replacement is in your near future:
- The Sticking Lever: You push the handle down to flush, and it stays down. You have to manually lift it back up to stop the toilet from running continuously.
- The “Jiggle” Factor: You have to jiggle the handle after every single flush to get the flapper to seal. This is a classic sign of a worn-out trip lever or a misaligned chain.
- Visible Rust and Corrosion: If you open your toilet tank and see a rusted, green, or heavily corroded metal rod attached to your handle, it is only a matter of time before it snaps completely.
- A Loose or Spinning Handle: If the exterior handle spins freely without lifting the internal mechanism, the plastic or metal teeth that lock the handle to the lever arm have stripped.
- The Handle Snapped Off: This is the most obvious sign! If you are left holding a piece of plastic or metal in your hand, you definitely need a replacement.
A malfunctioning handle can also lead to a constantly running toilet, which can waste thousands of gallons of water per month and cause your water bills to skyrocket. If you want to learn more about diagnosing other common tank issues, check out our guide on How to Fix Toilet Problems Fast by Using Simple Tools.
Choosing the Right Replacement Toilet Handle
Before you head out to your local hardware store in Cypress, Garden Grove, or Huntington Beach, you need to know what kind of handle your toilet uses. While many toilet handles look similar from the outside, the internal rods (or trip levers) are shaped differently to fit various tank designs.
Here are the primary mounting styles you will encounter:
- Front-Mount Levers: This is the most common style. The handle is located on the front-left or front-right of the toilet tank. The internal rod is relatively straight or has a slight curve to clear the flush valve.
- Side-Mount Levers: Popular on many modern and low-profile toilets, these handles mount on the left or right side of the tank. The internal rod features a sharp 90-degree bend to pivot properly inside the narrower side space.
- Angle-Mount (or Corner-Mount) Levers: Found on toilets with curved or angled tank fronts. These require a specialized rod that can bend around the corner of the tank without hitting the fill or flush valve.
When shopping, you can opt for an adjustable option like the Toilet Handle Replacement | Premium Toilet Levers | Fluidmaster , which features an adjustable arm that can be bent or angled to fit front, side, and corner mounts.
Are Toilet Flush Handles Universal or Do You Need a Flush Lever Replacement?
The short answer is: mostly, but not always.
Many modern toilet handles are marketed as “universal.” These products usually feature adjustable plastic or brass slider arms that allow you to customize the length and angle of the internal rod to fit your specific tank. They work wonderfully for standard gravity-flush toilets.
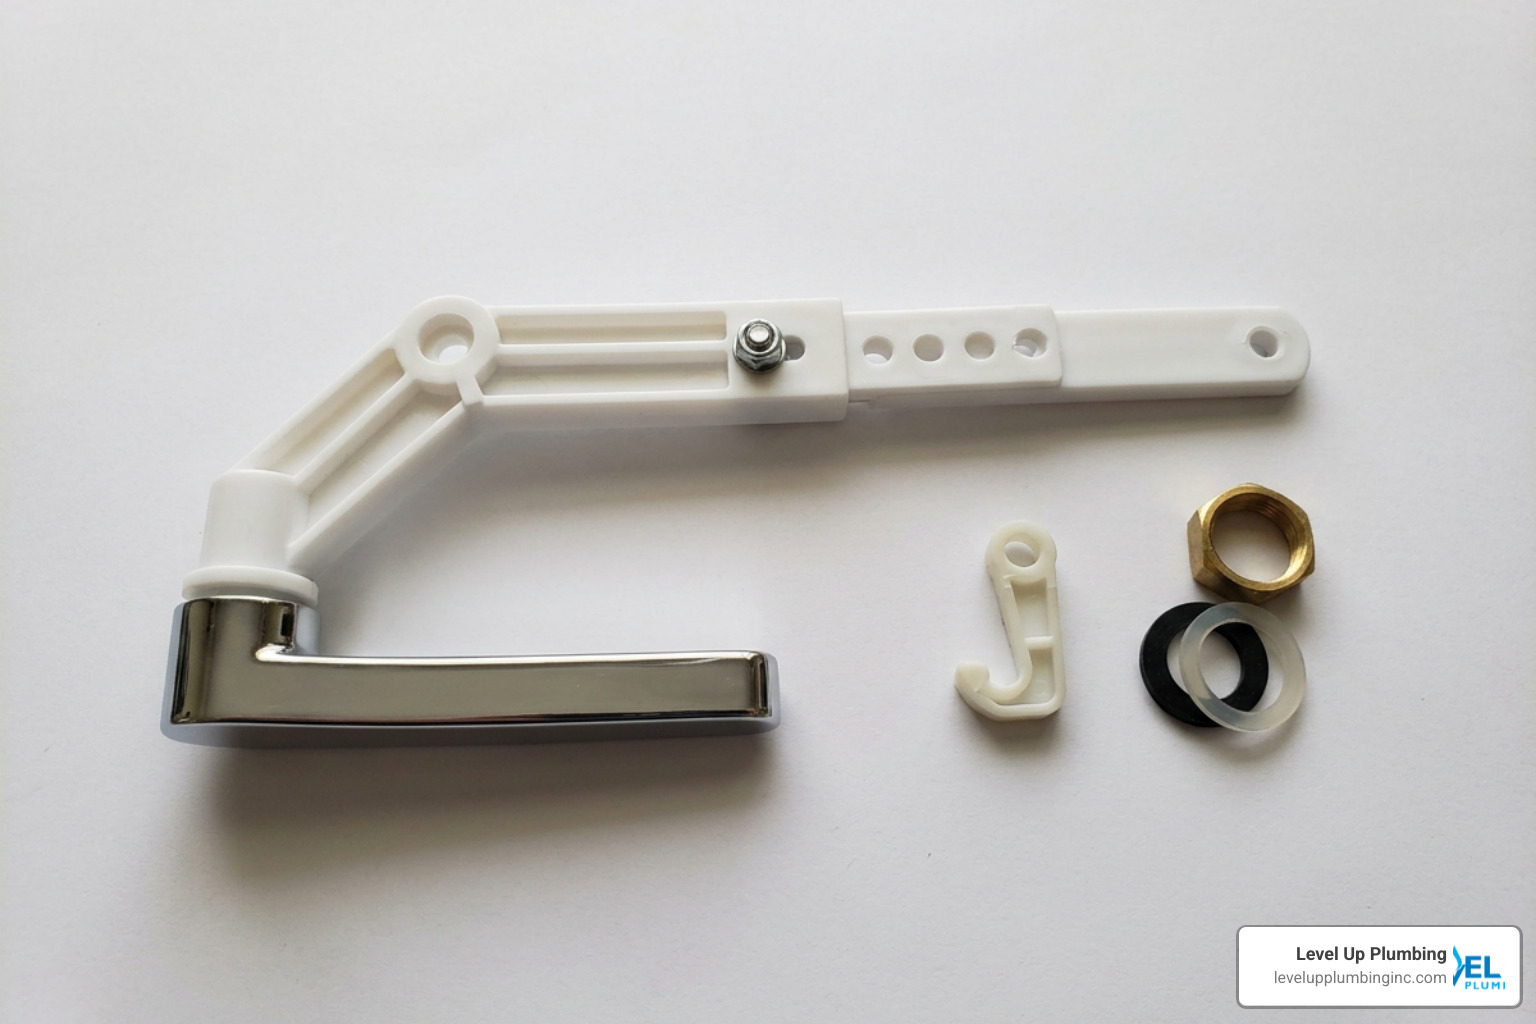
However, some major brands use proprietary designs. If you own a specialized toilet, a standard universal handle might not clear the internal mechanisms. For example:
- Some high-end Kohler models use unique canister flush valves that require a specific vertical lift. If you are replacing parts on these, you might also need to look at components like the Kohler 2.25 In. Or 57 Mm Replacement One-Piece Flush Valve – NuFlush to ensure total compatibility.
- Brands like Gerber or Crane often have specific tank configurations. If you are rebuilding the entire tank setup, you may need a specialized kit such as the Gerber & Crane Replacement Flush Valve Kit For 3.1-inch, Two-Piece Toilets – NuFlush .
Pro Tip: If you are unsure, the easiest solution is to remove your old handle and bring it with you to the hardware store to find an exact visual match!
How to Replace a Toilet Handle in 5 Easy Steps
Replacing your flush lever is an incredibly cost-effective DIY project. To give you an idea of how the DIY route compares to calling in our professional team at Level Up Plumbing, take a look at the comparison table below:
| Factor | DIY Replacement | Professional Replacement |
|---|---|---|
| Skill Level Required | Very Low (Great for beginners) | Professional Expertise |
| Time Investment | 15 to 30 minutes | 15 minutes (plus scheduling) |
| Tools Needed | Crescent wrench, screwdriver, towel | Professional plumbing truck inventory |
| Risk of Damage | Low (if careful with porcelain) | Zero (fully insured and guaranteed) |
| Best For | Standard tanks, quick weekend fixes | High-end toilets, rusted stuck parts, busy homeowners |
Tools and Materials Needed:
- A replacement flush lever assembly
- An adjustable crescent wrench
- A Phillips-head screwdriver (for adjustable universal models)
- A clean towel (to place your heavy porcelain tank lid on)
- A small can of penetrating oil (like WD-40, only if your old nut is rusted shut)
Step 1: Turn Off the Water and Drain the Tank
Before doing any work inside your toilet tank, we want to make sure we aren’t working in a full tub of water. Locate the water shutoff valve (the oval-shaped metal handle on the wall behind or beneath your toilet).
Turn this valve clockwise until it stops. This cuts off the water supply to the toilet.
Next, flush the toilet and hold the handle down to drain as much water as possible from the tank. You don’t need to get every single drop out, but getting the water level below the level of the flush lever arm will make your job much cleaner and easier. If you are new to working on home plumbing, check out our guide on How to Start Toilet Repair in Orange County CA for safe preparation steps.
Step 2: Disconnect the Lift Chain
Carefully lift the heavy porcelain tank lid off the tank and place it flat on a folded towel on the floor. Do not set it on a hard tile surface or lean it against the wall, as it can easily slide, crack, or chip!
Inside the tank, you will see a small chain (the lift chain) connecting the end of your flush lever arm to the rubber flapper at the bottom of the tank.
Note which hole on the old lever arm the chain is hooked into. This is important because you will want to use the same relative position on your new arm to maintain proper tension. Gently unhook the S-hook or clip from the old lever arm and let the chain drop onto the flapper. If you suspect your flapper or valve is also leaking, read our tips on How to Fix a Leaking Toilet Valve in 5 Quick Steps.
Step 3: Remove the Old Flush Lever
Now comes the part that trips up most DIYers: the mounting nut is reverse-threaded.
Because a toilet handle is constantly pushed downward, standard right-hand threads would loosen over time. To prevent this, manufacturers use left-handed threads.
To loosen the mounting nut inside the tank, turn it clockwise (to the right).
Use your adjustable crescent wrench to grip the plastic or brass nut. Give it a gentle turn clockwise. Once it breaks free, you can easily spin it off with your fingers. Slide the nut and the rubber washer off the arm, then slide the entire lever arm out through the hole in the tank. For more technical details on handling stubborn or corroded nuts, you can reference the expert tips in this guide on Toilet Flush Handle & Lever Replacement .
Step 4: Install the New Flush Lever Replacement
Take a quick moment to wipe down the area around the handle hole on both the inside and outside of the porcelain tank. Mineral deposits and grime can build up here, preventing the new handle from sealing properly.
Slide the new lever arm through the hole from the outside of the tank. On the inside of the tank, slide the rubber washer onto the shaft first (this cushions the connection and prevents water from splashing out), followed by the mounting nut.
This is reverse-threaded! Turn the nut counter-clockwise (to the left) to tighten it.
Tighten the nut hand-tight first. Then, use your wrench to give it an extra quarter-turn. Do not overtighten! Overtightening plastic nuts can strip the threads, and overtightening metal nuts can easily crack the fragile porcelain of your toilet tank, turning a simple repair into an expensive replacement.
Step 5: Reconnect the Chain and Test the Flush
Hook the lift chain back onto the new lever arm, using the same hole position as before.
Before turning the water back on, test the movement. When you push the handle down, the arm should lift the flapper straight up. When you release the handle, the flapper should drop back down flat to seal the drain hole.
Adjusting the Chain Slack:
- If the chain is too tight (no slack), the flapper won’t seal completely, and your toilet will run constantly.
- If the chain is too loose (too much slack), the lever won’t lift the flapper high enough to allow a complete, powerful flush.
- Aim for about 1/2 inch of slack in the chain when the handle is at rest.
Once you are happy with the chain tension, turn your wall shutoff valve counter-clockwise to turn the water back on. Let the tank fill up, flush it a few times to ensure everything is operating smoothly, and then carefully place your porcelain lid back on top. You did it!
Frequently Asked Questions about Toilet Handle Replacement
Why is my toilet running after replacing the handle?
If your toilet continues to run after a flush lever replacement, the most common culprit is chain tension. If the chain is too tight, it holds the flapper slightly open, allowing water to leak into the bowl. Adjust the clip on the chain down a link or two to introduce about a half-inch of slack. Another possibility is that the new lever arm is catching on the fill valve or the tank wall inside; ensure the arm has plenty of clearance to move freely up and down.
Which direction do I turn the toilet handle nut to loosen it?
You must turn the nut clockwise (to the right) to loosen it. This is because almost all toilet flush handles utilize left-handed (reverse) threads to keep the nut from loosening during daily use.
How much does it cost to replace a toilet handle?
Replacing a toilet handle yourself is incredibly inexpensive. A universal replacement lever from a local hardware store in Orange County is very budget-friendly. If you prefer to have a professional plumber handle the replacement to ensure your entire tank mechanism is in top shape, the cost will include a standard service call fee, which saves you the time, hassle, and potential risk of cracking your tank.
Conclusion
A broken toilet handle doesn’t have to disrupt your week. With a quick trip to the store and a few basic tools, you can easily perform a flush lever replacement yourself.
However, if you find that your mounting nut is completely rusted solid, your toilet tank has hairline cracks, or you are dealing with a larger plumbing issue in your home, we are always here to help. Level Up Plumbing is a proud, woman-owned business serving Huntington Beach, Cypress, Garden Grove, and the greater Orange County area. With over 21 years of local expertise, we provide award-winning customer service and honest, reliable repairs.
If you’d rather leave the plumbing to the experts, Schedule professional toilet repair in Huntington Beach with us today, and we’ll get your bathroom running perfectly in no time!