
Identifying Your Tap Type and Gathering Required Tools
Before grabbing your tools, you need to identify the type of tap sitting on your sink. Different mechanisms require completely different replacement parts, and buying the wrong piece before taking the fixture apart will stall your project.
Most home fixtures fall into one of three main categories:
- Traditional Compression Taps: These classic fixtures feature individual hot and cold handles that require multiple full turns to open completely. Inside, they use a traditional rubber washer that presses against a metal seat to seal off water flow. Over time, the rubber degrades or splits, creating a persistent drip directly from the spout.
- Ceramic Disc Taps: Typically found on modern dual-handle fixtures, these taps operate with a quick quarter or half-turn. Instead of rubber washers, they use two ultra-smooth ceramic plates inside a self-contained valve. When the plates line up, water flows; when turned off, they seal tight. Drips occur when dirt, limescale, or scratches break the airtight seal between the discs.
- Single-Lever Mixer Taps: Popular in modern kitchens and bath basins, a single lever controls both temperature and water volume. These rely on a internal ceramic disc cartridge. If the lever drips from the spout or leaks around the stem, replacing the entire internal cartridge is usually the fastest solution.
| Tap Type | Operational Turn | Internal Mechanism | Typical Cause of Drip | Primary Fix |
|---|---|---|---|---|
| Traditional Compression | Multiple 360° turns | Rubber washer & metal seat | Worn or split rubber washer | Replace rubber washer |
| Ceramic Disc Valve | 1/4 to 1/2 turn | Paired ceramic plates | Limescale build-up or scratched disc | Clean discs or replace valve |
| Single-Lever Mixer | Smooth swivel lever | Multi-port ceramic cartridge | Hard water deposits or cartridge failure | Replace ceramic cartridge |
Tools and Materials Checklist
To successfully fix dripping tap fixtures on your own, gather these common household items and basic plumbing tools:
- Adjustable wrench (spanner): Needed to loosen the retaining nuts and remove tap valves without damaging the metal finish.
- Screwdriver set: Both slotted (flathead) and Phillips head screwdrivers, along with a small Allen wrench (hex key) for decorative handle set screws.
- Replacement parts: Matching rubber washers, replacement ceramic cartridges, or fresh O-rings (take your old parts to the hardware store to match the exact size and spline count).
- Protective cloth or towel: Protects the sink basin finish from dropped tools and prevents small hardware from disappearing.
- Silicone plumber’s grease: Keeps replacement O-rings pliable and seals water-tight without damaging rubber compounds.
- Descaling solution or white vinegar: Removes mineral buildup on reusable internal components in hard water regions like Orange County.
How to Fix Dripping Tap Fixtures in 5 Steps
When you are ready to fix your faucet, following a systematic process prevents water damage, lost parts, and stripped threads. Working on residential fixtures requires patience—forcing components can quickly turn a simple maintenance task into an emergency pipe repair. For broader advice on managing plumbing projects without incident, review our guide on how to fix leak quickly and safely at the same time.
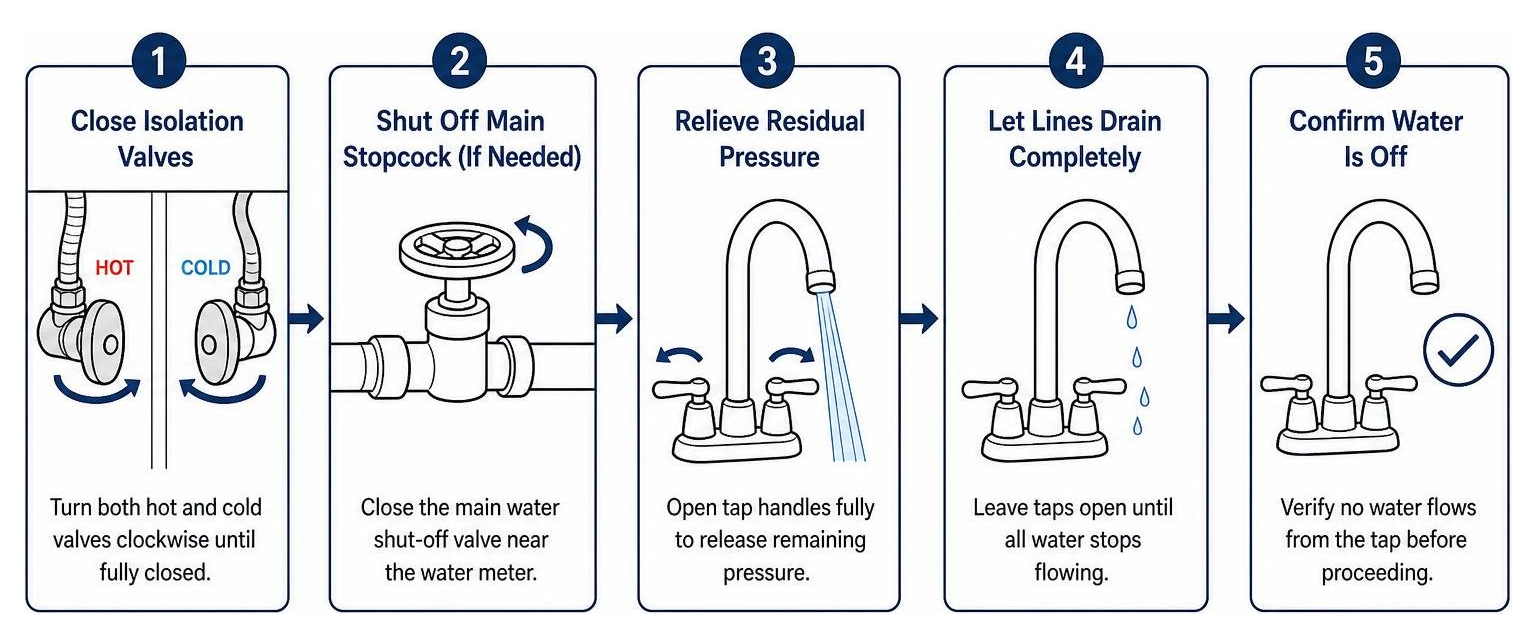
Step 1: Safely Shut Off the Water Supply and Drain Pipes
Never attempt to disassemble a plumbing fixture while it is under line pressure. Doing so can flood your kitchen or bathroom within seconds.
- Locate the isolation valves: Look underneath the sink basin for the hot and cold water shut-off valves. Turn the oval handles clockwise until they are completely closed. If the valve features a quarter-turn lever, turn it perpendicular to the flexible supply line.
- Shut off the main stopcock (if needed): If your sink lacks local isolation valves or if the old valves are frozen shut, close the main home water shut-off valve near the water meter.
- Relieve residual pressure: Open the tap handles fully to release remaining water trapped inside the lines. Let the water drain completely until all dripping stops.
Step 2: Protect the Sink Basin and Dismantle the Handle
Small screws, washers, and retaining clips love to slip out of wet fingers and slide straight down the drain.
- Plug the drain: Push the pop-up drain closed or place a clean basket strainer plug inside the waste opening.
- Line the basin: Lay a thick towel or microfiber cloth across the bottom of the sink. This cushions any heavy tools that might accidentally slip from your hands, preventing chipped porcelain or scratched stainless steel.
- Remove decorative caps: Pry off the decorative hot/cold index caps (often marked ‘H’ or ‘C’) using a small flathead screwdriver or butter knife.
- Unscrew the handle: Insert your screwdriver or Allen key into the exposed recess, remove the retaining screw, and pull the handle straight off the valve stem. If it resists due to corrosion, tap the underside gently with the soft palm of your hand to break the seal.

Step 3: How to Fix Dripping Tap Compression Washers
If you identified your fixture as a traditional compression style, replacing the worn washer takes only a few minutes once the handle is detached.
- Unscrew the valve assembly: Use an adjustable wrench to grip the hexagonal nut on the valve body. Turn counter-clockwise to unscrew and lift the valve out of the tap body. Wrap a soft rag around the wrench jaws to avoid scratching decorative chrome shrouds.
- Locate the rubber washer: At the bottom of the stem, you will find a small rubber washer held in place by a central brass screw or retaining nut.
- Remove and match the washer: Unscrew the central fastener, remove the hardened or split washer, and replace it with a fresh rubber washer of the exact same size. Standard basin taps typically take a 1/2-inch washer, but physical part matching at your local hardware store is always the safest bet.
- Inspect the brass seat: Look down into the tap body where the washer rests. If the metal seat appears pitted, scratched, or rough from mineral deposits, a new washer will split again in short order.
Step 4: How to Fix Dripping Tap Ceramic Cartridges
Modern ceramic disc taps do not use traditional rubber washers. Instead, you will need to service or replace the self-contained cartridge unit.
- Expose the cartridge: Once the handle is off, unscrew any decorative metal shroud by hand. Use your adjustable wrench to loosen the brass retaining nut securing the cartridge inside the tap housing.
- Extract the cartridge: Lift the old ceramic disc cartridge straight up out of the tap body. Note the orientation, specifically where the alignment tabs at the bottom seat into the tap base.
- Clean or replace: If the ceramic discs are merely coated in hard water scale, submerge the cartridge in a 50/50 mix of warm water and white vinegar for 15 minutes to clear the deposits. If the discs are chipped or badly scratched, replace the entire unit.
- Align the new cartridge: Align the base tabs of the new cartridge with the matching slots inside the tap housing and press it firmly into place.
Step 5: Reassemble the Tap and Test for Leaks
Reassembling the fixture requires a light touch. Over-tightening plumbing components compresses seals improperly and can crack brittle ceramic cartridges or strip brass threads.
- Thread components by hand: Thread retaining nuts and shrouds back onto the tap housing by hand to ensure threads engage smoothly without cross-threading.
- Snug with a wrench: Tighten retaining nuts with your adjustable wrench until firm. Do not use excessive force or lean on the wrench handle.
- Reattach the handle: Slide the handle back onto the splined stem, reinsert the securing screw, and press the decorative index cap back into position.
- Restore water gradually: Slowly turn the under-sink isolation valves counter-clockwise to restore water flow. Keeping the tap handle partially open while restoring water prevents sudden pressure surges and air pockets from damaging your new internal seals.
- Inspect for leaks: Close the tap fully and wipe down the fixture with a dry towel. Watch the spout tip and handle joints closely for several minutes to verify the leak is completely gone.
Troubleshooting Persistent Tap Leaks After Washer or Cartridge Replacement
What if you completed all five steps, turned the water back on, and still see drops pooling around the fixture? Don’t worry — persistent leaks usually point to one of three common issues.
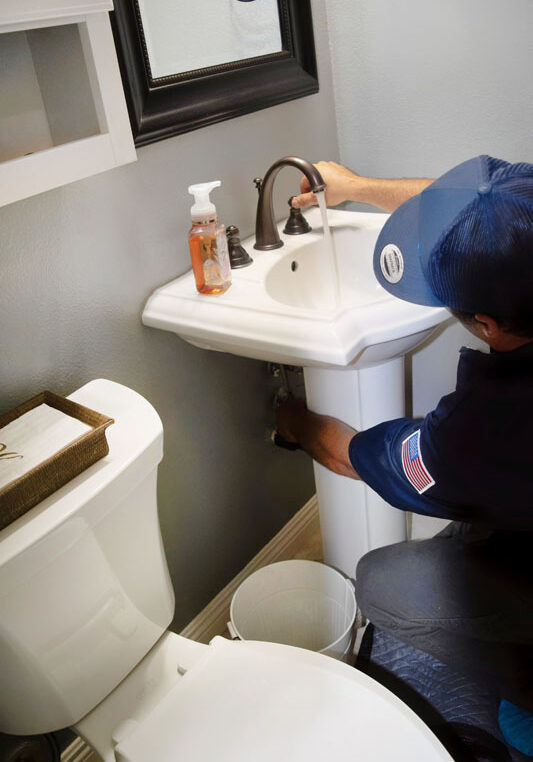
- Failed Spout O-Ring: If water drips down around the base of the tap spout or leaks out near the swivel joint rather than the spout tip, the primary culprit is a worn spout O-ring. Loosen the small grub screw located at the rear base of the spout, lift the spout body upward, and slice off the hardened rubber O-ring with scissors. Roll a fresh silicone-greased O-ring into the groove and reattach the spout.
- Corroded or Pitted Valve Seat: On traditional compression taps, a damaged metal seat inside the tap body will shred new rubber washers within days. You can smooth out minor pitting using a inexpensive tap seat reamer tool, which grinds the metal smooth again. However, severe pitting generally means the fixture body has reached the end of its functional life.
- Internal Thread Damage: Brass tap bodies can develop hairline fractures or stripped threads after years of overtightening. If internal threads are warped, water will bypass the cartridge seals entirely regardless of how tight you secure the retaining nut.
For homeowners in Southern California, reviewing municipal water leak conservation guidelines can help track unexpected consumption spikes and identify hidden fixtures that need attention.
When to Call a Professional Plumber
While learning to fix dripping tap fixtures is a rewarding weekend DIY project, certain scenarios demand the skills, specialized tools, and licenses of an experienced local technician.
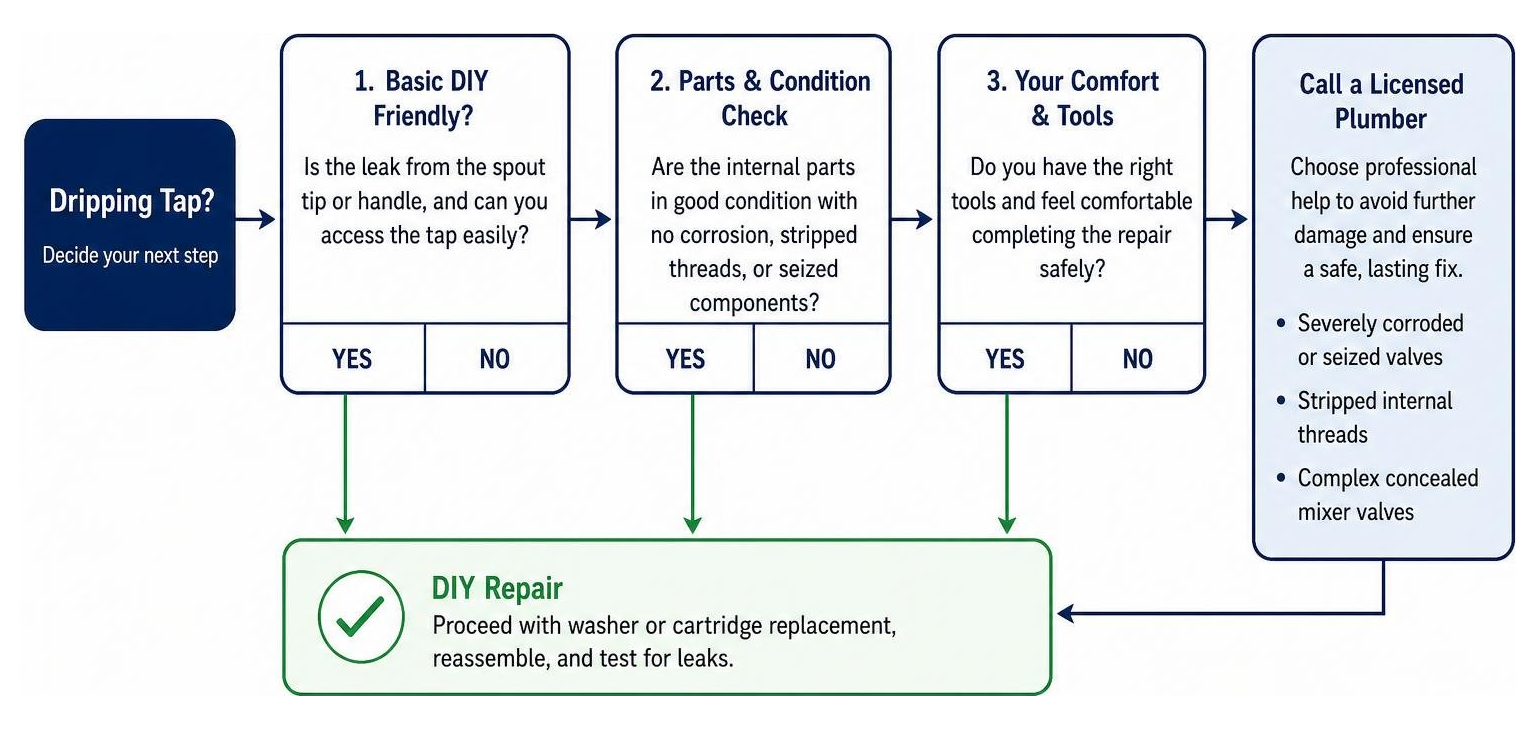
You should stop DIY attempts and call a professional if you encounter:
- Severely corroded or seized valves: Forcing frozen metal connections with oversized wrenches can snap underlying copper supply pipes inside the wall, turning a $5 washer swap into a major home restoration project.
- Stripped internal body threads: Once the brass threads inside the main faucet housing are stripped, standard replacement cartridges cannot form a watertight seal, requiring fixture replacement.
- Complex concealed mixer valves: In-wall shower mixers or high-end architectural fixtures require specialized cartridge pullers, internal valve extensions, and precise calibration.
- Leaks beneath the sink rim: Water pooling inside cabinet bases often stems from damaged supply line connections, deteriorated mounting gaskets, or corroded shut-off valves rather than simple spout washers.
When facing complicated fixtures or hidden pipe issues, consulting a licensed technician ensures your home remains protected. Learn more about professional options by reading our overview on faucet leak repair how a licensed plumber can help you.
Frequently Asked Questions About Dripping Taps
How much water and money does a dripping tap waste?
A single tap dripping at a rate of once per second wastes roughly 5,000 litres (over 1,300 gallons) of clean water every year. That is enough water to fill a standard backyard paddling pool every single week for an entire summer. On metered municipal water supplies, this continuous trickle steadily increases your monthly utility charges while unnecessarily straining local water conservation efforts.
Can I fix a dripping tap without turning off the main water valve?
Yes, provided your sink is equipped with functional under-sink isolation valves. These small oval or lever-operated valves sit directly on the hot and cold supply lines beneath the cabinet. By turning these local valves off, you isolate the individual fixture completely. This allows you to work safely on the tap without shutting off water to the rest of your home.
What if my tap leaks from the base or handle instead of the spout?
A drip coming directly from the spout tip points to a failed rubber washer or damaged ceramic cartridge. However, if water seeps out around the handle stem or trickles down the outer body to the base, the issue is almost always a worn spindle O-ring or stem packing seal. Disassemble the handle, unscrew the gland nut, and replace the small internal spindle O-ring with a greased replacement seal.
Conclusion
Fixing a dripping tap is one of the most practical and satisfying home repairs you can complete yourself. By identifying your fixture mechanism, isolating the water supply, and replacing worn rubber washers or ceramic cartridges carefully, you can stop water waste, lower your monthly utility bills, and restore peace and quiet to your home in under an hour.
However, if you run into frozen valves, stripped internal threads, or leaks behind your walls, don’t risk damaging your home’s pipework. The team at Level Up Plumbing brings over 21 years of trusted expertise and award-winning customer service to homeowners throughout Huntington Beach, Cypress, Garden Grove, and the broader Orange County area. Whether you need a simple fixture upgrade or specialized care like Huntington Beach slab leak services, we are here to help keep your home’s plumbing running smoothly.